background image

103

Equipment and parts necessary for upgrade

The following is a list of the equipment and parts required for the 
upgrade from JBOD to RAID:

Anti-static wrist strap and properly earthed grounding wire.

Phillips head screw driver.

Altos S700 RAID Controller (2 controllers if dual controller operation is 
required)

FC host cables to connect RAID controller to host/hub/switch

Contact Acer Technical Support to ensure that the correct LS 
Module Firmware is installed.

Upgrading from JBOD to RAID

Before beginning the upgrade, ensure that anti-static precautions 
are taken. The minimum requirement is an anti-static wrist strap 
and grounding wire.

1

Shut down the system and remove the power cables from the rear 
of the enclosure.

2

Using the Phillips head screwdriver, loosen the screws securing the 
I/O Module in the enclosure.

3

Using the handle on the module remove the I/O Module from the 
enclosure.

4

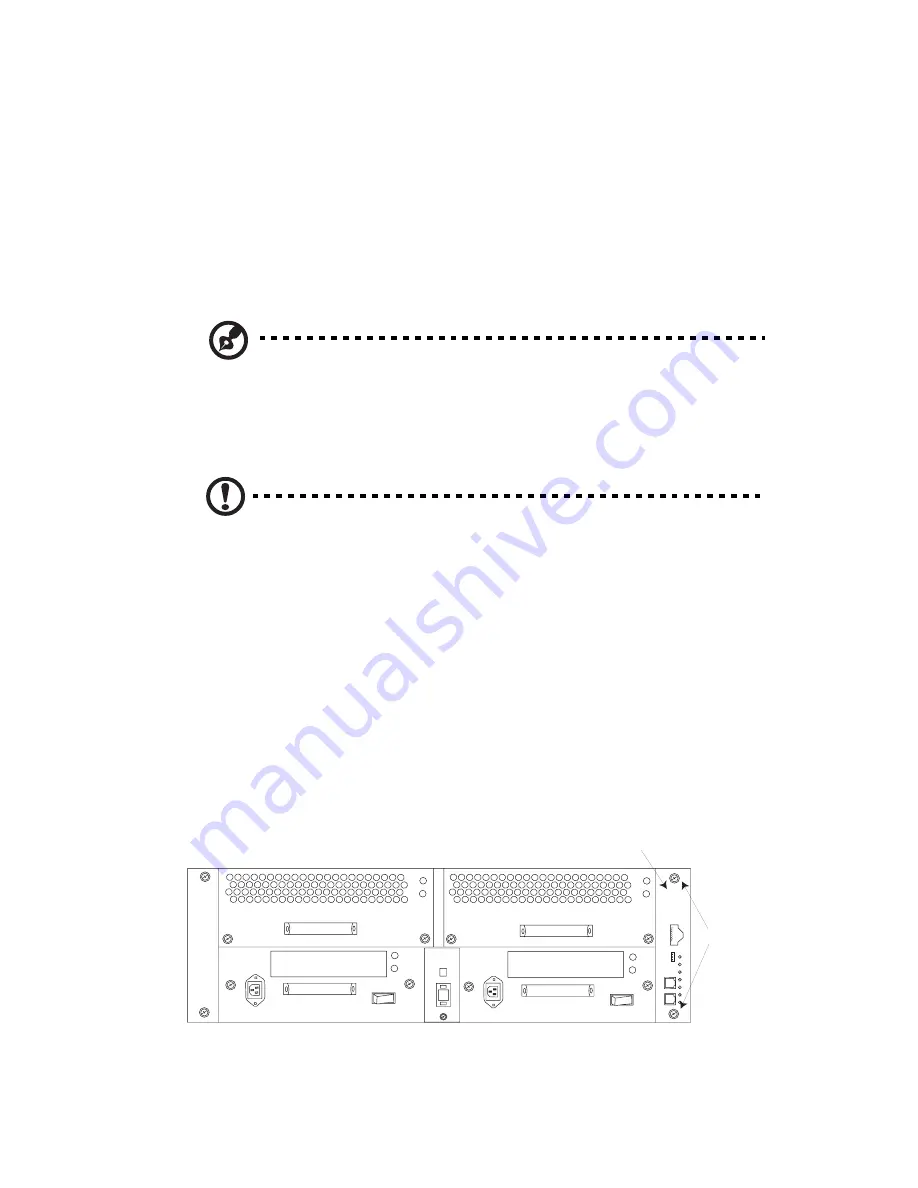
Into the I/O Module slot install the RAID controller and secure in 
place by tightening the screws using the Phillips head screwdriver.

1

2

1

2

0

I

0

I

RAID Controller Installed

RAID

Controller

Screws

1

2

3
4
5
6
7

Summary of Contents for Altos S700 Series

Page 1: ...Altos S700 Series User s Guide ...

Page 2: ...l affixed to your computer All correspondense concerning your unit should include the serial number model number and purchase information No part of this publication may be reproduced stored in a retrieval system or transmitted in any form or by any means electronic mechanical photocopy recording or otherwise without the prior written permission of Acer Incorporated Model Number __________________...

Page 3: ...ration 19 1Gb Operation 19 Split Fibre Channel Loop Operation Quad Loop 21 Setting Up Split Loop Operation 21 Removing Split Loop Operation 21 Configuration Rules 23 Supported Host Bus Adapters 24 Supported Cables 25 Copper Cables 25 Optical Cables 26 Setting the Enclosure ID 29 Configurations 32 JBOD Configurations 33 Dual FC Loop Configuration 33 Quad Loop Configuration 35 Connecting a Power Sou...

Page 4: ... Installing a Disk Drive Carrier 74 Removing a Disk Drive Carrier 74 Installing and Removing an LS Module 76 Installing an LS Module 76 Removing an LS Module 76 Installing and Removing a Power Supply 78 Installing a Power Supply 78 Removing a Power Supply 78 Installing and Removing an Advanced Cooling Module 79 Installing an Advanced Cooling Module 79 Removing an Advanced Cooling Module 79 Install...

Page 5: ... Temperature 92 Humidity 92 Altitude 92 Operational Shock 93 Operational Vibration 93 Regulatory Agency Compliance 93 Equipment and parts necessary for upgrade 103 Upgrading from JBOD to RAID 103 Installing the Battery Backup Unit 104 ...

Page 6: ...Contents vi ...

Page 7: ...operation of the Altos S700 Series only For details relating to the host system refer to the documentation supplied with the host system Conventions Used In This User Guide The following conventions are used throughout this Installation Guide A NOTE gives general information such as helpful tips and references to related information A CAUTION means take care There is a risk of causing damage to th...

Page 8: ...he interference by one or more of the following measures Reorient or relocate the receiving antenna Increase the separation between the device and receiver Connect the device into an outlet on a circuit different from that to which the receiver is connected Consult the dealer or an experienced radio television technician for help Notice Shield cables All connections to other computing devices must...

Page 9: ...accept any interference received including interference that may cause undesired operation Notice Canadian users This Class B digital apparatus meets all requirements of the Canadian Interference Causing Equipment Regulations Remarque à l intention des utilisateurs canadiens Cet appareil numérique de la classe B respected toutes les exigences du Règlement sur le matériel brouilleur du Canada ...

Page 10: ...ne that meets the following criteria The power cord must be properly rated for the AC voltage in your region The power cord plug cap must have an electrical current rating that is at least 125 of the electrical current rating of the product The power cord plug cap that plugs into the wall socket outlet must have a grounding type male plug designed for use in your region The power cord must have sa...

Page 11: ...odules Power supply modules have double pole neutral fusing Ventilation considerations The equipment rack must provide sufficient airflow to the front of the system to maintain proper cooling The rack selected and the ventilation provided must be suitable to the environment in which the system will be used Fans To avoid injury do not touch moving fan blades Cooling and airflow For proper cooling a...

Page 12: ...d in the rack assembly The equipment rack must be installed according to the manufacturer s instructions Main AC power disconnect You are responsible for installing an AC power disconnect for the entire rack unit This main disconnect must be readily accessible and it must be labeled as controlling power to the entire unit not just to the system s Grounding the rack installation To avoid the potent...

Page 13: ...rking label If you are not sure of the type of power available consult your dealer or local power company 7 Do not allow anything to rest on the power cord Do not locate this product where persons will walk on the cord 8 If an extension cord is used with this product make sure that the total ampere rating of the equipment plugged into the extension cord does not exceed the extension cord ampere ra...

Page 14: ...ce 12 Replace the battery with the same type as the product s battery we recommend Use of another battery may present a risk of fire or explosion Refer battery replacement to a qualified serviceman 13 Warning Batteries may explode if not handled properly Do not disassemble or dispose of them in fire Keep them away from children and dispose of used batteries promptly Dispose of used batteries accor...

Page 15: ...xv European Community Statement This equipment complies with the following European directives EMC Directive 89 336 EEC and amending Directives 92 31 EEC and 93 68 EEC Low Voltage Directive 73 23 EEC ...

Page 16: ...xvi ...

Page 17: ...Chapter 1 Introduction ...

Page 18: ...This Chapter introduces the Altos S700 Series The main features of the Series are described along with a list of the models that are available ...

Page 19: ...tiple dimensions enabling flexible configuration of capacity performance and functionality to match and grow with virtually any application or IT environment The enclosure is available with your choice of copper or optical I O modules with RAID Controller option and is downward compatible to 1Gbps protecting your investment A high performance industry first Quad Loop1 4 FCAL loops on one enclosure...

Page 20: ...urable and on line maintainable Industry standard 19 inch rackmount or deskside configuration Dual AC power supplies Disk Drive Carrier The disk drive carrier supports one inch SCA 2 direct attach disk drives The Altos S700 Series can hold up to fourteen disk drive carriers The disk drives can be hot swapped and the disk drive carriers provide for blind mating Power Supplies The Altos S700 Series ...

Page 21: ... correctly with one fan failed redundancy is lost if one fan is failed in either ACM however it is recommended that the failed fan be replaced as soon as possible The ACM units can be hot swapped The LS Module monitors and controls the speed of each fan The speed is set depending on the ambient temperature and failed status The fans are set to full speed if one fan is failed The following table sh...

Page 22: ...le Copper Copper This 2Gb FC expansion module has two HSSDC connectors The top connector is the primary FC loop input port and the bottom connector is available for FC loop expansion input A fibre channel loop back terminator is not required I O Expansion Module Optical Copper This 2Gb FC expansion module has the SFF LC optical connector as the FC Loop Input port The FC loop expansion is carried o...

Page 23: ...or is not required Altos S700 RAID Controller The Altos S700 RAID Controller is a high performance controller providing two host fibre channel and two device fibre channel interfaces It is an intelligent caching controller that supports RAID levels 0 1 3 5 0 1 and JBOD The controller enables multiple hosts to access an array of disk drives which can be configured as one or more virtual storage dev...

Page 24: ...Chapter 1 Introduction 8 Figure 1 1 Altos S700 Series Tower Model ...

Page 25: ...9 Figure 1 2 Altos S700 Series Rack Model ...

Page 26: ...Chapter 1 Introduction 10 ...

Page 27: ...Chapter 2 Installation and Setup ...

Page 28: ...are discussed along with the electrical mechanical and environmental precautions that need to be taken Items that need to be set prior to operating the Altos S700 enclosure are also described here Note Please read this Chapter carefully before attempting to install or operate the Altos S700 Series enclosure ...

Page 29: ...e Caution If any of the components are removed the resulting hole must be blocked by installing a component blank or replacing the component Failure to do so can seriously restrict air flow and cooling Caution This device should be connected to a power source which carries a fuse or circuit breaker that is greater than the rating of the shelf but also complies with national wiring standards Cautio...

Page 30: ...Chapter 2 Installation and Setup 14 Warning A possible shock hazard may exist in the area of the fan connection Warning Disconnect the power cords before removing a power supply from the enclosure ...

Page 31: ...ely and they will advise you of the appropriate action The cartons are sealed using packaging tape which should be cut open in the normal manner Exercise caution when lifting out the components At this point the contents should be verified against the packing list and Acer should again be notified if any discrepancies exist Anti static precautions must be observed before removing any of the compon...

Page 32: ...d that the system be continuously run at these extreme temperatures Consideration should therefore be given to ensure that the room ambient temperature is compatible with these specifications Air Flow To ensure that the internal heat build up is properly dissipated into the room environment air flow should in no way be restricted It is essential that no air vents are blocked and that the system is...

Page 33: ...17 least one other person when installing an enclosure This is necessary to prevent personal injury and damage to the enclosure ...

Page 34: ...des cabling power distribution units filters and any other devices through which the main current flows The electrical power rating of the enclosure is 100 240 VAC 10 5 Amps 50 60 Hz and this must be added to the power demands of any other electrical devices installed in the equipment rack to arrive at a total power consumption figure In addition surge currents must be catered for Disk drives may ...

Page 35: ...b Operation To set the fibre channel loop speed to 2Gb operation 1 Remove the LS Module from the front of the enclosure 2 On the LS Module locate the jumper position JP2 Figure 2 1 3 Install a jumper at JP2 4 Replace the LS module 1Gb Operation To set the fibre channel loop speed to 1Gb operation 1 Remove the LS module from the front of the enclosure 2 On the LS Module locate the jumper position J...

Page 36: ...Chapter 2 Installation and Setup 20 Figure 2 1 Location of Jumpers on LS Module ...

Page 37: ... has dual LS modules the following procedures must be applied to both LS modules Caution Enclosures operating in split loop mode can not be daisy chained to other enclosures Setting Up Split Loop Operation To operate the Altos S700 Series enclosure in split fibre channel loop mode follow this procedure 1 Remove the LS module from the front of the enclosure 2 On the LS Module locate the jumper posi...

Page 38: ...Chapter 2 Installation and Setup 22 3 Replace the LS module ...

Page 39: ...odules must be the same Cannot mix 1Gb and 2Gb LS and I O modules and 1Gb and 2Gb cables 2Gb JBOD and RAID enclosures require 2Gb cables 2Gb JBOD enclosures require 2Gb disk drives Disk drive blanks must be ordered for any empty drive slots 2Gb copper JBOD expansion configurations must be the same as the RAID configuration 2Gb optical JBOD cannot be expansion enclosure for 2Gb RAID configuration 2...

Page 40: ...Chapter 2 Installation and Setup 24 Supported Host Bus Adapters Contact your sales person for a list of approved Host Bus Adapters ...

Page 41: ...y Copper Cables Only the following AMPHENOL copper Fibre Channel cables must be used with the Altos S700 Series enclosure copper applications Amphenol Cable Model Numbers Model No Description CA S7002 001 3m 2Gb Fibre Channel copper cable non equalized HSSDC HSSDC CA S7002 002 1m 2Gb Fibre Channel copper cable non equalized HSSDC HSSDC CA S7002 003 3m 2Gb Fibre Channel copper cable non equalized H...

Page 42: ...e Channel Optical cables are available from Acer Please contact your sales person for more details of approved cables CA S7002 005 0 3m 2Gb FC optical cable CA S7002 006 10m 2Gb FC optical cable CA S7002 007 30m 2Gb FC optical cable CA S7002 008 150m 2Gb FC optical cable ...

Page 43: ...Chapter 3 JBOD Configurations ...

Page 44: ...the procedure for connecting your Altos S700 Series JBOD system to a host computer s Detailed information on how to configure and daisy chain enclosures is also provided along with instructions on how to set the enclosure ID ...

Page 45: ...r and the enclosure ID The enclosure ID is set using the enclosure ID switch located on the rear of the Altos S700 see Figure 3 1 Note The enclosure ID must be set prior to powering on the enclosure Note Each enclosure must have a separate ID when daisy chained together Note 2Gb Amphenol cables must be used if 2Gb operation is required Note Contact your sales person for a list of approved HBA s ...

Page 46: ...D switch can be set to 0 through 7 The graphic below shows the slot number and location 1 2 1 2 0 I 0 I Enclosure ID Switch 1 Slot location when viewed from the front of the enclosure LSM LSM Slot 0 Slot 1 Slot 2 Slot 3 Slot 4 Slot 5 Slot 6 Slot 7 Slot 8 Slot 9 Slot 10 Slot 11 Slot 12 Slot 13 ...

Page 47: ...4 19 34 49 64 79 94 109 Slot 2 5 20 35 50 65 80 95 110 Slot 3 6 21 36 51 66 81 96 111 Slot 4 7 22 37 52 67 82 97 112 Slot 5 8 23 38 53 68 83 98 113 Slot 6 9 24 39 54 69 84 99 114 Slot 7 10 25 40 55 70 85 100 115 Slot 8 11 26 41 56 71 86 101 116 Slot 9 12 27 42 57 72 87 102 117 Slot 10 13 28 43 58 73 88 103 118 Slot 11 14 29 44 59 74 89 104 119 Slot 12 15 30 45 60 75 90 105 120 Slot 13 16 31 46 61 ...

Page 48: ...s JBOD Note The following configuration procedures refer to connecting the Altos S700 Series directly to the host system It is also possible to connect the system using a Hub Switch Caution Before working on the enclosure ensure that anti static precautions have been taken The minimum requirement is an anti static wrist strap and grounding wire ...

Page 49: ...Loop configuration to your host computer and how to daisy chain these enclosures together To connect the dual FC Loop enclosure to the host Note You will need two HBA s in your host system or a single HBA with support for two connections A hub switch or two hosts with HBA may also be used 1 Insert the connector on the first cable into the top connector on the first I O module see Figure 3 2 2 Inse...

Page 50: ...r Loop Diagram To daisy chain enclosures together connect link cables from the bottom connectors on the I O modules of the first enclosure to the top connectors of the I O modules on the next enclosure see Figure 3 3 Note A maximum of eight enclosures may be daisy chained together 1 2 1 2 0 I 0 I To HBA To HBA ...

Page 51: ... each enclosure has a unique Enclosure ID Quad Loop Configuration Note Quad loop configuration requires that the enclosure be configured in split loop mode To set split loop mode a jumper must be installed at jumper location JP3 on each LS module in the enclosure 1 2 1 2 0 I 0 I To HBA 1 2 1 2 0 I 0 I To next enclosure To HBA To next enclosure ...

Page 52: ...ocation JP3 if one is not already installed This sets the enclosure to operate in split loop mode 2 Attach cables to the top and bottom connector of both I O modules see Figure 3 4 3 Attach the other end of these four cables to your host systems Figure 3 4 Cabling the Quad Loop Configuration 1 2 1 2 0 I 0 I Loop A Loop B Drives 1 7 LSM LSM Drive 1 Drive 2 Drive 3 Drive 4 Drive 5 Drive 6 Drive 7 Dr...

Page 53: ... not less than 4mm2 This cross sectional area corresponds to a minimum 10AWG wire Connecting an AC Power Source 1 Ensure all cables have been attached as described in the preceding sections 2 Attach the AC power cords to the power supplies and turn the power supply switches to the On position see Figure 3 5 Figure 3 5 Attaching the AC power cords Warning This equipment must be connected to an eart...

Page 54: ... after a delay of 12 seconds times the modulo 8 value of the numeric SEL_ID of the disk drive Once the enclosure is powered up and all 14 drives are spun up as depicted above the enclosure will support immediate drive spin up with two power supplies present Modulo 8 The drive spin up sequence above uses modulo 8 to calculate the spin up delay Modulo 8 is determined by SHELF ID x DRIVE NUMBER 8 NUM...

Page 55: ...Chapter 4 RAID Configurations ...

Page 56: ...This chapter describes how to set up configure and use the Altos S700 Series RAID Controller Some general information about the RAID controller is also provided ...

Page 57: ...line The new controller resumes processing array operations in a failback process During failover and failback write cache coherency is maintained with the disk drives Three circuit boards make up the RAID Controller Controller The controller circuit board contains the main controller and peripheral functions including processor control store memory XOR engine and cache controller and host and dev...

Page 58: ...essor coupled with a companion chip Proprietary XOR engine ASIC that provides data processing XOR function and data cache SDRAM control Four 2Gb capable fibre protocol chips for the device and host ports Dual internal 528 MB s 64 bit 66 MHz PCI buses Separate memory areas for processor and user data Scalable data cache memory 128 256 512 MB DIMMs 128 KB NVRAM configuration memory Real Time Clock 4...

Page 59: ...osure The controller circuit board performs these operations with a proprietary architecture using the following components Main microprocessor and companion chip Control store memory Memory Controller Hardware XOR Engine ASIC XOR ASIC Flash PROM Non volatile RAM NVRAM Dual universal asynchronous receiver transmitter DUART Fibre Channel I O processors Cache DIMM memory I O Circuit Board The I O ci...

Page 60: ... channels and an expansion module Port bypass circuitry on the I O circuit board enables quadplex operation on a second host loop The I O board has seven LEDs to indicate subsystem status RS232 Serial Port The 3 pin RS232 Serial Port is located on the RAID controller and provides VT100 terminal emulation capabilities It can be used to configure and manage the storage array This RS232 port applicab...

Page 61: ... Controller location The above illustration shows a dual RAID configuration The main parts of the RAID Controller are described in Figure 4 3 Figure 4 3 Main components of RAID controller 1 2 1 2 0 I 0 I RAID Controller RAID Controller 1 2 3 4 5 6 7 1 2 3 4 5 6 7 FC Host Connectors SSF optical HSSDC Connector RS232 Status LEDs 1 2 3 4 5 6 7 ...

Page 62: ...roller Status LEDs LED Description 1 Yellow Not Ready Normally Off Goes On during power up sequence 2 Green Ready Normally On 3 Green Dirty Cache On when there is data in cache 4 Yellow BBU Fault Normally Off 5 Green Partner Fail Normally Off 6 Green Device Activity i e on drive channels Flashes with activity 7 Green Host Activity Flashes with activity ...

Page 63: ... the two standard RAID controller configurations Single RAID Controller and Dual RAID Controller dual active The procedure for daisy chaining these standard configurations to expansions enclosures is also described This section also describes how to set the enclosure ID ...

Page 64: ...mber and the enclosure ID The enclosure ID is set using the enclosure ID switch located on the rear of the Altos S700 see Figure 4 4 Note The enclosure ID must be set prior to powering on the enclosure Note Each enclosure must have a separate ID when daisy chained together Figure 4 4 Location of Enclosure ID Switch This enclosure ID switch can be set to 0 through 7 1 2 1 2 0 I 0 I 1 2 3 4 5 6 7 1 ...

Page 65: ...ot 2 5 20 35 50 65 80 95 110 Slot 3 6 21 36 51 66 81 96 111 Slot 4 7 22 37 52 67 82 97 112 Slot 5 8 23 38 53 68 83 98 113 Slot 6 9 24 39 54 69 84 99 114 Slot 7 10 25 40 55 70 85 100 115 Slot 8 11 26 41 56 71 86 101 116 Slot 9 12 27 42 57 72 87 102 117 Slot 10 13 28 43 58 73 88 103 118 Slot 11 14 29 44 59 74 89 104 119 Slot 12 15 30 45 60 75 90 105 120 Slot location when viewed from the front of th...

Page 66: ...Chapter 4 RAID Configurations 50 Slot 13 16 31 46 61 76 91 106 121 Enclosure ID Drive Slot 0 1 2 3 4 5 6 7 ...

Page 67: ...Series directly to the host system It is also possible to connect the system using a Hub Switch Caution Before working on the enclosure ensure that anti static precautions have been taken The minimum requirement is an anti static wrist strap and grounding wire To connect this configuration to a host system follow this procedure Connecting a Single RAID Controller to a Host 1 Plug both host cables ...

Page 68: ...ntroller Enclosure To daisy chain the RAID enclosure to an expansion enclosure connect link cables from the RAID controller to the top connectors of the I O modules of the expansion enclosure see Figure 4 6 Note A maximum of eight enclosures may be daisy chained together 1 2 1 2 0 I 0 I HBA 1 HBA 2 1 2 3 4 5 6 7 ...

Page 69: ...ou must ensure that each enclosure has a unique Enclosure ID 1 2 1 2 0 I 0 I 1 2 1 2 0 I 0 I To next enclosure Link Cable I O Module To next enclosure Connect this cable for dual loop operation Link Cable Total of 8 enclosures may be daisy chained together HBA 1 HBA 2 RAID Controller 1 2 3 4 5 6 7 ...

Page 70: ...ration to a host system follow this procedure Connecting Dual RAID Controllers to a Host System Note This example configuration assumes that the RAID enclosure is being attached to two separate host systems each containing two HBA s Other configurations such as one host with 4 HBA s are also possible 1 Plug two host cables in to the host connectors of the first RAID controller one cable into each ...

Page 71: ...AID enclosure to an expansion enclosure connect link cables from the RAID enclosure to the top connectors of the I O modules of the expansion enclosure see Figure 4 8 Note A maximum of eight enclosures may be daisy chained together 1 2 1 2 0 I 0 I HBA 1 HBA 2 Host A HBA 1 HBA 2 Host B 1 2 3 4 5 6 7 1 2 3 4 5 6 7 ...

Page 72: ...en daisy chaining enclosures you must ensure that each enclosure has a unique Enclosure ID 1 2 1 2 0 I 0 I 1 2 1 2 0 I 0 I To next enclosure To next enclosure Link Cable Link Cable Total of 8 enclosures may be daisy chained together HBA 1 HBA 2 Host A HBA 1 HBA 2 Host B 1 2 3 4 5 6 7 1 2 3 4 5 6 7 ...

Page 73: ... 4mm2 This cross sectional area corresponds to a minimum 10AWG wire Connecting an AC Power Source 1 Ensure all cables have been attached as described in the preceding sections 2 Attach the AC power cords to the power supplies and turn the power supply switches to the On position see Figure 4 9 Figure 4 9 Attaching the AC power cords Warning This equipment must be connected to an earthed mains sock...

Page 74: ... after a delay of 12 seconds times the modulo 8 value of the numeric SEL_ID of the disk drive Once the enclosure is powered up and all 14 drives are spun up as depicted above the enclosure will support immediate drive spin up with two power supplies present Modulo 8 The drive spin up sequence above uses modulo 8 to calculate the spin up delay Modulo 8 is determined by SHELF ID x DRIVE NUMBER 8 NUM...

Page 75: ...Chapter 5 System Monitoring ...

Page 76: ...This Chapter describes the devices used to monitor the Altos S700 Series The location of the monitoring LEDs and how to interpret them is described ...

Page 77: ... Altos S700 Series This module is complemented by status and fault LEDs mounted on all the major components of the enclosure such as disk drives power supplies Advanced Cooling Modules ACMs and RAID Controller All these monitoring devices are discussed in the following sections ...

Page 78: ...mmunication with the host system at any one time but both LS modules will continuously monitor the system If the active LS Module fails then the ESI communication with the host system will be taken over by the passive LS Module LS Module Features Monitoring Control for 2 Power Supplies and 2 ACMs Reports status and receives control information via the FC loop Microcontroller for data processing co...

Page 79: ...ed LS Modules These LEDs show the status of the enclosure power Fibre Channel Loops LS Module status and the operating mode of the enclosure 1GB or 2Gb operation Figure 5 1 shows the location of the LEDs Figure 5 1 Location of Altos S700 Enclosure LEDs 0 1 2 3 4 5 LED 0 LED 1 LED 2 LED 3 LED 4 LED 5 ...

Page 80: ... no faults exist in the enclosure ON indicates a fault Flashing of this LED indicates the both a 1GB and a 2Gb I O module has been detected LED 2 FC Loop A Green ON indicates FC Loop A closed OFF indicates FC Loop A open LED 3 FC Loop B Green ON indicates FC Loop B closed OFF indicates FC Loop B open LED 4 LS Fault Amber Normally OFF indicating that the LS Module has no fault ON indicates an LS Mo...

Page 81: ...sure Note If enabled the audible alarm will sound when an error is detected Drive Ready Green LED Bicolor LED Green Bicolor LED Amber Condition Drive Controlled Off Off Slot empty ready for insert Drive Controlled On Off Drive online ready for operation Drive Controlled ON 125ms Off 125ms Off Off Drive Identify POD Drive Controlled ON 250ms Off 250ms Off Off Prepare for removal Drive Controlled On...

Page 82: ...Chapter 5 System Monitoring 66 Figure 5 2 Disk Drive Carrier LEDs 18F Disk Drive Ready Green BiColor LED Green Amber ...

Page 83: ... when the power supply is operating normally This green LED is driven by the power supply and indicates that the power supply output voltages are operating normally The power supply amber Fault LED is driven by the LS Module and power supply This amber LED is ON when the LS Module detects a power supply fault or it will flash when the power supply Locate feature is selected Note If enabled the aud...

Page 84: ...Series enclosure has two fault LEDs visible from the rear of the enclosure The LEDs are labeled 1 and 2 to correspond with the two fans inside the ACM assembly These LEDs are normally off and will only be on when a fault is detected in a fan by the LS Module Note The audible alarm will sound when an error is detected Figure 5 4 Advanced Cooling Module LEDs 1 2 Fan1 Fault Fan2 Fault Fan1 Fan2 ...

Page 85: ... 1 Yellow Not Ready Normally Off Goes On during power up sequence 2 Green Ready Normally On 3 Green Dirty Cache On when there is data in cache 4 Yellow BBU Fault Normally Off 5 Green Partner Fail Normally Off 6 Green Device Activity i e on drive channels Flashes with activity 7 Green Host Activity Flashes with activity FC Host Connectors SSF optical HSSDC Connector RS232 Status LEDs 1 2 3 4 5 6 7 ...

Page 86: ...Chapter 5 System Monitoring 70 ...

Page 87: ...Chapter 6 Installing and Removing Components ...

Page 88: ...ures for installing and removing the replaceable components in the Altos S700 Series Warning The module handles are to facilitate the easy insertion and removal of the modules they should not be used to lift and or carry the enclosure ...

Page 89: ...73 Location of the Components 1 2 1 2 0 I 0 I Disk Drives ACMs Power Supplies I O Module I O Module Module LS Module RAID Controller RAID Controller ...

Page 90: ... cam lever fully open slide the carrier into the slot until the lever starts to close 4 Fully close the cam lever The lever is fully closed and the drive locked in place when the lever clicks into position Removing a Disk Drive Carrier 1 Using your finger release the locking tab by pressing it in the direction shown in Figure 5 1 and pull the cam lever towards you 2 Fully open the cam lever approx...

Page 91: ...75 Figure 6 1 Disk Drive Carrier 18F Cam Lever Push locking tab in this direction to open ...

Page 92: ... on the top on the right for deskside systems 3 With the cam lever fully open slide the LS Module into the slot until the lever starts to close 4 Fully close the cam lever The lever is fully closed and the LS Module locked in place when the lever clicks into position Removing an LS Module 1 Using your finger release the locking tab by pressing it in the direction shown in Figure 5 2 and pull the c...

Page 93: ...77 Figure 6 2 LS Module 0 1 2 3 4 5 Cam Lever Push locking tab in this direction to open ...

Page 94: ... such that the LEDs are on the top on the right hand side for rack mount systems 3 Gently slide the power supply into the empty power supply slot 4 Secure in place using the two fixing screws torque setting 0 3Nm 5 Install the power cable Removing a Power Supply 1 Turn off the power supply and remove the power cable 2 Loosen the two fixing screws 3 Using the power supply handle gently slide it out...

Page 95: ...ule is to be installed 2 Orient the module such that the LEDs are on the top on the right hand side for rack mount systems 3 Gently slide the ACM into the empty ACM slot 4 Secure in place using the two fixing screws torque setting 0 3Nm Removing an Advanced Cooling Module 1 Loosen the two fixing screws 2 Using the advanced cooling module handle gently slide it out of the enclosure Caution Immediat...

Page 96: ... module Installing an I O Module RAID Controller 1 Remove the I O module blank if there is one installed 2 Gently insert the I O module into the slot 3 Secure in place using the two fixing screws torque setting 0 3Nm 4 Connect the cables as described in Chapter 3 Removing an I O Module RAID Controller 1 Remove all cables 2 Loosen the two fixing screws 3 Using the module handle gently slide the I O...

Page 97: ...Appendix A Safety Statement Translations ...

Page 98: ...d åtkomst Laitteisto on tarkoitettu asennettavaksi ainoastaan sivullisilta suojattuun paikkaan Dette udstyr er kun beregnet til installation i et område med begrænset adgang Dette utstyret er bare beregnet for installering på steder med adgangsbegrensning Allow disk drives and power supplies to reach room ambient temperature before powering on the shelf Ehe Laufwerke und Netzteile an die Stromvers...

Page 99: ...u slår på strømmen til hyllen It is recommended that if interconnecting equipment resides within more than one equipment rack cabinet these rack cabinets should be at the same ground potential Befinden sich Verbindungselemente in mehr als einem Rack Gehäuse sollten die Racks dasselbe Massepotential aufweisen Vi rekommenderar om förbindelseutrustning finns i mer än ett utrustningshyllskåp att dessa...

Page 100: ...n einer Komponente sollte sichergestellt werden dass antistatische Vorsichtsmaßnahmen ergriffen wurden Mindestanforderung sind ein ordnungsgemäß geerdetes Antistatik Armband und ein Erdungskabel Se till att antistatiska åtgärder vidtages innan någon av komponenterna installeras eller avlägsnas Minimikravet är ett ordentligt jordat antistatiskt armband och jordledning Ennen komponenttien asentamist...

Page 101: ...assen Dies ist notwendig um Verletzungen bzw Schäden am Fach zu vermeiden När en utrustningshylla installeras eller avlägsnas ska all strömtillförsel bortkopplas och alla skivdrivenheter avlägsnas Det rekommenderas att du arbetar med minst en person till när en skivhylla ska installeras Detta är nödvändigt för att förhindra personliga skador och skador på hyllan Poista kaikki teholähteet ja levyas...

Page 102: ...getauscht werden und sollte deshalb nicht entfernt werden Det yttre höljet är inte en utbytbar enhet och skall därför inte avlägsnas från lagringsuppsättningen Tornikehys ei ole paikan päällä vaihdettavissa eikä sitä saa poistaa muistijärjestelmästä Søjleindkapslingen kan ikke udskiftes på stedet og må derfor ikke fjernes fra lagringssystemet Det ytre dekselet er ikke konstruert for å kunne skifte...

Page 103: ...alvontayksikön poistamisen seurauksena syntyvä aukko on peitettävä suojalevyllä tai asentamalla uusi valvontayksikkö entisen tilalle Muussa tapauksessa ilmavirran kulku saattaa häiriintyä mikä heikentää jäähdytystä merkittävästi Når LS Module er fjernet skal det hul der opstår dækkes Det gøres enten ved at påsætte en udstanset plade eller ved at installere en anden LS Module til erstatning Hvis du...

Page 104: ...reich des Lüftungsanschlusses besteht Stromschlaggefahr Det finns risk för elstötar i området runt fläktanslutningen Tuuletinliitännän ympäristössä voi olla sähköiskun vaara Der er fare for stød i området hvor ventilatoren er tilsluttet Det kan være en viss risiko for elektrisk støt i nærheten av tilkoblingspunktet for viften ...

Page 105: ...Appendix B Technical Specifications ...

Page 106: ... Swappable Components Two power supplies removable from the rear Two advanced cooling modules removable from the rear Two loop resiliency and SES modules LS removable from the front Up to 14 disk drives removable from the front Two independent AC power inlets Physical Dimensions Deskside Enclosure Height 20 inches 50 8cm Width 9 inches 22 9cm Depth 20 inches 50 8cm Weight 60 lbs 29 5kg maximum Max...

Page 107: ...cm Weight 60 lbs 29 5kg maximum Warranty Three 3 years 5 years disk drive warranty Monitoring Temperature advanced cooling modules power supplies disk drives loop resiliency modules I O modules Failure Notification In band reporting SES LEDs audible alarm Spheras Storage Management software ...

Page 108: ...tive Humidity Operating 10 to 80 non condensing Max Rate of Operational Humidity Change 10 per hour Relative Humidity Storage 5 to 95 non condensing Altitude Altitude Operating 200 to 10 000 feet Rotational Velocity 10K 15K Form factor 3 5 Height 1 0 Interface Fibre Channel 2Gb FC support Input Voltage 85 264 VAC Current Rating 10 5 Amps Input Frequency 47 63 Hz Max Peak Output Power 853 Watts Max...

Page 109: ... these levels Regulatory Agency Compliance Product Safety Standards UL1950 Information Technology Equipment US CSA C22 2 No 950 Information Technology Equipment Canadian Law EN 60950 Information Technology Equipment European Norm Product Safety Third Party Certifications UL Listed USA CSA Certification Canada CB Certificate and Report from NEMKO NEMKO Norway TUV GS German CE Mark Emission Testing ...

Page 110: ...5 Radiated Immunity CENELEC EN 61000 4 3 Electrical Fast Transients Burst CENELEC EN 61000 4 4 1995 Transient Surge CENELEC EN 61000 4 5 1995 Conducted Immunity CENELEC EN 61000 4 6 Power Line Interruption CENELEC EN 61000 4 11 Electromagnetic Radiation United States FCC Part 15 Class A Computing Equipment Canadian DOC Data Processing Equipment ...

Page 111: ...Appendix C Configuration Loop Diagram ...

Page 112: ...Appendix C Configuration Loop Diagram 96 Loop Diagram for a Single Enclosure System Single Loop 3 4 5 6 7 8 9 10 11 12 13 14 15 16 External Circles denote disk drives with drive ID shown Enclosure ID 0 ...

Page 113: ...Diagram for a Dual Enclosure System Single Loop 3 4 5 6 7 8 9 10 11 12 13 14 15 16 External Circles denote disk drives with drive ID shown 18 19 20 21 22 23 24 25 26 27 28 29 30 31 Enclosure ID 0 Enclosure ID 1 ...

Page 114: ...Appendix C Configuration Loop Diagram 98 Loop Diagram for a Single Enclosure System Dual Loop 3 4 5 6 7 8 9 10 11 12 13 14 15 16 External Circles denote disk drives with drive ID shown Enclosure ID 0 ...

Page 115: ... Diagram for a Dual Enclosure System Dual Loop 3 4 5 6 7 8 9 10 11 12 13 14 15 16 External Circles denote disk drives with drive ID shown 18 19 20 21 22 23 24 25 26 27 28 29 30 31 Enclosure ID 0 Enclosure ID 1 ...

Page 116: ...Appendix C Configuration Loop Diagram 100 ...

Page 117: ...Appendix D Upgrading an Altos S700 JBOD Array to a RAID Array ...

Page 118: ...In this section the procedure for upgrading a Altos S700 Series Storage Array from a JBOD system to a RAID system is described The equipment and parts necessary for the upgrade are also described ...

Page 119: ...nstalled Upgrading from JBOD to RAID Before beginning the upgrade ensure that anti static precautions are taken The minimum requirement is an anti static wrist strap and grounding wire 1 Shut down the system and remove the power cables from the rear of the enclosure 2 Using the Phillips head screwdriver loosen the screws securing the I O Module in the enclosure 3 Using the handle on the module rem...

Page 120: ... the cable s to your HBA hub switch refer to Chapter 4 for more details 7 Install the battery backup unit as described below 8 Re attach the power cables and switch on the enclosure 9 You can now configure your RAID system using the Management Software supplied Installing the Battery Backup Unit The battery backup unit BBU for the RAID controller is installed on the ACM unit Location of Battery Ba...

Page 121: ...surface as in above 3 Orient the BBU as shown Installing the BBU 4 Feed the BBU cable through the hole provided and connect it to the BBU connector 5 Press the BBU into position and secure it by ensuring the four tabs click into place 6 Replace the ACM in the enclosure and tighten the ACM screws to complete the installation Feed cable through hole provided and attach to the connector BBU Tabs Tabs...

Page 122: ...Appendix D Upgrading an Altos S700 JBOD Array to a RAID Array 106 ...

Page 123: ...ppable 90 humidity 92 I i o modules 80 i o modules copper hssdc 6 id settings 29 id table 49 interface disk drive 90 interface host 90 L leds enclosure 63 leds ls module 63 loading racks 16 loop resiliency and ses module 62 ls module 76 M modulo 8 58 monitoring system 91 N notification 91 O operating 16 operating temperature 16 P port bypass circuits 62 power consumption 18 power output 4 power ra...

Page 124: ...108 spin up sequence 58 T technical specifications 90 temperature 16 92 terminal emulation 44 U unpacking 15 V vibration operational 93 VT100 44 W warranty 91 ...

Reviews: