39
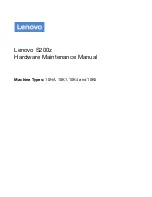
12 Reinstall the HSF assembly.
The HSF type will depend on the new processor model. The
figures below show the HSF types available for the Altos G330
system.
(1) Align then insert the HSF on top of the retention plate.
(2) Tighten the four mounting pins a few threads in, observing a
diagonally opposite pattern, then tighten them completely to
secure the heat sink to the processor base.
(3) Reconnect the HSF cable to its mainboard connector.
13 Observe the post-installation instructions described on page 26.
Summary of Contents for Altos G330 Series
Page 1: ...Acer Altos G330 Series User s Guide ...
Page 18: ......
Page 19: ...1 System tour ...
Page 33: ...2 System setup ...
Page 40: ...2 System setup 22 ...
Page 41: ...3 System upgrade ...
Page 68: ...3 System upgrade 50 ...
Page 69: ...4SystemBIOS ...
Page 101: ...5 System troubleshooting ...
Page 113: ...Appendix A Intel Active Management Technology ...
Page 121: ...Appendix B SATA RAID configuration ...
Page 127: ...Appendix C SAS RAID configuration ...