background image

 4 System BIOS

80

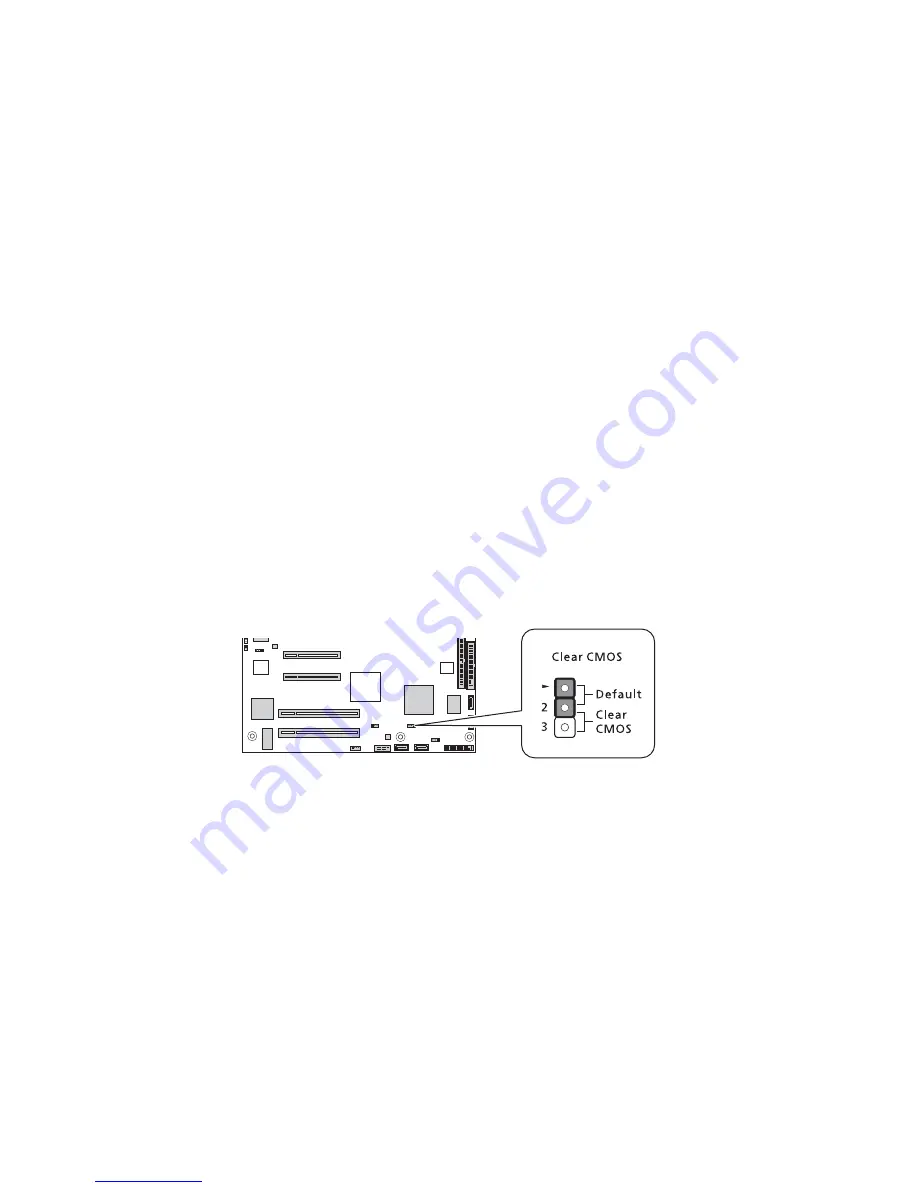
Clearing the CMOS RAM  

You may need to clear the Setup configuration values stored in the 
CMOS RAM if the configuration has been corrupted, or if incorrect 
settings made in the Setup utility have caused error messages to be 
unreadable.  Clearing the CMOS RAM removes the administrator 
password.

Clearing the CMOS RAM can be done either by using the CMOS clear 
jumper, or by removing the CMOS battery.  Go to page 47 for 
instructions on how to remove the battery.

To clear the CMOS RAM using the mainboard jumper: 

1

Perform the pre-installation instructions described on page 26.

2

Remove the side panel from the chassis following the instructions 
on page 27.  

3

Locate the Clear CMOS jumper on the mainboard.

If necessary, remove any cables that prevent access to the jumper.

4

Move the jumper from the default position (at pins 1 and 2) to the 

Clear CMOS 

position, covering pins 2 and 3.

5

Reconnect the AC power and turn on the server.

6

When the server begins to emit beeping sounds, power it down 
and disconnect the AC power.

7

Move the Clear CMOS jumper back to its default position.

8

Observe the post-installation instructions described on page 26.


Summary of Contents for Altos G330 Series

Page 1: ...Acer Altos G330 Series User s Guide ...

Page 2: ...ided below The serial number and model number are recorded on the label affixed to the unit All correspondence concerning the unit should include these information No part of this publication may be reproduced stored in a retrieval system or transmitted in any form or by any means electronic mechanical photocopy recording or otherwise without the prior written permission of Acer Incorporated Model...

Page 3: ...DE on the label Class B equipment This device has been tested and found to comply with the limits for a Class B digital device pursuant to Part 15 of the FCC Rules These limits are designed to provide reasonable protection against harmful interference in a residential installation This device generates uses and can radiate radio frequency energy and if not installed and used in accordance with the...

Page 4: ...nnections to other computing devices must be made using shielded cables to maintain compliance with FCC regulations Notice Peripheral devices Only peripherals input output devices terminals printers etc certified to comply with the Class B limits may be attached to this equipment Operation with noncertified peripherals is likely to result in interference to radio and TV reception Caution Changes o...

Page 5: ... EXPONERSE A LOS RAYOS ADVARSEL LASERSTRÅLING VEDÅBNING SE IKKE IND I STRÅLEN VARO LAVATTAESSA OLET ALTTINA LASERSÅTEILYLLE VARNING LASERSTRÅLNING NÅR DENNA DEL ÅR ÖPPNAD ÅLÅ TUIJOTA SÅTEESEENSTIRRA EJ IN I STRÅLEN VARNING LASERSTRÅLNING NAR DENNA DEL ÅR ÖPPNADSTIRRA EJ IN I STRÅLEN ADVARSEL LASERSTRÅLING NAR DEKSEL ÅPNESSTIRR IKKE INN I STRÅLEN Macrovision copyright protection notice U S Patent N...

Page 6: ... to comply with these requirements EMC Directive 89 336 EEC amended by 92 31 EEC and 93 68 EEC as attested by conformity with the following harmonized standards EN55022 1998 A1 2000 A2 2003 AS NZS CISPR22 2002 Class B EN55024 1998 A1 2001 A2 2003 EN61000 3 2 2000 Class D EN61000 3 3 1995 A1 2001 Low Voltage Directive 73 23 EEC as attested by conformity with the following harmonized standard EN6095...

Page 7: ...of conformity for EU countries Hereby Acer declares that this PC series is in compliance with the essential requirements and other relevant provisions of Directive 1999 5 EC Russian regulatory certification compliance ...

Page 8: ...connecting the power cord to the AC power outlet Unplug the power cord before removing the power supply unit from the server If the system has multiple sources of power disconnect power from the system by unplugging all power cords from the power supplies CAUTION for accessibility Be sure that the power outlet you plug the power cord into is easily accessible and located as close to the equipment ...

Page 9: ... electrical power This product should be operated from the type of power indicated on the marking label If you are not sure of the type of power available consult your dealer or local power company Do not allow anything to rest on the power cord Do not locate this product where people will walk on the cord If an extension cord is used with this product make sure that the total ampere rating of the...

Page 10: ...y hearing experts to protect your hearing Gradually increase the volume until you can hear it clearly and comfortably and without distortion After setting the volume level do not increase it after your ears adjust Limit the amount of time listening to music at high volume Avoid turning up the volume to block out noisy surroundings Turn the volume down if you can t hear people speaking near you Pro...

Page 11: ...s electronic device into the trash when discarding To minimize pollution and ensure utmost protection of the global environment please recycle For more information on the Waste from Electrical and Electronics Equipment WEEE regulations visit http global acer com about sustainability htm Mercury advisory For projectors or electronic products containing an LCD CRT monitor or display Lamp s inside th...

Page 12: ...these symptoms or any other recurring or persistent discomfort and or pain related to computer use consult a physician immediately and inform your company s health and safety department The following sections provide tips for more comfortable computer use Finding your comfort zone Find your comfort zone by adjusting the viewing angle of the monitor using a footrest or raising your sitting height t...

Page 13: ...l than the top edge of the display so your eyes point downward when looking at the middle of the display Adjust the display brightness and or contrast to a comfortable level for enhanced text readability and graphics clarity Eliminate glare and reflections by placing your display in such a way that the side faces the window or any light source minimizing room light by using drapes shades or blinds...

Page 14: ...e short breaks regularly and often Perform some stretching exercises Breathe fresh air as often as possible Exercise regularly and maintain a healthy body Warning We do not recommend using the computer on a couch or bed If this is unavoidable work for only short periods take breaks regularly and do some stretching exercises ...

Page 15: ... Setting up the system 17 Pre installation requirements 17 Connecting peripherals 18 Turning on the system 19 Power on problems 20 Turning off the system 21 3 System upgrade 23 Installation precautions 25 ESD precautions 25 Pre installation instructions 26 Post installation instructions 26 Opening the server 27 Removing the side panel 27 Removing the front bezels 28 Configuring a 5 25 inch storage...

Page 16: ...ting procedure 85 Resetting the system 85 Initial system startup problems 86 Initial troubleshooting checklist 87 Hardware diagnostic testing 88 Checking the boot up status 88 Verifying the condition of the storage devices 89 Confirming loading of the operating system 89 Component troubleshooting 90 POST beep codes 94 Appendix A Intel Active Management Technology 95 Intel AMT overview 97 Intel AMT...

Page 17: ...utilities 105 Onboard Intel SATA RAID configuration 105 Onboard LSI SATA RAID configuration 107 Appendix C SAS RAID configuration 109 SAS RAID configuration support 111 Entering the Adaptec SAS SATA Configuration Utility 111 Creating the RAID 1 volume 111 Index 113 ...

Page 18: ......

Page 19: ...1 System tour ...

Page 20: ...stem featuring the latest in computing technology It hosts a range of powerful and flexible features designed to meet the needs of various network environments From simple networking functions to computing intensive applications the Altos G330 delivers ...

Page 21: ...D 256 KB 1 MB 2 MB 4 MB 2x2 MB or 2x4 MB L2 cache 1066 800 and 533 MHz front side bus FSB speed Supports the following Intel technologies 1 Intel Quad Core Architecture Intel Dual Core Architecture Intel Hyper Threading Technology HT Intel Extended Memory 64 Technology EM64T Chipset North bridge Intel 3000 Memory Controller Hub MCH South bridge Intel 82801GR I O Controller Hub ICH7R 1 Support for ...

Page 22: ...oller Embedded ATI ES1000 chipset 16 MB DDR SDRAM SATA II controller Integrated in the Intel ICH7R chipset Data transfer rate of up to 3 0 Gb s Supports four onboard SATA ports Onboard SATA RAID support Intel SATA RAID Microsoft Windows OS only RAID 0 1 10 and 5 LSI SATA RAID multi OS RAID 0 1 and 10 Networking One Gigabit Ethernet LAN port RJ 45 Intel 10 100 1000 82573E Gigabit Ethernet Controlle...

Page 23: ...and 10 Adaptec 29320ALP R Ultra 320 SCSI HBA for backup device only I O ports Power supply and ventilation 350 watts ATX 12V PFC power supply with auto switching function Support for the following cooling components One rear system fan One processor heat sink fan HSF assembly 4 Optional HDD fan for systems using at least three SAS HDDs 3 The hot swap HDD configuration is only available when the op...

Page 24: ...Microsoft Windows 2000 Microsoft Windows Server 2003 x64 Edition Microsoft Windows Server 2003 Red Hat Enterprise Linux 4 0 EM64T Red Hat Enterprise Linux 4 0 SUSE Linux Enterprise Server 9 0 EM64T SUSE Linux Enterprise Server 9 0 Novell NetWare 6 5 Mechanical Chassis Tool less chassis design for easy hardware access Tower orientation Dimensions Height 424 6 mm 16 72 in Depth 479 7 mm 18 89 in Wid...

Page 25: ...vity indicator 3 Optical disc drive 10 HDD bay bezel 4 ODD eject button 11 Security keylock 5 5 25 inch drive bays 12 FDD eject button 6 USB 2 0 ports 13 FDD activity indicator 7 Power button 14 Floppy disk drive optional Note If you intend to install an optional floppy disk drive refer to the documentation that came with the new drive for instructions ...

Page 26: ...tour 8 Rear panel No Icon Component 1 Side panel release latch 2 Expansion slot covers 3 USB 2 0 ports 4 Gigabit LAN port 5 Serial port 6 Monitor port 7 PS 2 mouse port 8 PS 2 keyboard port 9 Power cable socket ...

Page 27: ...or heat sink fan 8 System fan 9 Power supply unit Notes qÜÉ eaa Ñ å áë å çéíáçå ä áíÉãK rëÉ çÑ áí áë çåäó êÉèìáêÉÇ ïÜÉå íÜÉ ëóëíÉã áë ìëáåÖ í äÉ ëí íÜêÉÉ NRh omj p p Ü êÇ ÇêáîÉëI çê ïÜÉå íïç NRh omj p p Ü êÇ ÇêáîÉë êÉ áåëí ääÉÇ áå Çà ÅÉåí eaa Ä óëK qÜÉ ÜçíJéäìÖ Ä Åâéä åÉ Äç êÇ áë å çéíáçå ä áíÉãK çåí Åí óçìê äçÅ ä ÅÉê êÉéêÉëÉåíáîÉ Ñçê áåÑçêã íáçå çå Üçï íç éìêÅÜ ëÉ íÜÉëÉ Ü êÇï êÉ çéíáçåëK ...

Page 28: ...nt No Component 1 Rear system fan connector 6 Channel A DIMM slots 2 2x4 ATX power connector 7 Chassis intrusion connector 3 Processor socket 8 CMOS battery 4 Processor HSF connector 9 2x12 ATX power connector 5 Channel B DIMM slots 10 HDD fan connector ...

Page 29: ...PCI slot 1 32 bit 33 MHz 3 3 V 14 SATA port 2 21 PCI slot 2 32 bit 33 MHz 3 3 V 15 Front panel LED connector 22 PCI Express x8 slot with x4 throughput 16 SATA port 1 23 PCI Express x8 slot with x8 throughput 17 Clear CMOS jumper 24 Rear panel ports No Component 1 HDD access LED control jumpers Close 2 3 HDD LED control via pin 11 default 2 HDD power cable connectors 3 HDD data cable connector 4 HD...

Page 30: ...rotected and can not be updated 2 3 The contents of the Intel 82573E NVM can be programmed 2 Clear CMOS 1 2 Normal operation setting 2 3 The CMOS RAM contents will be cleared on the next reset 3 BIOS recovery 1 2 Normal operation setting 2 3 BIOS recovery setting Note The default setting for normal operation is 1 2 for all system jumpers ...

Page 31: ...ont panel LED indicators The LED indicators green mounted on the front panel allow the constant monitoring of the system s power status and drive activity No Indicator Status Description 1 ODD activity Blinking There is an ongoing ODD activity 2 Power On The system is powered on Blinking The system is in ACPI sleep mode 3 HDD activity Blinking There is an ongoing HDD activity 4 FDD activity Blinki...

Page 32: ...how its status Status Green Amber Description HDD access Blinking Ongoing hot plug HDD activity HDD failure On Hot plug HDD failure HDD rebuild Flashing green amber HDD is rebuilding data No Indicator Status Description 1 Network connection Solid green Active network link Blinking green Ongoing network data activity Off Off line network 2 Network speed Solid yellow GbE link network access Solid gr...

Page 33: ...2 System setup ...

Page 34: ...This chapter gives you instructions on how to prepare the system for operation Procedures for connecting peripherals are also explained ...

Page 35: ...rom vibration Well ventilated and away from sources of heat Secluded from electromagnetic fields produced by electrical devices such as air conditioners radio and TV transmitters etc Checking the package contents Check the following items from the package Acer Altos G330 system Acer Altos G330 Resource CD Acer Altos G330 accessory box System keys attached to the security keylock If any of the abov...

Page 36: ...Consult the operating system manual for information on how to configure the network setup Caution Do not route the power cord where it will be walked on or pinched by items placed against it The server is designed to be electrically grounded earthed To ensure proper operation plug the power cord into a properly grounded AC outlet only ...

Page 37: ... a series of power on self test POST messages appears The POST messages indicate if the system is running well or not Note If the system does not turn on or boot after pressing the power button go to the next section for the possible causes of the boot failure Aside from the POST messages you can determine if the system is in good condition by checking if the following occurred The power status in...

Page 38: ...e power outlet and to the power cord socket No power comes from the grounded power outlet Have an electrician check your power outlet Loose or improperly connected internal power cables Check the internal cable connections If you are not confident to perform this step ask a qualified technician to assist you Warning Make sure all power cords are disconnected from the electrical outlet before perfo...

Page 39: ...ed user documentation To turn off the system via software 1 Press Ctrl Alt Delete on the attached keyboard or click Start on the Windows taskbar 2 Select Shut Down 3 Select Shut down from the drop down menu then click OK To turn off the system via hardware If you cannot shut down the server via software press the power button for at least four seconds Quickly pressing the button may put the server...

Page 40: ...2 System setup 22 ...

Page 41: ...3 System upgrade ...

Page 42: ...This chapter discusses the precautionary measures and installation procedures you need to know when upgrading the system ...

Page 43: ...a server component Do not remove a component from its protective packaging until you are ready to install it Do not touch the component pins leads or circuitry Components with a Printed Circuit Board PCB assembly should always be laid with the assembly side down Wear a wrist grounding strap and attach it to a metal part of the server before handling components If a wrist strap is not available mai...

Page 44: ...erals 3 Unplug all power cables from their outlets 4 Disconnect all telecommunication cables from their ports 5 Place the server on a flat stable surface 6 Open the server according to the instructions on page 27 7 Follow the ESD precautions described in the previous section when handling a server component Post installation instructions Perform the steps below after installing a server component ...

Page 45: ...o the server s internal components Refer to the following sections for instructions Removing the side panel 1 Perform the pre installation instructions described on page 26 2 Open the HDD bay bezel 1 If necessary insert the key into the lock and turn it counterclockwise until it points to the unlock icon 2 Open the lower bezel to a 90 angle 3 Remove the side panel 1 Loosen the two screws located o...

Page 46: ...e front bezels There are two front bezels protecting the 5 25 inch drive bays and the HDD bay Remove the top bezel first 1 Release the top bezel retention tabs from the chassis interior 2 Pull the top bezel away from the chassis 3 Pull the lower bezel upward to release its retention tabs from the chassis 4 Pull the lower bezel away from the chassis ...

Page 47: ... you can install a new storage device To install an optional storage device 1 Perform the pre installation instructions described on page 26 2 If you intend to replace the DVD drive go to the next step If you intend to install a new storage device go to step 4 3 Remove the default DVD drive 1 Disconnect the power and IDE cables from rear of the default DVD drive 2 Move and hold the DVD drive relea...

Page 48: ...l for future reinstallation 5 Install the new 5 25 inch storage device 1 Move and hold the DVD drive release slider of the unlock position 2 Slide the new 5 25 inch drive into the drive bay 3 Move the release slider into the lock position 4 Connect the power and data cables of the new storage device 6 Observe the post installation instructions described on page 26 ...

Page 49: ... Users need to purchase a blank HDD carrier to install additional hard drive s If you intend to install a SAS hard drive model install the SAS or SAS RAID card option first If you intend to install at least three 15K RPM SAS hard drives an HDD fan is required to maintain proper system cooling Contact your local Acer representative for more information on how to purchase these optional items To rem...

Page 50: ... connections for a SAS HDD connected to an optional SAS SAS RAID expansion card Easy swap HDD configuration also supports SATA HDDs connected to the onboard SATA connectors 3 Press the hard disk carrier button to release the ejector lever 4 Use the ejector lever to pull the drive out of the cage Make sure to support the drive when pulling it out of the cage 5 Observe the post installation instruct...

Page 51: ... then pull it open 2 Pull out the dummy HDD carrier from the cage 3 Prepare the new blank HDD carrier for installation 1 Remove the four screws that secures the blank frame You will use these screws to secure the hard disk later 2 Detach the plastic frame from the HDD carrier ...

Page 52: ...ctor lever still extended 2 Make sure that the drive is properly inserted before pushing the lever back until it clicks into place To install an easy swap hard drive 1 Remove the side panel from the chassis Go to page 27 for instructions 2 Observe steps 2 through 5 of the previous section 3 Connect the data and power cables to their HDD connectors 4 Observe the post installation instructions descr...

Page 53: ...m from functioning properly Do not touch the pins on either the processor or the processor socket they are very sensitive and are easily damaged Do not force the processor into the socket When properly aligned the processor will easily fit into place Be sure that the server has the most recent ROM version Failure to flash the ROM before installing a new processor can cause system failure To upgrad...

Page 54: ...rd connector 2 Loosen the four HSF mounting pins 3 Twist the HSF sightly to break the thermal grease bond loose Once the thermal grease bond is broken lift the HSF away from the mainboard 4 Lay down the HSF in an upright position with the thermal patch facing upward Do not let the thermal patch touch the work surface 5 Use an alcohol pad to wipe off the thermal grease from both the HSF assembly an...

Page 55: ...it from the socket hook 2 Fully open the load lever 3 Press the rear tab with your finger tip to bring the front end of the retention plate up slightly 4 Open the plate to expose the socket body 5 Grasp the processor by its edges and lift it out of its socket 7 Store the old processor inside an anti static bag 8 Remove the new processor from its box handling it by the edges 9 Remove the protective...

Page 56: ...you cannot install the processor in the wrong orientation without bending the pins 2 Close the retention plate 3 Press down on the socket lever while pushing it towards the center of the processor socket to engage it under the socket hook 11 Apply a thin layer of an Acer approved thermal interface material to the processor base and the bottom side of the HSF Make sure that only a very thin layer i...

Page 57: ...0 system 1 Align then insert the HSF on top of the retention plate 2 Tighten the four mounting pins a few threads in observing a diagonally opposite pattern then tighten them completely to secure the heat sink to the processor base 3 Reconnect the HSF cable to its mainboard connector 13 Observe the post installation instructions described on page 26 ...

Page 58: ... DIMM slots divided into two memory channels Channel A DIMM1A and DIMM2A Channel B DIMM1B and DIMM2B System memory configuration guidelines To ensure data integrity use only Acer approved DDR2 667 unbuffered ECC modules in 512 MB 1 GB or 2 GB capacities Use identical modules same type banking stacking technology and manufacturer The minimum memory configuration is one DIMM installed in the DIMM1A ...

Page 59: ...be installed or removed in matched pairs following the slot sequence DIMM1A and 1B first then DIMM2A and 2B Observe the population sequence illustrated in the table below when installing a memory module The table below lists the supported memory installation based on the memory interleave configuration Memory channel DIMM slot Population order A DIMM1A 1 A DIMM2A 3 B DIMM1B 2 B DIMM2B 4 Interleave...

Page 60: ... slot outward to release the DIMM 2 Hold the DIMM by its edges then gently pull it upward to remove it 6 Store the removed memory module inside an anti static bag 7 If you intend to install a new memory module proceed to the next section for related procedure otherwise observe the post installation instructions described on page 26 Dual channel 512 MB 512 MB 1 GB 1 GB 1 GB 2 GB 2 GB 2 GB 4 GB 512 ...

Page 61: ...ress the module at both ends until the retaining clips snap into place If you insert a module but it does not fit easily into the slot you have inserted it incorrectly Reverse the orientation of the module and insert it again 2 Make sure to firmly press the retaining clips inward to lock the module in place If the holding clips do not close the module is not properly inserted 6 Observe the post in...

Page 62: ... slots To install an expansion card 1 Perform the pre installation instructions described on page 26 2 If necessary remove any cables that prevent access to the expansion slots 3 Locate an empty expansion slot that is compatible with the specification of the card you intend to install 4 Install the expansion card 1 Pull the card bracket latch slightly upward 2 Detach the card bracket latch from th...

Page 63: ...per system cooling 5 Remove the expansion card from its protective packaging handling it by the edges 6 Install the new expansion card 1 Insert the card into the selected slot Make sure that the card is properly seated 2 Insert the lower end of the card bracket latch to its chassis notch 3 Secure the card bracket latch tab to the chassis ...

Page 64: ...to the expansion card as required 8 Observe the post installation instructions described on page 26 When you turn on the system the BIOS setup automatically detects and assigns resources to the new device applicable only to Plug and Play expansion cards ...

Page 65: ...r Discard used batteries according to manufacturer s instructions Lithiumbatteri Eksplosionsfare ved fejlagtig håndtering Udskiftning må kun ske med batteri af samme fabrikat og type Levér det brugte batteri tilbage til leverandøren Lithiumbatteri Eksplosjonsfare Ved utskifting benyttes kun batteri som anbefalt av apparatfabrikanten Brukt batteri returneres apparatleverandøren Explosionsfara vid f...

Page 66: ...ving the CMOS battery will clear the contents of the CMOS RAM Prior to battery replacement use the Save as User Default Values option of the Setup Exit menu to save the current configuration settings 1 Use your thumb to pry the retainer tab from the battery 2 Pull the battery out of its socket 5 Dispose the used CMOS battery according to the manufacturer s instructions or according to the local or...

Page 67: ...sor socket 2 Make sure the retainer tab secures the battery in place 8 Observe the post installation instructions described on page 26 9 Run the BIOS setup utility 10 Under the Exit menu you can either load the system default configuration settings or you can restore the customized user values you ve save in step 4 ...

Page 68: ...3 System upgrade 50 ...

Page 69: ...4SystemBIOS ...

Page 70: ...This chapter gives information about the system BIOS and discusses how to configure the system by changing the settings of the BIOS parameters ...

Page 71: ...y receive Run Setup messages the battery may be bad In this case the system cannot retain configuration values in the CMOS RAM Ask a qualified technician for assistance BIOS setup loads the configuration values in a battery backed nonvolatile memory called CMOS RAM This memory area is not part of the system RAM which allows configuration data to be retained when power is turned off Before you run ...

Page 72: ...OS setup menus Left frame Displays the menu fields Grayed out fields are display only items Blue fields are user configurable When a field is selected it is highlighted in white Right frame Displays the key legend navigation keys Above the key legend is an area reserved for a text description of the currently selected field BIOS setup navigation keys The BIOS setup utility uses a key based navigat...

Page 73: ...ary menu screens the Exit menu displays On a submenu screen the previous screen displays When you are making selections from a pop up menu closes the pop up without making a selection F1 Display the BIOS setup General Help panel F9 Press to load the default system values F10 Save the changes made and close the utility Note When other hot keys become available they are displayed at the bottom of th...

Page 74: ...Error Manager Exit Parameter Description Option Logged in as The kind of account used to logged into the system BIOS Version Firmware version loaded on the hardware platform BIOS Build Date Date when the firmware loaded on the hardware platform was compiled Quiet Boot Select whether to display the Acer logo screen Enabled or the BIOS POST messages Disabled during boot up Enabled Disabled ...

Page 75: ... the related submenu screen POST Error Pause Select whether to wait for user intervention Enabled or proceed with boot up Disabled when possible if a critical POST error is detected during boot up Enabled Disabled System Date Set the system date following the weekday month day year format System Time Set the system time following the hour minute second format Parameter Description Option ...

Page 76: ...t fields corresponding to particular processor details e g architecture revision model number Intel EM64T EM64T enables the system to perform 64 bit computing that leads to optimum graphic performance and faster data processing speed Enhanced Speed Step Select whether to enable the Enhanced Intel SpeedStep Technology EIST function EIST allows the system to dynamically adjust processor voltage and ...

Page 77: ...ualization Technology Select whether to enable the Intel Virtualization Technology function VT allows a single platform to run multiple operating systems in independent partitions Enabled Disabled Note Before enabling any of the Intel processor technologies mentioned in this section ensure that your system OS supports it Refer to your system OS user documentation for more information Parameter Des...

Page 78: ...t the onboard PATA controller Enabled Disabled Onboard SATA Controller Select whether to enable the system to detect the onboard SATA controller Enabled Disabled SATA Mode Select whether to set SATA devices to Legacy or Enhanced mode Legacy Enhanced Config SATA as RAID Select whether to enable RAID for SATA devices When enabled the SATA RAID OPROM field is displayed Enabled Disabled SATA RAID OPRO...

Page 79: ...he slave port of the primary IDE channel SATA Port 0 1 2 3 Display the drive name and capacity of the hard drives connected to the SATA ports Parameter Description Option COM1 Enable Select whether to enable the serial port Enabled Disabled Address Set the base I O address of the serial port 3F8 2F8 IRQ Set the IRQ line of the serial port 4 3 Parameter Description Option ...

Page 80: ...ds in a legacy OS like DOS When set to Enabled any attached USB mouse keyboard can be used in DOS or during system boot up When set to Disabled any attached USB mouse keyboard will not be supported in DOS or during system boot up Enabled Disabled Port 60 64 Emulation Select whether to enable the I O port 60 64h emulation support When set to Enabled complete USB legacy keyboard support for non USB ...

Page 81: ...63 PCI Parameter Description Option Intel 82573E GbE Select whether to enable the onboard Intel 10 100 1000 82573E Gigabit Ethernet Controller chipset Enabled Disabled ...

Page 82: ...shutdown When set to Power Off the system remains off after a power failure When set to Power On the system will be turned on after a power failure Last State Power Off Power On Wake On LAN from S5 Defines the power state to resume to after a PCI Power Management wake up event network signals is detected and the system is in a power off state When set to Power On the system will be turned on When ...

Page 83: ...65 Boot Configuration Parameter Description Option NumLock Select the Num Lock key behavior during system boot up On Off ...

Page 84: ... Monitor screen which displays a real time record of the system temperature fan speed and voltage The following screen is a sample hardware monitor log Auto Fan Control Select whether to enable Auto Fan Control In this mode the system fan speed is automatically adjusted based on the current system temperature Enabled Disabled ...

Page 85: ...Description Option Admin Password This field indicates whether an administrator password has been assigned Not Installed Installed User Password This field indicates whether a user password has been assigned Not Installed Installed Admin Password Press Enter to configure the admin password User Password Press Enter to configure the user password ...

Page 86: ...rict a user s access to the Setup menus To enable or disable this field an admin password must first be set A user can only access and modify the System Time System Date and User Password fields To set a system password 1 Use the up down keys to select a password parameter then press Enter A password box will appear 2 Type a password then press Enter The password may consist of up to seven alphanu...

Page 87: ...try then press Enter again 4 Press F10 5 Select Yes to save the new password and close the Setup utility To change a system password 1 Use the up down keys to select a password parameter then press Enter 2 Type the original password then press Enter ...

Page 88: ...stem BIOS 70 3 Type a new password then press Enter 4 Retype the password to verify the first entry then press Enter again 5 Press F10 6 Select Yes to save the modified password and close the Setup utility ...

Page 89: ... the new and confirm password fields 4 After doing this the system automatically sets the related password parameter to Not Installed To reset a lost password If you forget the administrator password you need to clear the contents of the CMOS RAM where the system passwords are stored After clearing CMOS reset the BIOS settings to regain access to the Setup utility For instructions go to page 80 ...

Page 90: ...e Memory Correction field in the Advanced Memory submenu be set to Enabled Enabled Disabled Event Log Area Status Displays the capacity status allotted for the DMI event log O S Boot WD Timer Select whether to enable the OS boot watchdog timer When set to Enabled the watchdog timer will trigger the system to automatically reset if the OS boot up fails Enabled Disabled ASF Support Select whether to...

Page 91: ... to enable the Preboot Execution Environment PXE remote system boot up Enabled Disabled View Event Log Press Enter to view the system event log SEL The following screen shows a sample SEL screen Console Redirection Displays the current console redirection settings Press Enter to access the related submenu System Information Displays basic system ID information Press Enter to access the related sub...

Page 92: ...direction enables users to manage the system from a remote location Enabled Disabled Flow Control Assign control for the console redirection flow None RTS CTS Baud Rate Select the baud rate for console redirection 9 6K 19 2K 38 4K 57 6K 115 2K Terminal Type Select a terminal type to be used for console redirection PC ANSI VT100 VT100 VT UTF8 ...

Page 93: ...s screen are non configurable Boot Options menu The Boot Options menu allows you to set the boot time out value and drive priority during system boot up By default the server searches for boot devices in the following order 1 Optical disc drive 2 Floppy disk drive 3 Hard disk drive 4 EFI Extensible Firmware Interface shell ...

Page 94: ...boots up Note Setting the Boot Timeout to 65535 will disable the boot timer 10 Boot Option 1 4 Set the boot device options to determine the sequence in which the server checks which device to boot from Select a boot order item then use the keys to select the particular drive for that boot position ODD FDD HDD EFI shell ...

Page 95: ...s an error it either displays an error message or emits a beeping sounds For more information on POST beep codes go to page 94 In instances of a non critical POST failure an error message describing the problem appears onscreen These text messages are displayed in normal video white text on black background It shows the error details and sometimes even a possible action to resolve the error These ...

Page 96: ... settings can take effect Keyboard hot key F10 Discard Changes and Exit Select this option to quit Setup without making any permanent changes to the system configuration Save Changes Saves changes made in the BIOS setup Discard Changes Discards all changes made in the BIOS setup Keyboard hot key F5 Restore Defaults If the system fails after implementing new configuration settings reboot the server...

Page 97: ...erform a BIOS upgrade you have the option to reload these preferred Setup values without having to manually enter them again Note Make sure to select this option whenever you make any change to the Setup settings or install new hardware to keep the user default values updated Restore User Default Values Select this option to reload the customized user default values Parameter Description ...

Page 98: ... clear the CMOS RAM using the mainboard jumper 1 Perform the pre installation instructions described on page 26 2 Remove the side panel from the chassis following the instructions on page 27 3 Locate the Clear CMOS jumper on the mainboard If necessary remove any cables that prevent access to the jumper 4 Move the jumper from the default position at pins 1 and 2 to the Clear CMOS position covering ...

Page 99: ...Exit menu to save the current configuration settings After upgrading the BIOS you have the option to reload these settings without having to manually enter them again by selecting the Restore User Default Values option To obtain the BIOS upgrade utility Download the BIOS image file to a temporary folder on your hard drive or to a USB flash device Important Review the instructions and release notes...

Page 100: ...the BIOS code and damage the system 1 Follow the instructions in the readme file that came with the BIOS upgrade utility 2 When the update is completed remove the bootable media from which you performed the upgrade then reboot the server If you encounter a CMOS checksum error or other problem after reboot shut down the system and boot it again CMOS checksum errors require that you enter Setup chec...

Page 101: ...5 System troubleshooting ...

Page 102: ...This chapter provides possible solutions for specific problems If you cannot correct the problem contact your local Acer representative or authorized dealer for assistance ...

Page 103: ... drivers and storage drivers Resetting the system Before going through in depth troubleshooting attempt first to reset the system using one of the methods below Perform Purpose To do this Soft boot reset To clear the system memory and reload the operating system Press Ctrl Alt Del Cold boot reset To clear the system memory restart POST and reload the operating system This will halt power to all pe...

Page 104: ...t occur at initial system startup are usually caused by an incorrect installation or configuration Hardware failure is a less possible cause If the problem you are experiencing is with a specific application see the There is problem with the software program item on page 92 ...

Page 105: ... properly formatted and configured Are the BIOS configuration settings correct Is the operating system properly loaded Refer to the operating system documentation Are all hardware components compliant with the tested components lists Are all internal cables correctly connected and secured Is the processor fully seated in its mainboard socket Are all standoffs in the proper location and not touchin...

Page 106: ... and the monitor 3 Make sure the system power cord is plugged into a properly grounded AC outlet and in the power cable socket 4 Make sure both the monitor and the keyboard are correctly connected to the system 5 Turn on the monitor 6 Set the display brightness and contrast controls to at least two thirds of their maximum range Refer the documentation that came with your monitor 7 If the operating...

Page 107: ...rive s DVD ROM drive floppy drive and any other 5 25 inch device you may have installed If any of these indicators fail to light up refer to the related problems listed in the Component troubleshooting section Confirming loading of the operating system Once the system boots up the operating system prompt appears on the screen The prompt varies according to the operating system If the operating sys...

Page 108: ...t up green Remove all add in cards and see if the system boots up If reboot is successful install the cards back in one at a time with a reboot between each addition to determine if one of them is causing the problem Make sure that you have correctly installed system compliant memory modules and that the system DIMM population guidelines were observed Make sure that you have installed a system com...

Page 109: ...Insert the tip of a paperclip into the small hole on the DVD drive Slowly pull the tray out from the drive until the tray is fully extended DVD drive cannot read a disc Do the following Make sure you are using the correct type of disc Make sure the disc is properly seated in the drive Make sure the disc is free from scratches or any contaminant Make sure the drive s IDE and power cables are proper...

Page 110: ...ce connected to a USB port does not work Do the following Reduce the number of external devices connected to a USB hub Refer to the documentation that came with the device There is problem with the software program Do the following Verify that the software is properly configured for the system Refer to the software installation and operation documentation for instructions on setting up and using t...

Page 111: ...oblem Make sure that you have correctly installed system compliant memory modules and that the system DIMM population guidelines were observed Make sure that you have installed a system compliant processor If you are using an add in video controller card do the following 1 Verify that the monitor works using the onboard video controller 2 Verify that the add in video controller card is fully seate...

Page 112: ... 9 11 Fatal error indicating a possible serious system problem Remove all add in cards and reboot the system If the error still occurs contact your local Acer representative for assistance If the beep codes are not generated after the add in cards are removed insert the cards one at a time booting the system between each card addition until the beeps occur again to reveal the malfunctioning card 8...

Page 113: ...Appendix A Intel Active Management Technology ...

Page 114: ...This appendix gives an overview of Intel Active Management Technology as well as instructions for the initial IAMT BIOS configuration ...

Page 115: ...increased IT efficiency with fewer deskside visits Remote hardware asset tracking for increased speed and accuracy with reduced accounting costs compared to manual tracking Intel AMT functions System administrators can use a web browser 5 to perform basic management tasks The web server built into each Intel AMT system enables one to View the system status View the hardware installed in the system...

Page 116: ...ame Right click My Computer then click Properties Computer Name TCP IP settings Open the Control Panel select Network Connections then right click the network connection Click Properties TCP IP Properties Enabling the IAMT BIOS Extension menu 1 Turn on the server and the monitor 2 During POST press F2 to access the BIOS Setup Utility 3 Select the Server Management menu 4 Change the setting of the ...

Page 117: ...y used when provisioning Intel AMT in an Enterprise environment Do not adjust these options unless instructed to do so by your Enterprise mode software vendor 1 In the Administrator password prompt type the default password admin password is case sensitive then press Enter 2 Select Change Password to change the administrator password ...

Page 118: ...ter one lower case character one number and a special character for example Also you should use a unique password for each provisioned Intel AMT system to prevent someone from possibly obtaining a master password and compromising the security of the entire network 4 Select Host Name 5 Type in the new host name for the system If you want IAMT to use DHCP to configure the client use the same name as...

Page 119: ...u must enter the following TCP IP settings IP address This address must be unique for your network it is different from the IP address configured under the client OS Subnet mask Default gateway address optional Preferred DNS address optional Alternate DNS address optional Domain name optional ...

Page 120: ...en press Enter 8 Set the field to Small Business 9 Select VLAN then press Enter 10 Enable or disable the VLAN support as necessary This setting must match the OS adapter configuration 11 Press Esc to close the BIOS Extension The system will continue to the load the operating system ...

Page 121: ...Appendix B SATA RAID configuration ...

Page 122: ...This appendix explains how to use the SATA RAID configuration utilities for creating a RAID volume in SATA drives ...

Page 123: ... user documentation that came with your OS pack Onboard Intel SATA RAID configuration This section briefly shows how to create a RAID 1 mirror volume using the onboard Intel SATA RAID function Enabling the onboard Intel SATA RAID function 1 Turn on the server and the monitor 2 During POST press F2 to access the BIOS Setup Utility 3 Select the Advanced IDE Controller submenu 4 Change the setting of...

Page 124: ...r the Main Menu then press Enter 2 Specify a name for the new RAID volume then press Enter 3 Use the Up and Down arrow keys to select RAID 1 Mirror then press Enter 4 Use the space bar to select the drives that you want to add to the array then press Enter This step is only applicable for systems with more than two hard drives installed 5 Press Enter to accept the RAID 1 volume capacity 6 Press En...

Page 125: ...d to LSI 6 Press F10 and select Yes to save the new SATA RAID settings and close the Setup Utility Entering the onboard LSI RAID Configuration Utility During POST press Ctrl E in the Intel Embedded Server RAID Technology information screen Loading the onboard LSI SATA RAID default setting 1 In the onboard LSI RAID Configuration Utility select Objects from the Management menu 2 Select Adapter from ...

Page 126: ...t the array then press F10 to configure the logical drive 7 Accept the default RAID level RAID1 then press Enter to return to the array selection window 8 Press Enter to end the array configuration 9 Select YES to save the configuration then press any key to return to the Configuration menu Initializing the RAID volume 1 Press Esc to return to the Management menu 2 Select Initialize from the Manag...

Page 127: ...Appendix C SAS RAID configuration ...

Page 128: ...This appendix explains how to use the SAS configuration utility for creating a RAID volume in SAS SATA drives ...

Page 129: ...ed SCSI SAS BIOS prompt Creating the RAID 1 volume 1 In the Adaptec SAS SATA Configuration Utility select Array Configuration Utility from Options 2 Select Create Array from the Array Configuration Utility s Main menu 3 Press the arrow keys to choose the specific physical drives then press the space bar to associate the selected drive with the current array The selected drives will be added to the...

Page 130: ...Appendix C SAS RAID configuration 112 ...

Page 131: ...eys 54 Security menu 67 Server Management menu 72 user interface 54 boot up sequence 75 C chassis intrusion connector 10 CMOS battery location 10 overview 47 replace 48 replacement warnings 47 CMOS RAM clear 80 overview 53 console redirection 74 D DVD ROM drive remove 29 troubleshooting 91 E easy swap HDD cable connections 32 install 34 remove 32 electrostatic discharge see ESD pre cautions 25 Err...

Page 132: ...ocation 8 specifications 4 troubleshooting 92 LED indicators front panel 13 HDD carrier 14 LAN port 14 M mechanical specifications chassis 6 mainboard 6 media storage controller 4 specification 5 upgrade option 5 memory BIOS settings 59 configuration guidelines 40 install 43 population order 41 remove 42 troubleshooting 91 monitor port 8 O ODD see optical disc drive 7 operating system support 6 op...

Page 133: ... processor 3 server management 6 system cooling 5 video controller 4 system boards backplane board 11 mainboard 10 system event log clear 72 enable 72 view 73 system fan auto fan control 66 cable connector 10 location 9 system jumpers BIOS recovery 12 clear CMOS 11 12 NIC1 NVM protect mode 12 system passwords admin password 68 change 69 remove 71 reset 71 set 68 user password 68 system profile vie...

Page 134: ...roblem 91 network problems 92 POST beep codes 94 power indicator problem 90 software program problem 92 system reset 85 USB device problems 92 U USB ports BIOS settings 62 front 7 rear 8 troubleshooting 92 user password 68 W Wake on LAN 64 WOL see Wake on LAN 64 ...

Reviews: