background image

Video Driver Controls

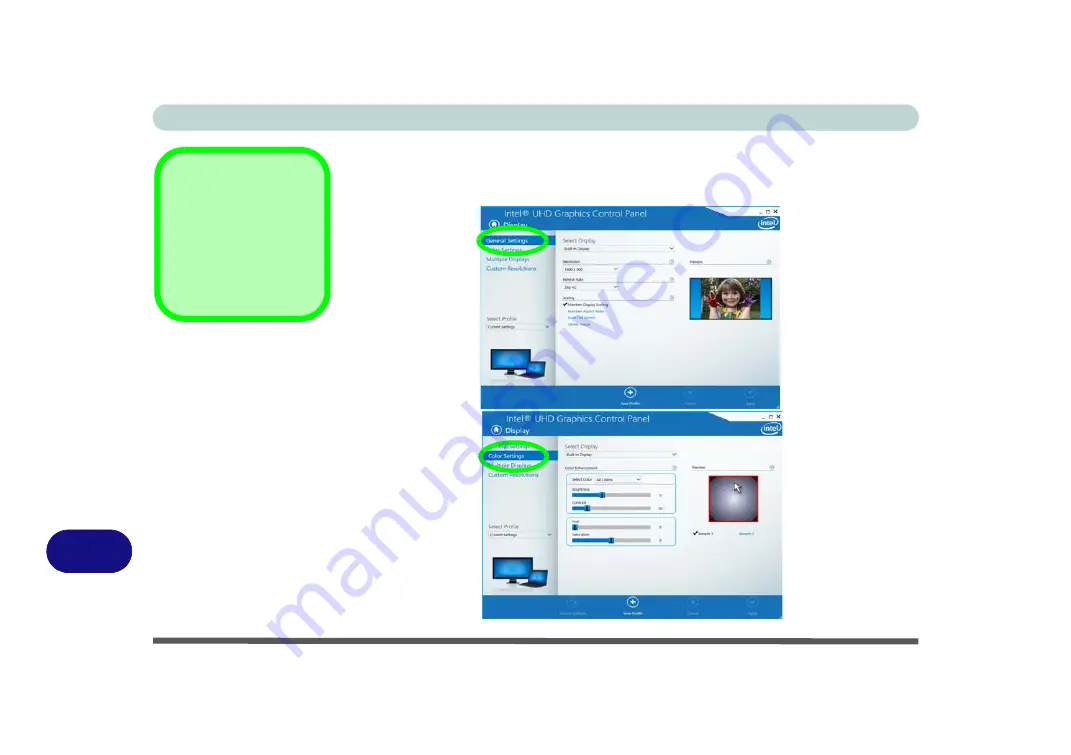
C - 12 Intel® HD/UHD Graphics Control Panel

C

Display

Click either 

General Settings

 or 

Color Settings

 to make display adjustments, in-

cluding configuration for any attached external displays.

Multiple Display 

At  least  one  other  dis-

play must be attached in

order  to  view  multiple

display


selection  op-

tions.

Figure C - 10

Intel® HD/UHD 

Graphics 

Control Panel - 

Display

Summary of Contents for MUSTANG W640SR

Page 1: ...User Manual MUSTANG W640SR NOTEBOOK...

Page 2: ......

Page 3: ...tion This publication and any accompanying software may not in whole or in part be reproduced translated trans mitted or reduced to any machine readable form without prior consent from the vendor manu...

Page 4: ...uirements and other relevant provisions of the R TTE Direc tive 1999 5 EC ErP Off Mode Power Consumption Statement The figures below note the power consumption of this computer in compliance with Euro...

Page 5: ...wed to sell his product in the European market This product conforms to the essential requirements of the R TTE directive 1999 5 EC in order to attain CE Marking A notified body has determined that th...

Page 6: ...communications However there is no guarantee that interference will not occur in a particular installation If this equipment does cause harmful interference to radio or television reception which can...

Page 7: ...forth for an uncontrolled environment This equipment should be installed and operated with a minimum distance of 20 centimeters between the radiator and your body Warning Use only shielded cables to...

Page 8: ...pe during an electrical storm There may be a remote risk of electrical shock from lightning 3 Do not use the telephone to report a gas leak in the vicinity of the leak 4 Use only the power cord and ba...

Page 9: ...nd of heating ele ment This is an electrical appliance If water or any other liquid gets into it the computer could be badly dam aged Do not expose the computer to any shock or vibration Do not place...

Page 10: ...and don t forget to save your work Remember to periodically save your data as data may be lost if the battery is depleted 5 Take care when using peripheral devices Do not turn off the power until you...

Page 11: ...r has been dropped or damaged do not touch the poisonous liquid if the LCD panel breaks If there is an unusual odor heat or smoke coming from your computer Bottom Cover Removal Warning Do not remove a...

Page 12: ...er cord be sure to disconnect it by the plug head not by its wire Make sure the socket and any extension cord s you use can support the total current load of all the connected devices Before cleaning...

Page 13: ...n or swelling however this is part of the battery s safety mechanism and is not a cause for concern Use proper handling procedures when using Polymer Lithium Ion batteries Do not use Polymer Lithium I...

Page 14: ...tative or qual ified service personnel Keep children away from and promptly dispose of a damaged battery Always dispose of batteries carefully Batteries may explode or leak if exposed to fire or impro...

Page 15: ...e computer models in this series come supplied with a light blue cleaning cloth To clean the computer case with this cloth follow the instructions below 1 Power off the computer and peripherals 2 Disc...

Page 16: ...pters 6 Put the notebook in its carrying bag and secure it with the bag s straps 7 If you re taking any peripherals e g a printer mouse or digital camera pack them and those devices adapters and or ca...

Page 17: ...ata Pass your computer and disks around the devices Ask security officials to hand inspect them you may be asked to turn it on Note Some airports also scan luggage with these devices Fly safely Most a...

Page 18: ...rms wrists and hands in a relaxed position Your knees should be slightly higher than your hips Place your feet flat on the floor or on a footrest if necessary Use a chair with a back and adjust it to...

Page 19: ...ake the following precautions Set the Windows Power Plans to turn the screen off after a few minutes of screen idle time Use a rotating moving or blank screen saver this prevents an image from being d...

Page 20: ...XVIII Preface...

Page 21: ...s Computer s Optical Device is a Laser Class 1 Product VI Instructions for Care and Operation VII Servicing IX Power Safety X Polymer Lithium Ion Battery Precautions XI General Battery Precautions XII...

Page 22: ...System Map LCD Panel Open 1 6 LED Indicators 1 7 Keyboard 1 8 Illuminated LED Keyboard 1 9 Keyboard Shortcuts 1 10 Function Hot Key Indicators 1 11 Control Center 1 12 System Map Front Docked Views 1...

Page 23: ...askbar 1 28 Action Center 1 29 Video Features 1 30 Power Options 1 34 Features Components Overview 2 1 Hard Disk Drive Solid State Drive 2 2 Optical CD DVD Device 2 3 Loading Discs 2 3 Handling CDs or...

Page 24: ...2 21 Realtek Audio Console Device Advanced Settings 2 22 Power Management Overview 3 1 The Power Sources 3 2 AC DC Adapter 3 2 Battery 3 2 Turning On the Computer 3 3 Shutting the Computer Down 3 4 P...

Page 25: ...C Adapter 3 19 Proper handling of the Battery Pack 3 20 Battery FAQ 3 21 Removing the Battery 3 24 Inserting the Battery 3 25 Drivers Utilities What to Install 4 1 Module Driver Installation 4 1 Drive...

Page 26: ...8 Optional Drivers 4 10 BIOS Utilities Overview 5 1 The Insyde BIOS Utility 5 2 UEFI Boot 5 3 Insyde BIOS Start Screen 5 4 Insyde BIOS Start Screen Options 5 5 Boot Manager 5 6 Boot From File File Ex...

Page 27: ...Wireless LAN Module 6 9 Intel WLAN Driver Installation 6 9 WLAN Configuration in Windows 6 10 Fingerprint Reader Module 6 13 Fingerprint Reader Driver Installation 6 14 Fingerprint Module Configurati...

Page 28: ...torage Technology for Optane Systems 6 28 Enabling Intel Optane 6 29 Disabling Intel Optane 6 33 Intel vPro Technology 6 37 Accessing the Intel Management Engine 6 37 PC Camera Module 6 40 Camera App...

Page 29: ...Ports and Jacks A 2 Control Center Overview B 1 Video Driver Controls Video Driver Installation C 1 Dynamic Video Memory Technology C 1 Configure Other Displays Using Project C 2 You can configure at...

Page 30: ...ay D 2 Memory D 2 Storage D 2 Audio D 2 Keyboard Pointing Device D 2 Interface D 2 Card Reader D 2 Slot D 3 Communication D 3 Power D 3 Security D 3 Design Features D 3 Operating System D 3 BIOS D 3 P...

Page 31: ...ing the Computer to the Docking Station E 7 Cold Undocking the Computer from the Docking Station E 10 Hot Docking the Computer to the Docking Station E 11 Hot Undocking the Computer from the Docking S...

Page 32: ...XXX Preface Power E 24 Security E 24 LED Indicators E 24 Environmental Spec E 24 Dimensions Weight E 24...

Page 33: ...ities essential to the operation or improvement of some of the computer s subsystems Chapter 5 An outline of the computer s built in software or BIOS Basic Input Output System Chapter 6 A quick guide...

Page 34: ...ocumentation more detailed descriptions of the functions setup and system controls are covered in the remainder of the User s Manual but do not worry if you do not understand every thing the first tim...

Page 35: ...as an interface between the com puter and a hardware component e g a wireless network module It is very important that you install the drivers in the order listed You will be unable to use most advan...

Page 36: ...nd leave it there for 6 seconds or longer Remove the adapter cord from the computer s DC In jack and then plug it back in again the battery will now be unlocked 4 Use one hand to raise the lid LCD to...

Page 37: ...s not the case or where you are re configuring your computer for a different system you will find the Windows 10 64 bit operating system is supported Windows OS Note that the information included on t...

Page 38: ...e Touchpad and Buttons valid operational area is that indicated within the red dotted lines above 7 2 6 1 9 5 Wireless Device Operation Aboard Aircraft The use of any portable electronic transmission...

Page 39: ...Number Lock is Activated Blinking White The Computer is in Sleep Mode White Caps Lock is Activated Orange The Battery is Charging White Scroll Lock is Activated White The Battery is Fully Charged Note...

Page 40: ...e it automatically Howev er special functions hot keys unique to the system s regular key board may not work NumLk ScrLk Hold down the Fn Key and either NumLk or ScrLk to enable num ber or scroll lock...

Page 41: ...ny standard USB keyboard The system will detect and enable it auto matically However spe cial functions hot keys unique to the system s regular keyboard may not work Scr Lk Hold down the Fn Key and Sc...

Page 42: ...skbar Notification Area C Launch Cortana in listening mode D Toggle the Desktop E Launch File Explorer Quick Access tab Number 1 2 etc Launch an application from the taskbar numbered from left to righ...

Page 43: ...e Mode Toggle Fn Turn LCD Backlight Off Press a key to or use TouchPad to turn on Fn Sleep Toggle Fn Mute Toggle Fn NumLk Number Lock Toggle Fn Backlight Keyboard Level Adjust Illuminated Keyboard Des...

Page 44: ...ntrol Center on off The Con trol Center gives quick access to frequently used controls and enables you to quickly turn the camera touch pad on off see Appendix B for full details Figure 1 5 Control Ce...

Page 45: ...tion see the accom panying docking station for full details of the docking procedure 2 1 2 2 Docking Port Cover Make sure you keep the docking cover closed when the computer is not docked in the sta t...

Page 46: ...ormats MMC MultiMedia Card RS MMC SD Secure Digital Mini SD SDHC SDXC Powered USB 3 0 Port The powered USB 3 0 port can supply power for charging devices only not for operating de vices when the syste...

Page 47: ...nderbolt Device Name 3 When you see the Safe to Remove Hardware message you can remove the cable after about 20 seconds to make sure that it is safe to eject the device Thunderbolt Port Security Level...

Page 48: ...2 3 4 5 6 7 USB 3 0 Port OR USB 2 0 Port This model includes 1 USB 2 0 port Type A 2 USB 3 0 USB 3 1 Gen 1 port Type A ports and 1 USB 3 0 USB 3 1 Gen 2 port Type C port The USB ports and Smart Card R...

Page 49: ...Don t try to remove a floppy disk CD DVD while the system is accessing it This may cause the system to crash Changing DVD Regional Codes Go to the Control Panel and double click Device Man ager Hardwa...

Page 50: ...further information 2 1 4 3 CPU The CPU is not a user serviceable part Overheating To prevent your comput er from overheating make sure nothing blocks the Vent Fan In take while the computer is in use...

Page 51: ...the computer and turn it over and then remove the battery slide latch in the direction indicated below then slide hold latch in place and slide the battery out in the direction of arrow 2 Insert the...

Page 52: ...s to lock the battery Figure 1 11 Battery Insertion 1 2 3 1 2 3 3 1 2 6 Cell Battery 9 Cell Battery Replacement batteries are available from Ace Computers and can be found at the following website htt...

Page 53: ...ctor on the docking station 1 Turn the computer over 2 Slide the docking port cover latch in the direction of the arrow at point to open the cover 3 After disconnecting the computer from the docking s...

Page 54: ...skbar in the lower left corner of the screen or by pressing the Windows Logo Key on the keyboard Figure 1 13 Windows Start Menu Desktop Windows Screens Note that the Win dows screens on the following...

Page 55: ...enu icon or use the Windows Logo Key X key combination to bring up an advanced Context Menu of useful features such as Apps and Features Power Options Task Manager Search File Explorer Device Manager...

Page 56: ...pps and many more will be installed as you add more applications etc Not all of these apps can fit on the screen so may need click and drag the handles at the edge of the screen to expand the menu in...

Page 57: ...rograms to the Start Menu Right Click on a program s icon and select Pin to Start from the drop down menu To remove an app or program from the Start Menu right click the icon and select Unpin from Sta...

Page 58: ...en the Control Panel The Control Panel can be accessed in a number of ways in Windows 10 Figure 1 17 Windows 10 Control Panel Access Select Control Panel under the Windows System item in the Start Men...

Page 59: ...Start Menu and also as an App gives you quick access to a number of system settings control panels allowing you to adjust settings for System Devices Network internet Personalization Apps Accounts Ti...

Page 60: ...the taskbar in the bottom right of the screen Some of the Control Panels and appli cations referred to throughout the course of this manual can be accessed from here Figure 1 19 Taskbar You can pin un...

Page 61: ...enter appears as a vertical panel on the right side of the screen when you swipe in from the right or click the button in the notification tray This gives you access to commonly needed functions like...

Page 62: ...displays from the Project menu press the Windows logo key on your keyboard and the P key or Fn F7 To Configure Displays using Project Figure 1 21 Project Devices 1 Attach your display to the appropri...

Page 63: ...ettings 2 Adjust the settings for Brightness and color Scale and layout Resolution and Orientation from the menus 3 When and external display is attached you can arrange the display configuration from...

Page 64: ...Graphics Control Panel 1 Right click the desktop and select Intel R Graphics Settings from the menu OR 2 Click the icon in the notification area of the Desktop taskbar and select Intel R Graphics Set...

Page 65: ...ttings 1 Windows 10 has minimum screen resolution requirements 2 Right click a blank area of the Desktop and select Display Settings 3 Adjust the Resolution to make sure that it is at least 1024 768 a...

Page 66: ...or Restart you can also add Hibernate Sleep to the menu see page 1 35 To fully control all the power options including Hibernate mode go to the Power Options control panel and configure the power butt...

Page 67: ...e a password Task Manager and Switch User If you click the Power icon in the lower right corner of the screen a power management option menu appears to display Sleep Hibernate Shut down and Restart Ad...

Page 68: ...Quick Start Guide 1 36 1...

Page 69: ...res and components of the computer Hard Disk Drive Solid State Drive Optical CD DVD Device Multi In 1 Card Reader Smart Card Reader Touchpad and Buttons Mouse Realtek Audio Console External Optical CD...

Page 70: ...m see Storage on page D 2 If you need to replace remove the hard disk or Solid State Drive please contact your distributor supplier for further information Bottom Cover Removal Warning Do not remove a...

Page 71: ...isc tray with label side facing up use just enough force for the disc to click onto the tray s spindle Gently push the CD DVD tray in until its lock clicks and you are ready to start The busy indicato...

Page 72: ...her materials to the surface of the disc Do not store or place the CD or DVD in high temperature areas Do not use benzene thinner or other cleaners to clean the CD or DVD Do not bend the CD or DVD Do...

Page 73: ...DVD Region Note DVD region detection is device dependent not OS dependent You can select your module s re gion code 5 times The fifth selection is perma nent This cannot be al tered even if you chang...

Page 74: ...hard disk s Make sure you install the card reader driver see CardReader on page 4 7 Note Some of these cards require PC adapters that are usually supplied with the cards Push Push Card Reader The car...

Page 75: ...the card The card is usually used to store authentication data e g a user name and password The computer s Smart Card reader communicates through the gold contact on the card to the microprocessor and...

Page 76: ...n the middle Press the left button zone for a left click and right button zone for a right click ac tion Touchpad Cleaning In order to improve pad performance it is neces sary to keep the surface clea...

Page 77: ...Windows as fol lows 1 Select Control Panel under the Windows System item in the Start Menu see page 1 26 or click Additional mouse options from Mouse in Windows Settings see page 2 12 2 Click Mouse Ha...

Page 78: ...Features Components 2 10 Mouse Properties Control Panel 2 Figure 2 8 Mouse Properties Control Panels...

Page 79: ...nfigure the functions from the Mouse or Touchpad control panels in De vices in the Settings control panel as follows 1 Click the Settings item in the Start Menu or All Settings in the Action Center 2...

Page 80: ...omponents 2 12 Mouse Touchpad Devices 2 Mouse Settings You can select the primary mouse button and scrolling options and access Mouse Properties from Additional mouse options Figure 2 10 Windows Setti...

Page 81: ...ng the Touchpad button to turn it off You can set the system to automatically disable the internal Touchpad when an ex ternal USB point device e g a USB mouse is attached Click Leave touchpad on when...

Page 82: ...d by ac cident by recognizing when your palm is resting on it or brushing its surface while you are typing Click in the check box to enable disable the different gestures or taps on the surface of the...

Page 83: ...separated on the Touchpad surface and slide both fingers in the direction required in a straight con tinuous motion The two finger pinch to zoom gesture can be used to perform the same function as a s...

Page 84: ...The three finger and four finger swipes and taps can be configured for a number of different functions Select the appropriate function from the drop down menu Figure 2 15 Three Finger Gestures Swipes...

Page 85: ...nts Mouse Touchpad Devices 2 17 2 The following is an overview of some of the main gestures you can use with your Touchpad however these can be configured from the Touchpad menus Figure 2 17 Touchpad...

Page 86: ...u Make sure you have installed the driver and checked the Microsoft Store for updates see Audio on page 4 8 The volume may also be adjusted by means of the volume icon in the taskbar or the audio slid...

Page 87: ...2 Realtek Audio Console Main You can adjust the Speaker and Microphone levels by using the sliders in the Re altek Audio Console Main window HD Audio HD Audio parameters can be set in the BIOS see pa...

Page 88: ...Features Components 2 20 Realtek Audio Console 2 Realtek Audio Console Speakers Click Speakers to access controls for the format and speaker balance etc Figure 2 20 Realtek Audio Console Speakers...

Page 89: ...Realtek Audio Console Microphone Click Microphone to access advanced controls for recording on the microphone Adjust the recording Main Volume level to around 60 to obtain the optimum re cording qual...

Page 90: ...dvanced Settings For the purposes of re cording it is recommend ed that you enable Separate all input jacks as independent input devices in De vice advanced settings This will help prevent a situation...

Page 91: ...wer saving techniques to give the operating system OS direct control over the power and thermal states of devices and processors For example this enables the OS to set devices into low power states ba...

Page 92: ...adapter and leave it there for 6 seconds or longer Remove the adapter cord from the computer s DC In jack and then plug it back in again the bat tery will now be unlocked 2 Raise the lid LCD to a comf...

Page 93: ...ton when it is pressed for less than 4 seconds pressing and holding the power button for longer than this will shut the computer down Use Power Options Hardware and Sound in the Windows control panel...

Page 94: ...hard disk or system problems Use the Power item in the Start Menu and select Shut down If you want to add Hibernate Sleep to the Power Menu see Adding Hibernate Sleep to the Power Menu on page 3 10 Y...

Page 95: ...f after a specified time and to send the computer into Sleep after a period of inactivity Click Change plan settings and then click Change advanced power settings to ac cess further configuration opti...

Page 96: ...power Choose High performance you may need to click Create a power plan to select the High performance plan for maximum performance when the computer is pow ered from an AC power source Choose the Po...

Page 97: ...you last left off what was on your desktop without reopening the application s and file s you last used If your mobile PC in Sleep is running on battery power the system will use only a minimum amount...

Page 98: ...rn you to where you last left off within seconds You should put your mobile PC into Hibernate if you will not use the computer for a period of time and will not have the chance to charge the battery T...

Page 99: ...Power Buttons The power sleep button Fn F12 key combo and closed lid may be set to send the computer in to a power saving state Click Choose what the power buttons do on the left menu in Power Option...

Page 100: ...1 Go to the Power Options Hardware and Sound control panel 2 Click Change settings that are currently unavailable 3 Click Choose what the power buttons do 4 Click to put a check in the Hibernate Slee...

Page 101: ...F12 Key Combo Hibernate Off battery Press the Power Button Orange AC DC adapter Display Turned Off White Press a Key or Move the Mouse Touchpad Table 3 1 Resuming Operation Closing the Lid If you hav...

Page 102: ...tch User Sign out Change a password and Task Manager options If you click the Power icon in the lower right corner of the screen a power management option menu ap pears to display Sleep Shut down and...

Page 103: ...r Controls The Settings item in the Start Menu or via the Action Center gives you access to a number of power settings control panels which enable you to quickly adjust power options Click System to a...

Page 104: ...evel and by clicking Battery usage by app you can see the current state of battery usage by application etc The Battery saver can be level can be adjusted to be turned on if the battery level falls be...

Page 105: ...tings Menu Power Controls 3 15 3 Power Sleep Power sleep gives you quick access to Screen and Sleep settings Click Addi tional power settings to go to the main power options control panel Figure 3 10...

Page 106: ...ery levels from power plan Change plan settings Change advanced power settings see Figure 3 3 on page 3 6 Click the battery icon in the notification area to see the current battery level and charge st...

Page 107: ...Slightly Favors Performance Over Power Favors Performance Over Power Windows Features Throttled Screen Brightness Reduced Default Position Auto Enabled at 20 of Battery Capacity Battery Saver Note th...

Page 108: ...it is not powered by the AC DC adapter Reduce the amount of time before the display is turned off Close wireless Bluetooth modem or communication applications when they are not being used Disconnect r...

Page 109: ...hen fully charge a new battery see Battery FAQ on page 3 21 for instructions on how to do this Recharging the Battery with the AC DC Adapter The battery pack automatically recharges when the AC DC ada...

Page 110: ...Discard used battery according to the manufacturer s in structions Damaged Battery Warning Should you notice any physical defects e g the battery is bent out of shape after being dropped or any unusua...

Page 111: ...indicates the battery is critically low just let the computer use up all of the battery power and shut down on its own 1 Save and close all files and applications 2 Create a power plan for dischargin...

Page 112: ...battery options 5 Choose the options below click Yes if a warning appears Low battery levels 0 Critical battery Levels 1 Low battery action Do Nothing Critical battery action On battery Shut Down Crit...

Page 113: ...arge the battery When charging the battery don t stop until the LED charging indicator light changes from orange to green How do I maintain the battery Completely discharge and charge the battery at l...

Page 114: ...Slide the latch in the direction of the arrow and hold it in place 4 Slide the battery out in the direction of the arrow Bottom Cover Removal Warning Do not remove any cov er s and or screw s for the...

Page 115: ...y 1 Turn the computer off and turn it over 2 Slide the battery into the compartment in the direction of the arrow 3 Slide the latches and in the direction of the arrows to lock the battery Figure 3 16...

Page 116: ...Power Management 3 26 3...

Page 117: ...on of the computer Table 4 1 on page 4 4 lists what you need to install and it is very important that the drivers are installed by the method outlined in this chapter and in the order indicated Note t...

Page 118: ...Device Drivers Utilities User s Manual disc into the DVD drive 2 Click the message Tap to choose what happens with this disc 3 Click Run autorun exe 4 Click Install Drivers button or Option Drivers bu...

Page 119: ...nstalled in this order which is the same as that listed in the Drivers Installer menu below 6 Click to select the driver you wish to install you should note down the drivers as you install them 7 Foll...

Page 120: ...Page 6 3 Video VGA Page 4 7 Wireless LAN Module Page 6 9 LAN Page 4 7 Fingerprint Reader Module Page 6 13 CardReader Page 4 7 Bluetooth Combo Module Page 6 17 Touchpad Page 4 7 Thunderbolt Port Driver...

Page 121: ...drivers it may be necessary to uninstall the original driver To do this go to the Control Panel in the Windows OS and double click the Programs icon Programs Unin stall a program Click to select the...

Page 122: ...s New Hardware Found If you see the message New Hardware Found dur ing the installation procedure other than when out lined in the driver install procedure click Cancel to close the window and follow...

Page 123: ...lug in a network cable and click OK to continue installation If a net work cable is not available restart the system and re install the LAN driver 1 Click 3 Install LAN Driver Yes 2 Click OK to comple...

Page 124: ...will pop up 9 To prioritize the Realtek audio driver you can click Pause all to pause the download queue 10 Click on Realtek Audio Control and click on the resume icon to download the driver 11 When...

Page 125: ...latest hotfixes from Microsoft To enable Windows Update make sure you are con nected to the internet 1 Go to the Control Panel 2 Click Windows Update System and Security Security 3 Click Check for up...

Page 126: ...ges indicated in Table 4 1 on page 4 4 for the driver installation procedures for any modules in cluded in your purchase option Figure 4 3 Option Drivers Note that you need to install both the WLAN Bl...

Page 127: ...n could be useful if your system ever needs servicing There is one general rule Don t make any changes unless you are sure of what you are doing Many of the settings are required by the system and cha...

Page 128: ...ating system Once that starts you can t get into BIOS without rebooting The Setup BIOS Utility tells the system how to configure itself by translating in structions from the operating system and other...

Page 129: ...will not appear However you can still press F2 to enter the setup or F7 to choose the preferred boot device if you press the key immediately the system boots up To enter BIOS turn on the computer and...

Page 130: ...with the Start Screen with 5 menu icons date and time information CPU temperature information and navigation and Help icons at the bottom of the screen You can use the Touchpad an attached mouse or th...

Page 131: ...t From File Press Enter here or click Boot From File to select a file or device to Boot from Administer Secure Boot Press Enter here or click Administer Secure Boot to proceed with a Secure Boot proce...

Page 132: ...in the order specified in the Boot Option Menu Press Enter to access the menu use the arrow keys to move up and down the menu and press Enter to select a device Figure 5 2 Boot Manager BIOS Screens N...

Page 133: ...om File File Explorer If you need to boot from a file e g on a USB flash drive then access this menu and use the cursor keys to select the device or file you can press Enter to explore for a file on a...

Page 134: ...events unauthorized operating systems and software from loading during the startup process You can select a trusted UEFI file to execute the BIOS make sure that you Enforce Secure Boot Erase all Secur...

Page 135: ...y Management database if required by accessing the advanced secure boot options for Platform Key PK Options Key Ex change Key KEK Options Allowed Signatures Database DB Options and For bidden Signatur...

Page 136: ...es 5 10 Setup Utility Main Menu 5 Setup Utility Main Menu SATA Port Main Menu Pressing Enter opens the sub menu to show the configuration of a optical Device HDD on the computer s SATA Ports Figure 5...

Page 137: ...an change the date and time settings in your operating system you will also change these settings Some applications may also alter data files to reflect these changes System Extended Memory Main Menu...

Page 138: ...dvanced Menu Advanced Chipset Control Advanced Menu The sub menu here allows you to enable disable Intel R Speed Shift Technology VT d UEFI OS Fast Boot Intel Software Guard Extensions and to configur...

Page 139: ...ogy Advanced Menu Advanced Chipset Control Use this menu item to enable disable Intel Speed Shift Technology You will also need to install the driver for Intel Speed Shift Technology see Intel Speed S...

Page 140: ...ons allowing user level code a degree of security and privacy from the operating system Make sure that SW Guard Ex tensions is Enabled here and then install the driver see Intel Software Guard Extensi...

Page 141: ...t the SATA Mode to Intel RST Premium With Intel Optane System Acceleration for Intel Optane or to AHCI see IRST Driver Installation on page 6 22 If you wish to change your SATA mode to from AHCI Intel...

Page 142: ...to connect If the unique ID is not located then you will be asked to confirm the connection The connection manager will request approval from the host and auto approval may be given based on the uniq...

Page 143: ...ccess to the computer OS only the BIOS An on screen keyboard is available to assist with keyboard input Security Menu The changes you make here affect the access to the BIOS utility itself and also ac...

Page 144: ...menu items in the BIOS cannot be modified in user mode Note You can only set the user password after you have set the supervisor pass word Power on Password Security Menu Specify whether or not a pas...

Page 145: ...e TPM support and to configure the TPM State Select TPM Configuration and press En ter to access the sub menu Press Enter to access the Security Device Support menu and select Enable to support TPM To...

Page 146: ...which to boot under EFI Figure 5 12 Boot Menu EFI BIOS Screens Note that the BIOS screens pictured on these pages are intend ed for guidance in set ting up your system s BIOS BIOS versions are sub jec...

Page 147: ...ides a clean in terface between operating systems and platform firmware at boot time In contrast to BIOS UEFI defines a set of standard boot and runtime services The Network Stack item can be enabled...

Page 148: ...ing Exit Discarding Changes will wipe out any changes you have made to the Setup and exit the BIOS You can also choose to Load Optimal Defaults or press F9 to return the BIOS to its original state and...

Page 149: ...e vices aboard aircraft is usu ally prohibited Make sure the module s are OFF if you are using the computer aboard aircraft Driver Installation Module Power Make sure any modules e g WLAN PC Camera 4G...

Page 150: ...an tenna must not be co located or operate in conjunction with any other antenna or transmitter Important Notice 4G Bluetooth Wireless LAN Modules In order to comply with FCC regulations you should N...

Page 151: ...executables frequently accessed data and system page files to an non volatile low latency Intel Optane SSD Contact your distributor or supplier to see if your system supports this technology Intel Ra...

Page 152: ...1 Start up your notebook computer and press F2 to enter the BIOS 2 Go to the Boot menu select UEFI Setting and press Enter see page 5 15 3 Set UEFI Boot to Enabled 4 Press Esc to exit the menu and go...

Page 153: ...Mode 8 Select Save and Exit 9 As the computer restarts press F2 to enter the BIOS again 10 Go to the Advanced menu and you will now see the Intel R Rapid Storage Technology Advanced menu item You can...

Page 154: ...Options 6 6 Setting Up SATA Mode Optane or AHCI 6 Note this item only appears after you have restarted and accessed the BIOS again after having set SATA Mode to RAID Figure 6 3 Inte R Rapid Storage Te...

Page 155: ...reate a partition for Windows 19 It is very important to make sure that when you create the partition to leave at least a minimum of unallocated space of 5MB see sidebar 20 Follow the on screen instru...

Page 156: ...Optane or AHCI 6 23 After installing the Intel Rapid Storage Technology application you can access Device Manager right click the Start menu and select Device Manager 24 Click Disk drives to check th...

Page 157: ...system is not in Airplane Mode and then insert the Device Drivers Utilities User s Manual disc into an attached DVD drive 2 Click Option Drivers button 3 Click 1 Install WLAN Driver Yes 4 Click in the...

Page 158: ...LAN module is turned on and not in Airplane Mode before configuration begins 1 Click the Wireless icon in the notification area of the taskbar 2 Make sure that Airplane mode is off the Airplane mode i...

Page 159: ...nt it will display Connected status 8 Select any connected network and click Disconnect to disconnect from a connected access point Figure 6 6 Network Connected Click Disconnect Wireless Device Operat...

Page 160: ...lane Mode or turn the WLAN module off aboard aircraft 11 Network Internet in Windows Settings will bring up a more comprehensive list of network and internet settings including Wi Fi can be turned on...

Page 161: ...int modules supplied with this model Install the driver from the Device Drivers Utilities User s Manual disc by following the appropriate instructions on the page overleaf The fingerprint reader modul...

Page 162: ...plane Mode and then insert the Device Drivers Utilities User s Manual disc into the DVD drive 2 Click Option Drivers 3 Click 2 Install Fingerprint Driver Yes 4 Click Next Install 5 Click Finish to res...

Page 163: ...dd a PIN 4 Under Windows Hello click Set up under Fingerprint 5 The wizard will then guide you through the set up process to scan your fingerprints PIN Code You will be asked to add a PIN code when se...

Page 164: ...recommended or Remove the current fingerprint reading 10 You can now scan your fingerprint to log on to the computer Figure 6 9 Rest Lift Your Finger Fingerprint Sign In Issues If at the Windows Hello...

Page 165: ...t The use of any portable electronic transmission devices aboard aircraft is usually prohibited Make sure the WLAN Bluetooth module s are OFF if you are using the computer aboard aircraft Use Airplane...

Page 166: ...rs Utilities User s Manual disc into an attached DVD drive 2 Click Option Drivers button 3 Click 3 Install Combo BT Driver Yes 4 Click Next 5 Click in the check box to accept the license and click Nex...

Page 167: ...r click the Bluetooth icon in the taskbar and click Add a Bluetooth Device 2 Click Bluetooth other devices and make sure Bluetooth is On 3 Click Add Bluetooth or other device Bluetooth Add a device an...

Page 168: ...Combo Module 6 4 Double click the device you want to pair with the computer and click Connect if the PIN matches that on the device to which you wish to connect you may need to click paid on the devic...

Page 169: ...Modules Options Bluetooth Combo Module 6 21 6 5 Select a device and click Remove Device to disconnect from any device click Yes to confirm Figure 6 13 Bluetooth Remove Device...

Page 170: ...ettings 2 Click Bluetooth other devices and click More Bluetooth options 3 In Bluetooth Settings make sure that Allow Bluetooth devices to find this PC check box Discovery has a check inside it 4 Make...

Page 171: ...device e g a USB flash drive into the combo port see Figure 1 13 on page 1 22 You may then install the driver as below 1 Insert the Device Drivers Utilities User s Manual disc into an attached DVD dri...

Page 172: ...Thunderbolt Device Name 3 When you see the Safe to Remove Hardware message you can remove the cable after about 20 seconds to make sure that it is safe to eject the device Thunderbolt Port Security Le...

Page 173: ...er Installation Make sure you have enabled Software Guard Extensions from Advanced Chipset Control in the Advanced Menu in the BIOS before installing the driver see SW Guard Extensions SGX Advanced Me...

Page 174: ...abled disabled in the BIOS see Intel R Speed Shift Technology Advanced Menu Advanced Chipset Control on page 5 13 Speed Shift Technology Driver Installation 1 Insert the Device Drivers Utilities User...

Page 175: ...p from the Apps screen See the following pages for more information if you have set your system for Intel Optane see page 6 28 configuration After setting the SATA mode to Intel Optane and installing...

Page 176: ...launched the system will open the Status window Here you can view the general health of the storage system Various volume creation and management options are available depending on the system s statu...

Page 177: ...the Intel Rapid Storage Technology application 2 Click Enable 3 The system will pop up a message and ask you to select a compatible fast drive in this case there should only be one option Figure 6 16...

Page 178: ...ed by the powered AC DC adapter and not by battery only 5 Click Yes to begin the process this may take some time 6 You can click the Intel Optane Memory tab in the IRST control panel and click Reboot...

Page 179: ...orage Technology 6 31 6 7 After restarting can access Device Manager right click the Start menu and select Device Manager 8 Click Disk drives to check that the drive should read Intel Optane Figure 6...

Page 180: ...Modules Options 6 32 Intel Rapid Storage Technology 6 9 Run the Intel Rapid Storage Technology application to check the status Figure 6 20 IRST Intel Optane Memory Enabled...

Page 181: ...hese instructions 1 Run the Intel Rapid Storage Technology application 2 Click Disable 3 Click Yes when the message pops up Disabling Intel Optane Disable Intel Optane if you want to reinstall reset t...

Page 182: ...ndow 7 To enable Intel Optane Memory follow the process indicated in Enabling Intel Optane on page 6 29 HDDs Intel Optane SSDs Note that if your sys tem s HDD or Intel Op tane SSD is to be transferred...

Page 183: ...book computer and press F2 to enter the BIOS 9 Go to the Advanced menu and you will now see the Intel R Rapid Storage Technology Advanced menu item You can and press Enter to check the information 10...

Page 184: ...ta 13 Click on Are you sure you want to disable and select Yes 14 Select Save and Exit 15 If you re enable Optane in the Intel Rapid Storage Technology control panel then it will also be re enabled in...

Page 185: ...ll need to assist you in managing the information as applicable to your enterprise Note the following password information for the Intel Management En gine The default password is admin without quotes...

Page 186: ...en to the platform configuration screen The platform configuration screen allows you to setup Intel ME as per your require ments consult your IT administrator for the actual settings required Access t...

Page 187: ...Modules Options Intel vPro Technology 6 39 6 Figure 6 28 Intel Management and Security Status Help Click Learn More to and then click For more infor mation refer to the user guide...

Page 188: ...the LED indicator to the left of the camera will be illuminated see Figure 1 2 on page 1 6 Note that you need to use the Camera app in Windows to take pictures and capture video Use the Fn F10 key com...

Page 189: ...camera into the search box to find the Camera app 3 The interface displays two buttons on the right of the screen one for photo and one for video 4 Simply click on the appropriate button to switch to...

Page 190: ...id to help you line up pictures Time lapse can be set to keep taking photos until the camera but ton is pressed again The Video recording resolution and frame rate can be set to any supported by the s...

Page 191: ...Modules Options PC Camera Module 6 43 6 7 With the Pro menu expanded you can access the Exposure compensation button to adjust the brightness Figure 6 32 Camera Brightness Adjustment...

Page 192: ...on the Camera app icon you can type camera into the search box to find the Camera app 3 Click to select either photo or video modes 4 Click the photo icon to take a picture 5 Click on the video icon t...

Page 193: ...to the Photos app stored in the Start menu type Photos into the search box if you cannot find the app You can also access the photos from the Camera roll icon at the bottom right of the Camera app scr...

Page 194: ...ations and therefore requires implementation by a sys tem administrator before users can access security features Make sure you have administrator s rights to your computer and have a Windows password...

Page 195: ...ct the Security menu 4 Click TPM Configuration and select Enable for Security Device Support 5 You will then need to save the changes and restart the computer Clearing TPM Information You can click Cl...

Page 196: ...TPM Management in Windows You can manage your TPM settings from within Windows 1 Go to the Control Panel 2 Click BitLocker Drive Encryption System and Security 3 Click TPM Administration Figure 6 36...

Page 197: ...you to configure the TPM within Windows As TPM is usually administered within large enterprises and organizations your system administrator will need to assist you in managing the information here Fi...

Page 198: ...ly require a restart of the computer and confirmation of the setting changes after restart by pressing the appropriate F key 2 After the restart the TPM will be prepared and you can then use the Actio...

Page 199: ...he disk Access the Microsoft BitLocker Drive Encryption control panel applet from the Windows control panel System and Security 1 Click Turn on Bit Locker 2 Follow the on screen instructions to setup...

Page 200: ...ibited Make sure the 3G 4G WLAN Blue tooth module s are OFF if you are using the computer aboard aircraft Use Air plane Mode hot key to tog gle Airplane Mode On Off and check the LED indica tor for th...

Page 201: ...ar of the battery compartment as illustrated below until it clicks fully into position and then replace the battery see over Power Safety Warning Before you undertake any installation procedures make...

Page 202: ...o eject it however do not do this while a connec tion is in progress If you do eject the card while a 3G 4G connection is ongoing you will need to shut down the system rein sert the USIM card restart...

Page 203: ...t to a 4G connection in much the same way as the WLAN connection except you use the Cellular menu 1 Click the Wireless icon in the notification area of the taskbar and click on the Wi Fi icon in order...

Page 204: ...s per any internet connection 6 Click Disconnect to drop the connection to the cellular network 7 You will need to turn your Wi Fi on again after disconnecting Power Saving States Cellular Connections...

Page 205: ...Modules Options 3G 4G Module 6 57 6 8 Cellular in Network Internet in Windows Settings will allow you to access some further cellular settings Figure 6 45 Network Internet Settings Cellular...

Page 206: ...Modules Options 6 58 3G 4G Module 6 9 Click Advanced options to access more detailed menu options Figure 6 46 Cellular Advanced Options...

Page 207: ...es make sure you have followed the instructions carefully and observed the safety precautions in the preface If all else fails talk to your service representative You should also make a record of what...

Page 208: ...atus Connections Check all the cables to make sure that there are no loose connections anywhere Power Savings Make sure that the system is not in Hibernate or Sleep mode by pressing the keys config ur...

Page 209: ...to run at times when you are not using your computer You can use those that are provided free with your OS or buy the more powerful dedicated programs to do so Write down your passwords and keep them...

Page 210: ...w Viruses are often triggered from within e mail attachments so take care when opening any attached file You can configure most Anti Virus pro grams to check all e mail attachments Note You should als...

Page 211: ...looking at the computer s manual but what about any new peripheral devices you have just purchased Many problems are caused by the installation of new hardware and or software Always refer to the doc...

Page 212: ...ings The less you have to deal with then the easier the source of the problem may be found Example if your computer has many devices plugged into its ports and a number of programs running then it wil...

Page 213: ...mmediately turn it off then on again You are losing battery power too quickly The system is using too much power If your OS has a Power Options scheme see Power Plans on page 3 5 check its settings Yo...

Page 214: ...LAN is supported in AC mode only When the system enters a power saving state the plugged in AC DC adapter should be connected and should remain connected in order to allow the system to wake up on net...

Page 215: ...The CD DVD is not correctly placed in the tray Gently try to remove the disc using the eject hole see Loading Discs on page 2 3 The DVD regional codes can no longer be changed The code has been change...

Page 216: ...he features you prefer see Power Saving States on page 3 7 Make sure you have enabled Hibernate mode from the control panel The Wireless LAN or Bluetooth modules cannot be detected The modules are off...

Page 217: ...copy a file from the device to your computer until the file transfer process from the computer has been completed The Bluetooth module is off after resuming from Sleep The Bluetooth module s default...

Page 218: ...charge USB compliant devices but is not designed to allow their operation I have changed or replaced a WLAN module and have received an error message See Intel Rapid Storage Technology on page 6 27 Wh...

Page 219: ...Ports Jacks A 1 A Appendix A Interface Ports Jacks Overview The following chapter will give a quick description of the interface ports jacks which allow your computer to communicate with external devi...

Page 220: ...the latest digital storage cards Push the card into the slot and it will appear as a removable device MMC MultiMedia Card RSMMC SD Secure Digital Mini SD SDHC SDXC DC In Jack Plug the supplied AC DC a...

Page 221: ...the LAN port Security Lock Slot To prevent possible theft a Kensington type lock can be attached to this slot Locks can be purchased at any computer store Smart Card Reader The Smart Card reader read...

Page 222: ...pe A ports on this computer model USB 3 1 Gen 2 ports are capable of 10Gbps SuperSpeed This model includes 1 Type C Gen 2 port The Type C USB 3 1 Gen 2 port is the smaller black port there is a factor...

Page 223: ...icking the icon in the Start screen Desktop app or notification area of the taskbar The display configuration for the Thunderbolt ports and Mini Display Ports can be set up in the BIOS see DDI Control...

Page 224: ...Interface Ports Jacks A 6 A...

Page 225: ...controls and settings Click the Control Center icons to toggle the appro priate function or hold the mouse button down and move the dial control where applicable Figure B 1 Control Center Control Cen...

Page 226: ...contains 2 menu headings Basic Setting Extra Setting The Extra Setting tab al lows you to adjust the app skin color to your choice A third menu item LED Device is available for systems supporting ill...

Page 227: ...ll affect Airplane Mode and PC camera power Figure B 3 Power Modes In Power Saving Mode the Airplane Mode will be ON and the PC Camera will be turned OFF In Quiet Mode the Airplane Mode will be ON In...

Page 228: ...button under the icon will appear highlighted when it is enabled Note that the power status of the camera module is also effected by the Power Mode selected see Power Modes on page B 3 Docking If you...

Page 229: ...ches to the power saving mode and will need to click OK to con firm Volume The Volume icon will show the current volume level You can use the dial to adjust the Volume or the Fn F5 F6 key combinations...

Page 230: ...KB Brightness Enable and then select the amount of time the system for which the system is idle before the keyboard LED en ters sleep mode i e the LED keyboard illumination will turn off to save power...

Page 231: ...the video driver go to the Display Display Settings control panel to adjust the video settings to the highest resolution Dynamic Video Memory Technology Intel DVMT automatically and dynamically alloca...

Page 232: ...your display to the appropriate port and turn it on 2 Press the P key combination 3 Click on any one of the options from the menu to select PC screen only Duplicate Extend or Second screen only 4 You...

Page 233: ...dis plays 1 Attach your external display to the appropriate port and turn it on 2 Click the Start Menu and click Settings System or right click the desktop and select Display Settings 3 Click the Mul...

Page 234: ...re the HDMI audio output as per the instructions below 1 Go to the Sound control panel 2 Click Playback tab 3 The playback device will be selected 4 You may need to select the audio device and click S...

Page 235: ...Video Driver Controls HDMI Audio Configuration C 5 C 6 Adjust the HDMI settings from the control panel tabs 7 Click OK to close the Sound control panel Figure C 4 HDMI Device Properties...

Page 236: ...deo Configuration 1 Connect an HDMI cable from the HDMI Out port to your external display 2 Configure your external display as per the instructions in Attaching Other Displays on page C 21 3 Set up yo...

Page 237: ...ss the P key combination 3 Click Connect to a wireless display at the bottom of the Project screen and follow the steps to connect to any wireless enabled display 4 The system will then search for com...

Page 238: ...ct for specific settings for your display see the documentation supplied with your compatible adapter display for full details 8 Go to the Project menu and click Disconnect to temporarily disconnect f...

Page 239: ...HD Con trol Panel To access the control panel see below and overleaf 1 Right click the Desktop and select Intel R Graphics Settings from the menu OR 2 Click the icon in the notification area of the De...

Page 240: ...ideo Driver Controls C 10 Intel HD UHD Graphics Control Panel C OR 3 Double click the Intel R HD UHD Graphics control panel in the Windows Control Panel Figure C 8 Control Panel Intel Graphics Setting...

Page 241: ...ay make changes to any of the graphics properties by clicking the appropriate menu panel and adjusting the settings from the menus Home Click the Home button to return to the main menu screen in any o...

Page 242: ...ral Settings or Color Settings to make display adjustments in cluding configuration for any attached external displays Multiple Display At least one other dis play must be attached in order to view mu...

Page 243: ...y mode of any attached dis plays see Attaching Other Displays on page C 21 Click Apply to save any changes made Multiple Display At least one other dis play must be attached in order to view multiple...

Page 244: ...ay or any at tached display to any width height refresh rate color depth and underscan percent age of your choice Note that incorrect settings can cause system instability and even possible component...

Page 245: ...nce gives the smoothest motion of images Quality displays the most detail Balanced Mode provides better computer performance with good quality and Custom allows you to configure the Anisotropic Filter...

Page 246: ...s Control Panel C Options and Support Hot Key Manager in Options and Support allows you to create hot keys for open ing the application and scaling etc Click Apply to save changes Figure C 14 Intel HD...

Page 247: ...n the Built In Display and any attached displays Preferences Go to the Preferences sub menu in Options to configure the preferences for the Intel HD UHD Graphics Control Panel Make sure you click En a...

Page 248: ...witch to vivid col ors The Preview image will display a sample image using the current settings You can Save Profile and name the Profile to recall the settings at any time Click Apply to save changes...

Page 249: ...op of the screen to display the sub menus The Image Enhancement menu allows you to adjust the Sharpness Skin Tone Enhance ment Noise Reduction Contrast Enhancement and Film Mode Detection Click Apply...

Page 250: ...same view and may be configured independently Extended Extend Both connected displays are treated as separate devices and act as a virtual desktop Collage A number of connected displays are combined i...

Page 251: ...ntrol Panel control panel and click Display Multiple Displays sub menu 3 Click Clone from the Select Display Mode menu 4 Click Apply and OK to confirm the settings change 5 Select the displays from th...

Page 252: ...ngs change Display Settings Extended Desktop You can have different Colors Screen Area and Monitor Refresh Rates for each display device provided your monitor can support them You can drag the moni to...

Page 253: ...lay Multiple Displays sub menu 3 Click Collage from the Select Multiple Display Mode menu 4 Click Enable Collage and click On 5 Click Vertical or Horizontal to arrange and displays as required 6 Click...

Page 254: ...Video Driver Controls C 24 C...

Page 255: ...dule Check with your distributor supplier for details Note that this computer model series may support a range of CPUs and or video adapters To find out which CPU is installed on your system go to the...

Page 256: ...e Gen 3 4 Interface Factory Option Dummy ODD Factory Option Audio High Definition Audio Interface S PDIF Digital Output S PDIF Built In Array Microphone 2 Built In 2W Speakers Keyboard Pointing Device...

Page 257: ...ndard Built In 6 Cell Smart Lithium Ion Battery Pack 62WH Standard Battery Security Security Kensington Type Lock Slot BIOS Password Area Fingerprint Reader Module Trusted Platform Module 2 0 Intel PT...

Page 258: ...e Environmental Spec Temperature Operating 5 C 35 C Non Operating 20 80 Relative Humidity Operating 20 C 60 C Non Operating 10 90 Dimensions Weight 382mm w 259 5 mm d 32 95 mm h 2 5kg Barebone System...

Page 259: ...USB devices with a full range of extra USB ports audio devices and provides a battery charging facility Compatibility Note that this docking station is compatible with particular computer models with...

Page 260: ...n s AC DC adapter plugged in to the DC In jack at the rear of the docking station make sure the computer s AC DC adapter is not used at any time when the computer is docked Follow the instructions on...

Page 261: ...key if a Hard Disk is installed in the Device Bay 3 Lock Switch 4 Notebook Eject Latch 5 Notebook Placeholder 6 Retaining Pins 7 Docking Connector 8 Eject Pins 2 1 7 8 3 5 8 Backup Hotkey The Backup h...

Page 262: ...32 Serial COM Port 7 RJ 45 LAN Jack 8 DC In Jack 9 Headphone Jack 10 Microphone Jack 11 S PDIF Out Jack 12 USB 2 0 Ports 1 3 11 12 2 4 5 9 6 7 10 LAN Jack Docking Note that when the computer is docked...

Page 263: ...tch LED Indicator Table E 1 Power Button LED Lock Switch LED Indicator To confirm the computer s power status check the LED Power Indicators on the computer itself Icon Color Description Orange DC Pow...

Page 264: ...m Map Left Right Views 1 Bay with HDD or Dummy Caddy 2 Powered USB 3 0 Port 3 USB 3 0 Ports 1 2 3 3 USB Port Power Note that power to the notebook computer and docking station s USB ports may be enabl...

Page 265: ...rface 2 Securely attach any peripherals you want to use with the docking station e g keyboard and mouse to their ports 3 Attach the AC DC adapter to the DC In jack at the rear of the docking station a...

Page 266: ...ry before attempting to dock the computer with the docking station 7 Slide the notebook computer s docking port cover latch in the direction of the arrow at point to open the cover failure to open the...

Page 267: ...sition 12 Press the power button on the docking station or power button on the notebook to turn it on 13 The Power LED on the docking station will be green and you can then use the docking station por...

Page 268: ...tion will be orange 2 Slide the lock switch on the docking station in to the unlock position 3 Lift the eject latch fully in the direction indicated to unlock the docking station while carefully holdi...

Page 269: ...face 2 Securely attach any peripherals you want to use with the docking station e g keyboard and mouse to their ports 3 Attach the AC DC adapter to the DC In jack at the rear of the docking station an...

Page 270: ...ttery you cannot hot dock the computer with the docking station 7 Slide the notebook computer s docking port cover latch in the direction of the arrow at point to open the cover failure to open the co...

Page 271: ...he lock position 11 The Power LED on the docking station will be green and you can then use the docking station ports Figure E 10 Slide the Lock Switch 3 3 Moving the Docking Station Note that if the...

Page 272: ...skbar the docking power LED will be Orange at this point and the ports buttons and attached devices on the docking station will not work 3 Follow steps 2 to 5 of the cold undocking procedure on page E...

Page 273: ...Go to the click Power Options Hardware and Sound control panel 2 Click Choose what closing the lid does in the left pane 3 Set the When I close the lid option when the computer is plugged in to Do not...

Page 274: ...n interface for data transfer through which information transfers in or out one bit at a time This port can be used to connect the computer to devices such as terminals and peripherals This port is su...

Page 275: ...digital streams This allows you to connect an external monitor TV or Flat Panel Display etc as a display device by means of a HDMI cable Note that HDMI carries both audio and video signals You can us...

Page 276: ...e g ADSL modems usually connect to the LAN port Note that when the system is docked the notebook s LAN Jack can no longer be used and you must use the docking station s LAN jack as the network jack on...

Page 277: ...S PDIF Sony Philips Digital Interface Format Out Port allows you to connect your DVD capable PC to a Dolby AC 3 compatible receiver for 5 1 or dts surround sound Item Description Note Docking Station...

Page 278: ...vice The USB 3 0 ports are denoted by their blue color USB 2 0 ports are colored black USB 3 0 will transfer data much faster than USB 2 0 and is backwards compatible with USB 2 0 Note The powered USB...

Page 279: ...An external display attached to the docking station s DVI D port 6 An external display attached to the docking station s HDMI port BIOS Controls USB ports Card Reader Smart Card ExpressCard Note that...

Page 280: ...overleaf application If you do not have a hard disk installed in the docking station you can set the Windows File History application to backup to any attached hard disk CD DVD or non system partitio...

Page 281: ...ess the hard disk backup hotkey 2 This will run the Windows Recovery control panel 3 You can then choose to backup individual files and folders or alternatively create a System Image Backup see your W...

Page 282: ...Jack One S PDIF Out Jack One RJ 45 LAN Jack One RS232 Serial COM Port One Docking Port Hot Plug One DC In Jack Buttons Switches Power Button Notebook Eject Latch Docking Lock Switch HDD Backup Hotkey...

Reviews: