background image

Cutter Balance: "Dialing in" your cutter

Raster™ Braille cutters are precision-
machined to very close tolerances and are 
tested for accuracy before leaving the factory. 
But sometimes a little fine-tuning is needed to 
make a cutter work as it should.

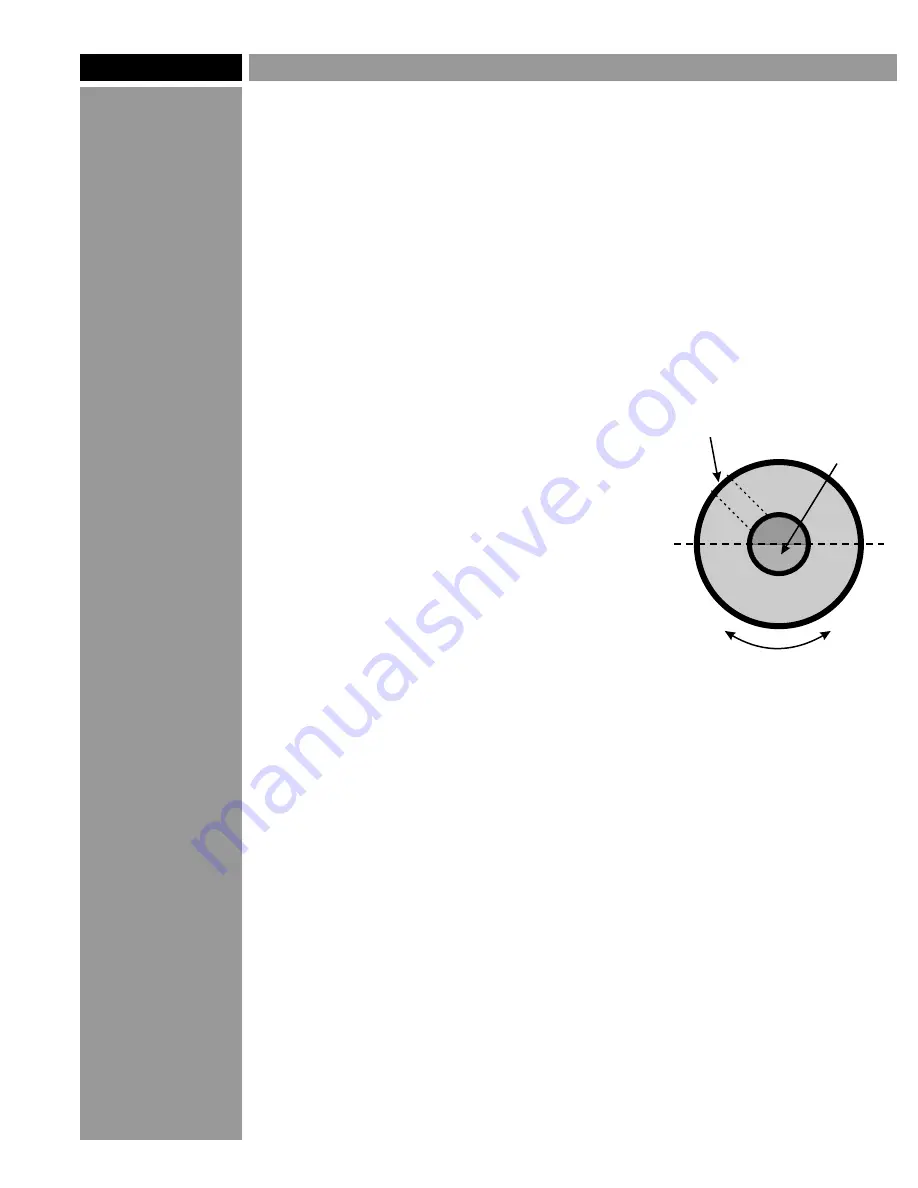
Balance is very important to a cutter's 
performance. If  the balance is off, a cutter 
can drill holes that are much too large.  You 
can change the balance of  a cutter by 
changing its orientation in the spindle.

Loosen the setscrew and turn the cutter 180 
degrees, then retighten the screw. This will 
change the orientation of  the cutter's "flat" 
side in relation to the brass knob and the 
spindle itself. Now try drilling again and check 
the holes. If  it still isn't right, rotate it 90 
degrees and try again.

Be careful not to lose track of  your "0" point 
on the micrometer during this procedure.

There is no one correct position

, so try a 

few different positions until the cutter drills 
the proper size holes. You can tell by the 
sound it makes: as the cutter gets closer to 
being in balance, it runs quieter.

You can also try adjusting the spindle speed, 
on materials where the speed isn't critical 
(most engraving plastics fall into this 
category). A particular cutter may run 
smoother and work better at a lower or higher 
speed than normal.

Page 7

©2005 Accent Signage Systems, Inc. All rights reserved.

TM

Raster  Method of Braille

"flat" side 
of cutter tip

Location of 
setscrew

Top View
of Cutter

Rotate the cutter

within the knob

to change the

orientation

Brass
knob

Summary of Contents for Raster Braille

Page 1: ...TM Raster Method of Braille Getting Started Guide 2322 chestnut ave west minneapolis MN 55405 phone 612 377 9156 fax 612 377 6747 www accentsignage com TM Raster Pen...

Page 2: ...machined spheres of acrylic stainless steel or brass and the Raster Pen a simple to use mechanical device for inserting the Rasters into the sign How It Works It s simple Translate text to Braille dri...

Page 3: ...s is 0 042 Turn the spindle micrometer up one full turn plus 17 tick marks 5 For metal substrates or any time the adhesive assist method is used the depth should be 0 002 0 003 deeper to allow for the...

Page 4: ...s down You should feel the Raster pop into place Don t use any more force than necessary excess force can crack the Rasters damage the sign or cause a jam in the Pen s mechanism NOTE Proper grip and h...

Page 5: ...pop into place without much force If too much force is needed or if the Rasters won t stay in the holes drill the holes a little deeper and try again 5 Check the height of the installed Rasters with...

Page 6: ...r fingernail Remove the backing to expose the adhesive 4 Using the Raster Pen insert the Rasters through the adhesive Don t use too much force press only hard enough to seat the Raster firmly in the s...

Page 7: ...orced plastic Use the adhesive assist method with these materials Be aware that these materials are abrasive and will wear out tools faster than other plastics Expanded PVC plastic Lightweight sign ma...

Page 8: ...try drilling again and check the holes If it still isn t right rotate it 90 degrees and try again Be careful not to lose track of your 0 point on the micrometer during this procedure There is no one c...

Page 9: ...ling the Raster Pen to avoid contaminating the Rasters with oil from your hands Don t use static reducing agents with acrylic Rasters some of these products can cause discoloration of the Rasters The...

Page 10: ...y on Rasters because these products can make the Rasters turn cloudy 3 Check the tip of the Raster Pen to make sure no debris is obstructing the passage Any foreign matter inside the barrel will be ca...

Page 11: ...roduct documentation Under no circumstances shall this warranty apply to any Products that have been misused or tampered with by any customer ASSI AS FAR AS IS POSSIBLE UNDER APPLICABLE LAW EXPRESSLY...

Reviews: