background image

Notes on the operating instructions 


84 


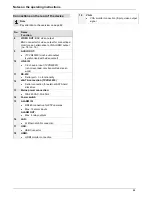
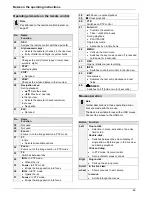
Connections on the rear of the device 


Note 

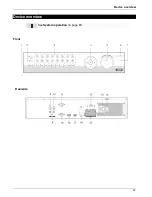
Pay attention to the overview on page 82. 


No. 

Name 
Function


VIDEO OUT: 

BNC video output  

BNC connector for video output for connecting a 
monitor as an alternative to VGA-/HDMI output 
(no. 18 / no. 19)


AUDIO OUT:  


 (TVVR45030) cinch audio output 
(synchronised with video output)


10 

LINE IN: 


Cinch audio input (TVVR45030) 
(is not recorded, only transmitted via net-
work)


11 

RS-232: 


Serial port 

– no functionality


12 

eSATA connection (TVVR45030) 


Serial connection for external SATA hard 
disk drive


13 

Mains power connection: 


100-240 VAC, 50-60 Hz 


14 

Power switch 

15 

ALARM IN:  


RS485 connection for PTZ cameras 


Max. 16 alarm inputs  

ALARM OUT: 


Max. 4 relay outputs 


16 

LAN: 


2x Ethernet LAN connection


17 

USB:  


USB Connector


18 

HDMI: 


HDMI monitor connection 

19 

VGA: 


VGA monitor connection (9-pin), video output 
signal


Summary of Contents for TVVR45030

Page 1: ...ABUS 32 channel Network video recorder NVR TVVR45030 User manual Version 1 0...

Page 2: ...r these operating instructions for future reference A list of contents with the corresponding page number can be found in the index See System operation on page 83 Pay attention to the information in...

Page 3: ...operation on page 83 Pay attention to the information in the separate quick guide plus the notes on the CD and in the accompanying documentation on Web server control and Clients Software These can b...

Page 4: ...DVR burner No Name Function 3 Camera selection keys 1 2 3 Displays the camera status White Camera is connected Blue Connected camera is recording Not lit No camera connected In the live view Selects...

Page 5: ...d with video output 10 LINE IN Cinch audio input TVVR45030 is not recorded only transmitted via net work 11 RS 232 Serial port no functionality 12 eSATA connection TVVR45030 Serial connection for exte...

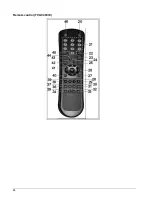
Page 6: ...85 Remote control TVAC40930...

Page 7: ...iris 37 Focus In PTZ mode Brings the image section into focus 38 II Pause reverse playback 39 Stops playback 40 PTZ Switches on PTZ control 41 Enter II Confirms the selection Ticks unticks the boxes D...

Page 8: ...umgebung 28 Fernbedienung 28 Wartung und Pflege 29 Zubeh r 29 Inbetriebnahme 29 Kinder 29 Einf hrung 30 Allgemeine Informationen 30 Auspacken 30 Lieferumfang 30 Bildschirmtastatur 31 Ger t starten 31...

Page 9: ...on 45 Warnung 51 Benutzer 51 Kamera 53 OSD 53 Bild 53 PTZ 54 Bewegung 54 Reaktion 54 Einrichten 56 Zeitplan 56 Kodierung 57 Erweiterte Einstellung nur TVVR45030 57 Urlaub 58 Festplatten 59 Festplatte...

Page 10: ...Richtlinie 75 Glossar 76 Verwendete Fachbegriffe 76 ber das interne Festplattenlaufwerk 78 Device overview 82 System operation 83 General information 83 Operating elements on the device 83 Connection...

Page 11: ...114 Setting up network cameras 114 Camera recording 114 Live view 115 Overview 115 Status symbols 115 Pop up menu for mouse operation 115 Selection bar in the camera image 116 Settings 117 Setting the...

Page 12: ...ade 144 Default 145 Network 145 Video Export 147 Duration 147 Event event type Alarm input 148 Event event type Motion 148 Manual Management 149 Record 149 Continous Capture 149 Alarm 149 Shutdown 149...

Page 13: ...ren 186 Inleiding 187 Algemene informatie 187 Uitpakken 187 Leveringsomvang 187 Beeldschermtoetsenbord 188 Apparaat starten 188 Apparaat uitschakelen vergrendelen opnieuw opstarten 188 Statusindicator...

Page 14: ...klikken op Toepassen en verlaat het menu met Back 215 Geavanceerde instelling alleen TVVR45030 215 Vakantie 215 Harde schijven 216 Harde schijf inbouwen 216 Parameters van het harde schijfbeheer 216 H...

Page 15: ...me 240 G n ralit s 240 Dispositifs de commande sur l appareil 240 Connecteurs au dos de l appareil 241 Touches de commande sur la t l commande 243 Commande la souris 243 Guide de d marrage rapide 258...

Page 16: ...ge de la cam ra 269 R glages 270 Configuration de la sortie cam ra 270 Restitution 271 G n ralit s 271 L cran de visualisation 271 Commande via champ de contr le 271 Clic droit sur lecture en cours 27...

Page 17: ...uvement 301 Manuel Management 302 Enregistrer 302 Capture continue 302 Alarme manuel 302 Arr ter 302 D pannage 303 Entretien et nettoyage de l appareil 303 Sp cifications techniques 304 Capacit de m m...

Page 18: ...tet 327 Nedlukning Logout og genstart af apparatet 327 Statusvisninger 328 Generelt 328 DVR status LED 328 Taster til valg af kamera status LED 328 Visninger p monitoren 328 Indstillingsassistent 329...

Page 19: ...sks 355 Indbygning af en harddisk 355 Harddiskforvaltningens parametre 355 Kameraets harddiskindstillinger 356 Kontrol af harddiskstatus 357 Indstilling af harddiskalarmer 357 S M A R T 357 Afspilning...

Page 20: ...382 Instalacja twardego dysku 382 Wykonanie pod cze 382 Konfigurowanie urz dzenia 382 Wa ne zasady bezpiecze stwa 383 Obja nienie symboli 383 U ycie zgodne z przeznaczeniem 383 Og lne informacje 383 Z...

Page 21: ...na obrazie kamery 397 Ustawienia 398 Ustawianie wyj cia kamery 398 Odtwarzanie w widoku na ywo 399 Og lne 399 Ekran odtwarzania 399 Sterowanie za pomoc pola kontrolnego 399 Klikni cie prawym przyciski...

Page 22: ...Resetowanie systemu 426 Net Detect 426 Eksport 428 Czas 428 Zdarzenie typ zdarzenia Wej cie alarmowe 429 Zdarzenie typ zdarzenia Ruch 429 Zapis panika 430 Nagrywarka 430 Ci g e obrazy natychmiastowe...

Page 23: ...02 451 451 451 451 452 452 452 452 452 453 453 453 454 455 455 455 455 456 456 457 457 458 458 458 459 459 459 459 459 460 460 460 460 461 461 IP 462 462 463 463 463 463 464 465 465 466 466 466 466 46...

Page 24: ...9 470 470 470 472 473 473 479 479 481 OSD 481 481 PTZ 482 482 482 484 484 485 TVVR45030 485 486 487 487 487 488 488 489 489 490 490 490 491 492 492 492 493 494 495 495 497 497 498 498 499 499 499 499...

Page 25: ...Contents 104 500 RS232 500 501 501 501 502 504 504 504 504 RoHS 504 505 505 507...

Page 26: ...ink the cable 1 Connect all network cameras with your network 2 Connect the audio connections 3 Connect the sensors to the alarm inputs 4 Connect the monitor to the HDMI VGA or BNC con nection 5 Conne...

Page 27: ...if you are already familiar with electronic de vices Warning All guarantee claims become invalid for damages caused by non compliance with these operating instructions We cannot be held liable for re...

Page 28: ...ble from time to time Never modify or manipulate the mains cable or plug Do not use plug adapters or extension cables that do not conform to the applicable safety standards and do not make alterations...

Page 29: ...firms Improper repairs can expose device users to the risk of fatal injury Accessories Only connect devices that are suitable for the in tended purpose Otherwise hazardous situations or damage to the...

Page 30: ...and without prior warning ABUS Se curity Center GmbH is not liable or responsible for direct or indirect damages resulting from the equipment performance and use of this product No forms of guarantee...

Page 31: ...ly UPS After the device has been connected to the power supply and the main switch on the rear of the device is switched on the DVR status LED lights up 1 The device carries out a self test during the...

Page 32: ...White flashing System status is OK recording settings are stored surveillance mode is active Blue constantly lit At least one camera is currently recording Red constantly lit System maintenance requi...

Page 33: ...list Click on Apply to continue The follow ing query appears Click on Next to start the wizard Note After the system is set up you can untick the box The setup wizard is then no longer started auto m...

Page 34: ...ure both network connec tions For this change the LAN output at select NIC 3 Because this device has two network connections there are setting possibilities for the parallel and the separate use of th...

Page 35: ...am eras found below 3 Activate the Checkbox with a left click to select the network camera and then click on Add 4 Click on Next Camera recording 1 At Camera select a camera with which you would like...

Page 36: ...view or switch back to the original view Status symbols The following symbols are displayed depending on the operating status of the device Symbol Meaning R R R Red Event Recording Event recording Ye...

Page 37: ...lection bar in the camera image Click on the camera image in single or multi view A se lection bar appears 1 2 3 4 5 6 7 8 Nr Meaning of symbol 1 Area to move the miniature bar 2 Activate deactivate m...

Page 38: ...ion of HDMI and VGA output is supported The BNC output can be used either for a spot monitor or a separate monitor Note VGA monitor connected A connected HDMI VGA monitor automatically becomes the mai...

Page 39: ...the control panel The control panel 4 is used for controlling the running playback The symbols have the following meaning No Meaning function 1 Zoom in Zoom out the time line 24 12 1 hours 2 Audio pla...

Page 40: ...to finish Please klick on Tag management 6 In order to change the description of your marking click on the process symbol To remove click on the delete symbol Right click when playback is running Per...

Page 41: ...ung siehe S Settings Includes the menus Configuration Camera Record HDD Playback 122 Maintenance Device maintenance new firmware update log search import export con figuration reset to factory default...

Page 42: ...e PTZ configuration motion recognition etc 129 Record Menu to set recording parameters time plan camera resolution camera stream etc 135 HDD Used for initialising or managing installed HDDs assigning...

Page 43: ...Warning Behaviour of the device in ex ceptional cases HDD full network discon nected etc 130 User Adding and changing users assigning authorisation rights 130 Note Pay attention to the instructions i...

Page 44: ...ce within a network This address may only appear once within a network Certain IP address ranges are reserved for public networks e g the Internet Private ad dress range e g 10 0 0 0 10 255 255 255 Su...

Page 45: ...soft ware can affect the network Warning When using a router the network clients e g the recorder can be connected to the Internet and vice versa Make sure to use protective measures to prevent unauth...

Page 46: ...v6 Standard Gateway Currently no functioning MAC Adress Hardware address of the installed net work card MTU Bytes Describes the max size of the largest protocol data Preferred DNS Server Address of th...

Page 47: ...mail account Sender s Re ceiver Select three possible recipients for the e mail Receiver Enter the name of the recipient here Receiver s Adresse Enter the e mail address of the recipient here Enable A...

Page 48: ...ere the CMS is installed Alarm Host Port Port of your CMS Station Server Port Port for data communication Gen eral 8000 HTTP Port Port for web server General 80 Multicast IP In order to minimize traff...

Page 49: ...it N C Normally closed circuit Activate the alarm input by ticking the checkbox for Setting Define the response of the recorder when there is an alarm under Handling Click Copy to apply these settings...

Page 50: ...rm Output see also page Fehler Textmarke nicht definiert Confirm the settings by clicking Apply and leave the menu with OK TAB PTZ Linking Currently no functioning Alarm output 1 Select an alarm outpu...

Page 51: ...Note Change all passwords on a regu lar basis using a combination of letters and numbers Note down all pass words in a safe place Confirm Enter the access code again here Level IMPORTANT More access...

Page 52: ...ocal Configuration Local Log Search Local Parameters Settings Local Advanced Operation Local Shutdown Reboot Remote Confguration Remote Log Search Remote Parameters Settings Remote Serial Port Ctnrol...

Page 53: ...he user names password and http port by hand afterwards The available bandwidth shows you how much bandwidth is still available for setting up the network camera OSD Camera Camera to be set Camera Nam...

Page 54: ...el under Camera Select the checkbox for motion detection The motion detection in the network camera must also be activated For further details refer to the network camera manual Handling Trigger Chann...

Page 55: ...ng Here you can configure the behavior of the recorder dur ing a detected event for example motion got detected by clicking the respective check box Parameter Notification Full Screen Monitoring The c...

Page 56: ...1 Define the day to be set in the pull down menu at Schedule 2 Activate deactivate All day If the full day is active no definite times can be entered as the setting is now valid for the whole day 3 T...

Page 57: ...OK Encoding TAB Record The following setting options are available in this sub menu Confirm the settings by clicking on Apply and exit the menu with OK Confirm the settings by clicking on Apply and le...

Page 58: ...rwrite You can specify whether older re cordings are deleted when the HDD memory is full eSATA Specify if an eSATA hard disc connected by USB should be used for exporting or for additional re cording...

Page 59: ...maintenance specialist 5 Install the HDD and then connect it 6 Reattach the cover and connect the device to the mains power supply 7 Switch on the device and start the HDD menu Click on HDD in the men...

Page 60: ...ted cameras to a hard disc group see HDD settings of cameras Click on the Edit symbol A pop up window appears HDD No Selecting hard disc by means of in ternal connection number HDD Property R W Readab...

Page 61: ...d in the log data Call up the log file and search according to the infor mation S M A R T HDD see page 140 Setting up the HDD alarm You can specify alarms to inform you of HDD errors To do this call u...

Page 62: ...he sub menus Tag and Picture are almost iden tical with the menu described above and are there fore not listed separately In the sub menu Tag searching does not take place according to recording type...

Page 63: ...onfiguration 142 Select one or more network cameras by activating the checkbox Click on Search Select one or more images from the list which appears Click on Details to obtain more information about t...

Page 64: ...k Displays the transmission and reception rate of the recorder 145 System Info Note The information menu shows the technical data for the device and information on the various set tings of the cameras...

Page 65: ...age press 4 or 1 To go to a specific page number enter it in 5 and confirm by clicking 6 Click on Details to see more detailed information Click on Play to start the recording for the event when neces...

Page 66: ...backing up the settings in advance These can be imported again follow ing the system reset Network Note Information regarding the network traffic and net work interfaces are shown here TAB network loa...

Page 67: ...is still high you should check that the cables are correct and not dam aged The higher the packet loss rate the poorer the connection between the pinged device and re corder For Network Packet Export...

Page 68: ...can view the respective recording To block or unblock a file click on the Lock symbol 3 Click on Export to access the export screen 1 Select the connected medium used for data storage from the drop d...

Page 69: ...ng the check box and click Search For both types of event the following window appears af ter activating the Search button Select the files to be exported by activating or deactivat ing the check box...

Page 70: ...e camera to manually record continuous instant images You can set the time interval in which these are recorded in the recording menu see p 135 Click the control button for this Alarm In order to swit...

Page 71: ...ended HDD USB port not working Device not supported Connect a compatible USB medium USB 2 0 USB hub is in use Connect the USB medium directly Network access not possible Network cable connections are...

Page 72: ...ackup 3 x USB 2 0 Views 1 4 6 8 9 16 Recording modes Manual schedule motion detection alarm motion detection and alarm motion detection or alarm Search modes By event date and time Alarm inputs NO NC...

Page 73: ...veil lance depends on the set resolution and frame rate of the recording On the included CD you can find a program in order to calculate the required amount of memory In addition you find this softwar...

Page 74: ...l children Children may put batteries in their mouths and swallow them This can cause serious harm to their health If this happens consult a doctor immedi ately Do not charge normal batteries heat the...

Page 75: ...n of websites on the Inter net e g www abus sc de Dual Stream Dual stream is a video transmission method A high resolution recording and lower resolution transmission are made over the network for exa...

Page 76: ...smission or display PIP Picture in Picture Where two signal sources are shown on the screen at the same time The second signal source is stored above the first PPPoE PPP over Ethernet point to point p...

Page 77: ...the device immediately after switching it off To move the device carry out the following steps 1 Wait until OFF has been shown on the display for at least two minutes 2 Remove the mains plug from the...

Page 78: ...ABUS Network video recorder NVR TVVR45030 Manufacturer ABUS Security Center GmbH Co KG Linker Kreuthweg 5 86444 Affing Germany...

Reviews: