12
Zenith Automatic Transfer Switch | new.abb.com/low-voltage
and maintain all electrical equipment.
DISCONNECT all power sources prior to installation,
operation, service and maintenance of all electrical
equipment. These activities shall be performed only by
Only use the Charging Handle to perform manual
operations of the Transfer Switch. No motorized device
shall be used as a substitute.
Failure to comply with these instructions
could result in death or serious injury.
WARNING
Manual close contact operations ONLY when opposite
source contacts are open.
Failure to comply with these instructions
will result in death or serious injury.
Hazardous Volatge Can Cause
Severe Injury Or Death
Improper Installation
Operation and Maintenance
Stored Energy Mechanism Key Features
Contact Close operation. Charging is not required for Contact
Open operations.
Standalone ATS Operation
Sequence of Operations - Manual Mode
In the event the ATS had to be operated manually, please follow
these steps:
1. Prior to manually operate the ATS, turn Control Switch
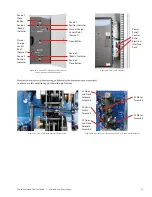
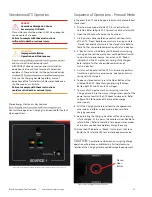
to Inhibit. Refer to figure S4-1 for location of Control Switch.
2. Open the ATS Access Panel on the front door.
3. Via the Access Panel, determine contact position status
of the ATS. “Open” denotes contacts are in an open state.
“Closed” denotes contacts are in the closed state. Refer to
table T4-1 for all possible combination of status indication.
4. A “Ready” status will indicate that the mechanism spring
is charged and that the mechanism could perform transfer
to a particular power source. For instance, S1 “Ready”
indicates that the S1 mechanism spring is fully charged.
Refer to table T4-1 for all possible combination of
status indication.
5. A status will indicate that the ATS is not ready to perform
transfer to a particular power source, due to mechanism
spring not fully charged.
6. To open a closed contact, press the Open Button at the
middle of the ATS. Note that upon pressing the Open
Button, both S1 and S2 contacts will open.
7. To manually charge the mechanism spring, insert the
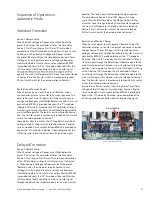
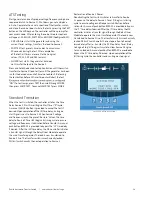
Charging Handle into the manual charge access point of the
power source to which the ATS needs to close onto. Refer
to figure S4-3 for location of the respective charge
access points.
8. With the Charging Handle inserted into the appropriate
access point, perform a clockwise rotation to initiate
charging sequence.
9. Keep rotating the Charging Handle until the closing spring
is fully charged. At this point, the handle will not be able to
rotate further. Refer to table T4-3 for approximate number
of rotations needed to completely charge the spring.
10. Once the ATS indicates a “Ready” status, press the Close
Button to transfer the ATS to the intended power source.
CAUTION:
Completion of the mechanism spring charge
operation will produce an audible click. Further clockwise
rotation of the Charging Handle could damage the equipment.
Figure S4-7: Showing mechanism status & contact position indication for source 1
Manual
Open
Button
Figure S4-8: Showing manual open button
DANGER
WARNING

