background image


TZIDC, TZIDC-110, TZIDC-120

 DIGITAL POSITIONER  |  CI/TZIDC/110/120-EN REV. E 

59


Change from one to two columns 


Trademarks 


HART is a registered trademark of FieldComm Group, Austin, Texas, USA 


FOUNDATION Fieldbus is a registered trademark of FieldComm Group, Austin, 
Texas, USA. 


PROFIBUS and PROFIBUS PA are registered trademarks of PROFIBUS & 
PROFINET International (PI) 


Summary of Contents for TZIDC

Page 1: ...onically configurable positioner with communication capabilities designed for mounting on pneumatic linear or rotary actuators Fully automatic determination of the control parameters and adaptation to...

Page 2: ...Mounting on linear actuators 28 Mounting on rotary actuator 30 6 Electrical connections 32 Safety instructions 32 TZIDC TZIDC Control Unit terminal assignment 33 TZIDC Remote Sensor terminal assignmen...

Page 3: ...to the product may only be performed if expressly permitted by these instructions Information and symbols on the product must be observed These may not be removed and must be fully legible at all tim...

Page 4: ...ed to and to communicate information and data via a network interface It is operator s sole responsibility to provide and continuously ensure a secure connection between the product and your network o...

Page 5: ...its intended use The device may only be connected when de energized The potential equalization of the system must be established in accordance with installation regulations applicable in the respecti...

Page 6: ...ools and test devices as needed Maintenance and exchange work may be conducted by qualified specialists only i e qualified personnel in accordance with TRBS 1203 or similar Only those auxiliary compon...

Page 7: ...ion protection specialist may modify the device The IP 65 NEMA 4x IP rating is only achieved if the splash guard is screwed in place Operating the unit without splash guard cap is prohibited The devic...

Page 8: ...T51 C 40 to 40 C Electrical Data In intrinsically safe types of protection Ex ib IIC Ex ia IIC or Ex iaD only for connection to a certified intrinsically safe circuit Current circuit terminal Electri...

Page 9: ...e entries that meet the requirements of EN 61241 11 for Category II 2 D as well as the ambient temperature range must be used Prevent electrostatic charging due to propagating brush discharge when the...

Page 10: ...uited cable entries must be used that meet the requirements of EN 60079 15 IECEx Ex i and Ex n type of protection Ex marking Ex marking Marking Ex ia IIC T6 or T4 Gb Ex ib IIC T6 or T4 Gb Ex nA IIC T6...

Page 11: ...n module for analog position feedback 31 32 U 10 to 30 V DC I 4 to 20 mA max 21 5 mA Special conditions Devices must only be connected to circuits in zone 2 if they are suitable for operation in zone...

Page 12: ...V18345 x0x2x2xx0x Intelligent Positioner intrinsically safe with entity parameters of For use in Class I Div 1 Groups A B C and D Class II Div 1 Groups E F and G Class III Enclosure Type 4X Terminals...

Page 13: ...nF Li 0 H Terminals Limit 2 41 42 and Limit 1 51 52 V max 15 5 V I max 52 mA Ci 20 nF Li 30 H When installed per installation Drawing No 901064 Temperature Code T4 Max Ambient temperature 85 C Note T...

Page 14: ...ar characteristic curves and the following maximum values Current circuit terminal Electrical information maximum values Signal circuit 11 12 or Ui 24 V li 250 mA Pi 1 2 W Characteristic curve linear...

Page 15: ...pair work was being carried out Only non flammable gases may be used for the pneumatic power supply Only suited cable entries must be used that meet the requirements of EN 60079 15 IECEx Ex i and Ex n...

Page 16: ...me that installation or maintenance or repair work was being carried out Only non flammable gases must be used for pneumatic power supply Only suited cable entries must be used that meet the requireme...

Page 17: ...cal variations or optional features Local communication interface LCI shall not be used in hazardous location Each pair of conductors of each intrinsic safety circuit shall be shielded See also FM ins...

Page 18: ...n 1 Applicable Groups A B C D E F G non Incendive for Class I Division 2 Group E F and G hazardous classified indoor and outdoor NEMA 4x locations The following temperature code ratings were assigned...

Page 19: ...tic curves and the following maximum values Current circuit terminal Electrical information maximum values Signal circuit 11 12 or Ui 24 V li 250 mA Pi 1 2 W Characteristic curve linear Li 10 H Ci 5 n...

Page 20: ...e that installation or maintenance or repair work was being carried out Only non flammable gases may be used for the pneumatic power supply Only suited cable entries must be used that meet the require...

Page 21: ...or maintenance or repair work was being carried out Only non flammable gases may be used for the pneumatic power supply Only suited cable entries must be used that meet the requirements of EN 60079 1...

Page 22: ...be shielded FM approvals TZIDC 120 Positioner Model V18347 a042b2cd0e IS I II III 1 ABCDEFG T6 T5 T4 Ta 40 C 55 C 85 C 901265 Entity FISCO Entity and FISCO Parameters Terminals Type Groups Parameters...

Page 23: ...Change from two to one column 3 Product identification Name plate 1 Full type designation 2 Software revision 3 Serial number 4 NL number 5 Year of manufacture 6 Supply air pressure 7 Input 8 Output 9...

Page 24: ...The storage temperature should be between 40 to 85 C 40 to 185 F Avoid storing the device in permanent direct sunlight In principle the devices may be stored for an unlimited period However the warran...

Page 25: ...ctory settings Never start automatic adjustment before restoring the factory settings Note Before assembly check whether the positioner meets the control and safety requirements for the installation l...

Page 26: ...rical connection is performed as described in Connection on device TZIDC Control Unit with TZIDC Remote Sensor on page 40 Note To connect the TZIDC Remote Sensor a cable with the following specificati...

Page 27: ...inear actuators The operating range for linear actuators is 45 symmetrically to the longitudinal axis The usable span within the operating range is at least 25 recommended figure 40 The usable span do...

Page 28: ...Figure 6 Attaching a follower guide to the actuator 1 Tighten the screws so that they are hand tight 2 Attach the follower guide 1 and clamp plates 2 with screws 4 and spring washers 3 to the actuato...

Page 29: ...uts 5 Tighten the nuts so that they are hand tight Note Adjust the height of the positioner on the cast iron yoke or columnar yoke until the lever is horizontal based on a visual check at half stroke...

Page 30: ...lever M11031 1 2 3 5 4 1 Potentiometer lever 2 Actuator bolts 3 Valve stem 4 Valve yoke 5 Positioner Figure 11 Actuator bolts on the lever rear view M11032 1 2 3 5 4 1 Potentiometer lever 2 Actuator b...

Page 31: ...otation direction of the actuator must be considered when determining the adapter position on axis 1 For this purpose the feedback shaft can be adjusted manually so that the adapter 3 can be attached...

Page 32: ...ed Before opening the housing switch off the power supply The electrical connection may only be established by authorized specialist personnel Notices on electrical connection in this instruction must...

Page 33: ...SW1 Option module 41 42 Digital feedback SW2 Option module 31 32 Analog feedback AO Option module 1 2 3 TZIDC remote sensor Only for options TZIDC Remote Sensor or TZIDC for remote position sensor Te...

Page 34: ...optional Figure 18 TZIDC Remote Sensor Electrical Connection Change from one to two columns Connections for inputs and outputs Terminal Function comments 1 2 3 TZIDC control unit 51 52 Proximity swit...

Page 35: ...o columns Terminal Function comments 11 12 Fieldbus bus feed 51 52 Digital feedback Limit 1 with proximity switch optional 41 42 Digital feedback Limit 2 with proximity switch optional 41 42 43 Digita...

Page 36: ...s Terminals 11 12 11 12 Supply voltage Power feed from the Fieldbus 9 to 32 V DC 9 to 32 V DC Max permissible voltage 35 V DC 35 V DC Input Current 10 5 mA 11 5 mA Current in the event of an error 15...

Page 37: ...0 to 100 ranges cannot overlap The module for analog feedback and the module for digital feedback have separate slots and can be used together Assembly kits for digital feedback Two proximity switches...

Page 38: ...gital feedback 5 Terminals for basic unit Figure 20 Connection to device example Change from one to two columns 2 tap holes 14 NPT or M20 1 5 are provided on the left side of the housing for cable ent...

Page 39: ...with wire end sleeve with plastic sleeve 0 5 to 1 5 mm2 AWG21 to AWG17 Option modules Cross section Rigid flexible wires 0 14 to 1 5 mm2 AWG26 to AWG17 Flexible with wire end sleeve no plastic sleeve...

Page 40: ...e following options can be installed if required Optical position indicator Mechanical feedback contacts designed as proximity switches or microswitches Connect the positioner TZIDC Control Unit housi...

Page 41: ...ensor while observing the following instructions A shielded 3 wire cable with a maximum length of 10 m 33 ft must be used for the connection Route the cable into the terminal compartment through the E...

Page 42: ...tor To eliminate the possibility of this occurring it is recommended to install a pressure compensation valve between the springless chamber and the supply air for these types of applications It enabl...

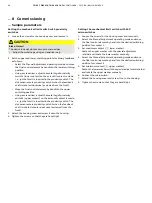
Page 43: ...cess failures and result in injuries Before recommissioning a positioner that was previously in use at another location always reset the device to its factory settings Never start automatic adjustment...

Page 44: ...connections The following is now shown in the display 3 Checking mechanical mounting Press and hold down MODE and ENTER once the countdown has gone from 3 to 0 release MODE and ENTER The device switch...

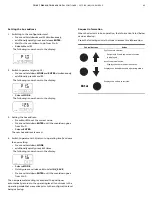
Page 45: ...to parameter 1 6 return to operating level and save the new setting Press and hold down MODE additionally quickly press 2 times The following is now shown in the display Release MODE Quickly press and...

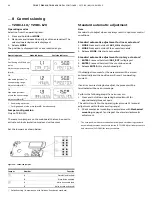
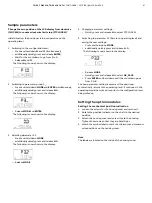
Page 46: ...ation standard Standard automatic adjustment Note Standard Auto Adjust does not always result in optimum control conditions Standard automatic adjustment for linear actuators 1 MODE Press and hold unt...

Page 47: ...isplay M10906l Release MODE 4 Changing parameter settings Quickly press and release to select CTCLOCKW 5 Switching to parameter 3 3 Return to operating level and saving the new settings Press and hold...

Page 48: ...mity switch 2 upper contact on the axis until contact is made i e just before it is inserted in the proximity switch The slot sensor enters proximity switch 2 when the feedback shaft is rotated counte...

Page 49: ...mA is also displayed Designator display This 14 segment display with eight digits indicates the designators of the parameters with their status of the parameter groups and of the operating modes Desc...

Page 50: ...parameterize device consult the associated operating instructions and or configuration and parameterization instructions 10Maintenance The positioner does not require any maintenance if it is used as...

Page 51: ...tails Company Address Contact person Telephone Fax Email Device details Type Serial no Reason for the return description of the defect Was this device used in conjunction with substances which pose a...

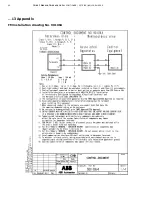
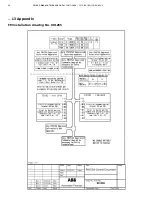
Page 52: ...52 TZIDC TZIDC 110 TZIDC 120 DIGITAL POSITIONER CI TZIDC 110 120 EN REV E 13 Appendix FM installation drawing No 901064...

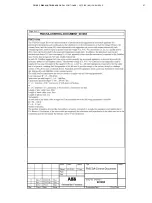
Page 53: ...TZIDC TZIDC 110 TZIDC 120 DIGITAL POSITIONER CI TZIDC 110 120 EN REV E 53...

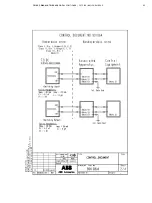
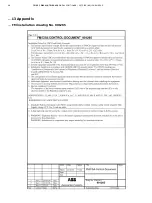
Page 54: ...54 TZIDC TZIDC 110 TZIDC 120 DIGITAL POSITIONER CI TZIDC 110 120 EN REV E 13 Appendix FM installation drawing No 901064...

Page 55: ...TZIDC TZIDC 110 TZIDC 120 DIGITAL POSITIONER CI TZIDC 110 120 EN REV E 55...

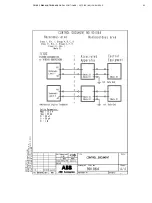
Page 56: ...56 TZIDC TZIDC 110 TZIDC 120 DIGITAL POSITIONER CI TZIDC 110 120 EN REV E 13 Appendix FM installation drawing No 901265...

Page 57: ...TZIDC TZIDC 110 TZIDC 120 DIGITAL POSITIONER CI TZIDC 110 120 EN REV E 57...

Page 58: ...58 TZIDC TZIDC 110 TZIDC 120 DIGITAL POSITIONER CI TZIDC 110 120 EN REV E 13 Appendix FM installation drawing No 901265...

Page 59: ...nge from one to two columns Trademarks HART is a registered trademark of FieldComm Group Austin Texas USA FOUNDATION Fieldbus is a registered trademark of FieldComm Group Austin Texas USA PROFIBUS and...

Page 60: ...C 110 120 EN Rev E 09 2018 We reserve the right to make technical changes or modify the contents of this document without prior notice With regard to purchase orders the agreed particulars shall preva...

Reviews: