ABB CHARGING STATION
Operation and installation manual
Terra 94/124/184(NEVI) UL
Page 1: ...ABB CHARGING STATION Operation and installation manual Terra 94 124 184 NEVI UL...
Page 2: ...sumes no responsibility for any errors that may appear in this document We reserve all rights in this document and in the subject matter and illustrations contained therein Any reproduction disclosure...
Page 3: ...power allocation Fair Share 23 3 6 Working principles 24 3 6 1 Terra xx4 variants CC CJ NC and NN 24 3 6 2 Terra xx4 variant C 25 3 7 Description of the touchscreen 26 3 7 1 General description of th...
Page 4: ...k assessment Weather conditions 69 9 3 4 Working area preparation 69 9 3 5 Personal Protective Equipment PPE 69 9 3 6 Safety equipment and tools 70 9 3 7 Total de energization procedure 70 10 Technica...
Page 5: ...Introduction and general information EN 1 Introduction and general information This chapter will give instruction on the correct use of this document Chapter recipients Owner Qualified installer User...
Page 6: ...ranty 1 2 Function and target of this document The purpose of this document is to give the information that is necessary to safely do these tasks Install the EVSE Operate the EVSE Perform basic mainte...
Page 7: ...EV Infrastructure Facility of the manufacturer to do a remote check on the correct operation of the EVSE Cabinet Enclosure of the EVSE including the components on the inside Power cabinet Intermediat...
Page 8: ...cal rules and fully knows the EVSE and its safe installation The qualified installer obeys all local rules and the instructions in the operation and installation manual Owner Legal owner of the EVSE U...
Page 9: ...failure to comply with the instructions for a correct installation and cannot be held responsible for any other upstream or downstream equipments The instructions provided in the manual do not replac...
Page 10: ...er parties than the manufacturer Insufficient ventilation of the equipment Operation of the equipment outside of its design conditions Damage or failure due to relocations or alterations of the equipm...
Page 11: ...ANGER Do not proceed with installation if the integrity of the equipment is compromised Do not use the equipment if you find any operating anomalies To avoid risk related to improper use of the produc...
Page 12: ...cle manufacturer Manufacturer and national guidelines and regulations about charging stations must be taken into account The AC cable owned by the user could be damaged valid only if the AC socket is...
Page 13: ...according to the local rules Alternate current Direct current Protective Earth PE Sign that means that you must read the manual before you install the EVSE Waste from electrical and electronic equipm...
Page 14: ...ctrical wires of sufficient gauge and insulation to handle the rated current and voltage demand Make sure that the load capacity of the grid is in accordance with the EVSE Make sure that the wiring in...
Page 15: ...For more information contact the Government Waste Disposal department in your country 2 7 Cybersecurity This product and its features are designed to be connected to and to communicate information an...
Page 16: ...out the models details of the equipment characteristics and technical data overall dimensions and equipment identification A description of the equipment characteristics is provided to identify its ma...
Page 17: ...h Connector type Power rating Field Description Terra PPP Terra is the charger identification PPP is the output power 94 90 kW output power 124 120 kW output power 184 180 kW output power MM MM is the...
Page 18: ...F G H I J K L N M O Ref Description A Manufacturer B EVSE Model designation C Part number of the EVSE Internal ABB use D Serial number of the EVSE E ABB Global ID F EVSE main technical data G Address...
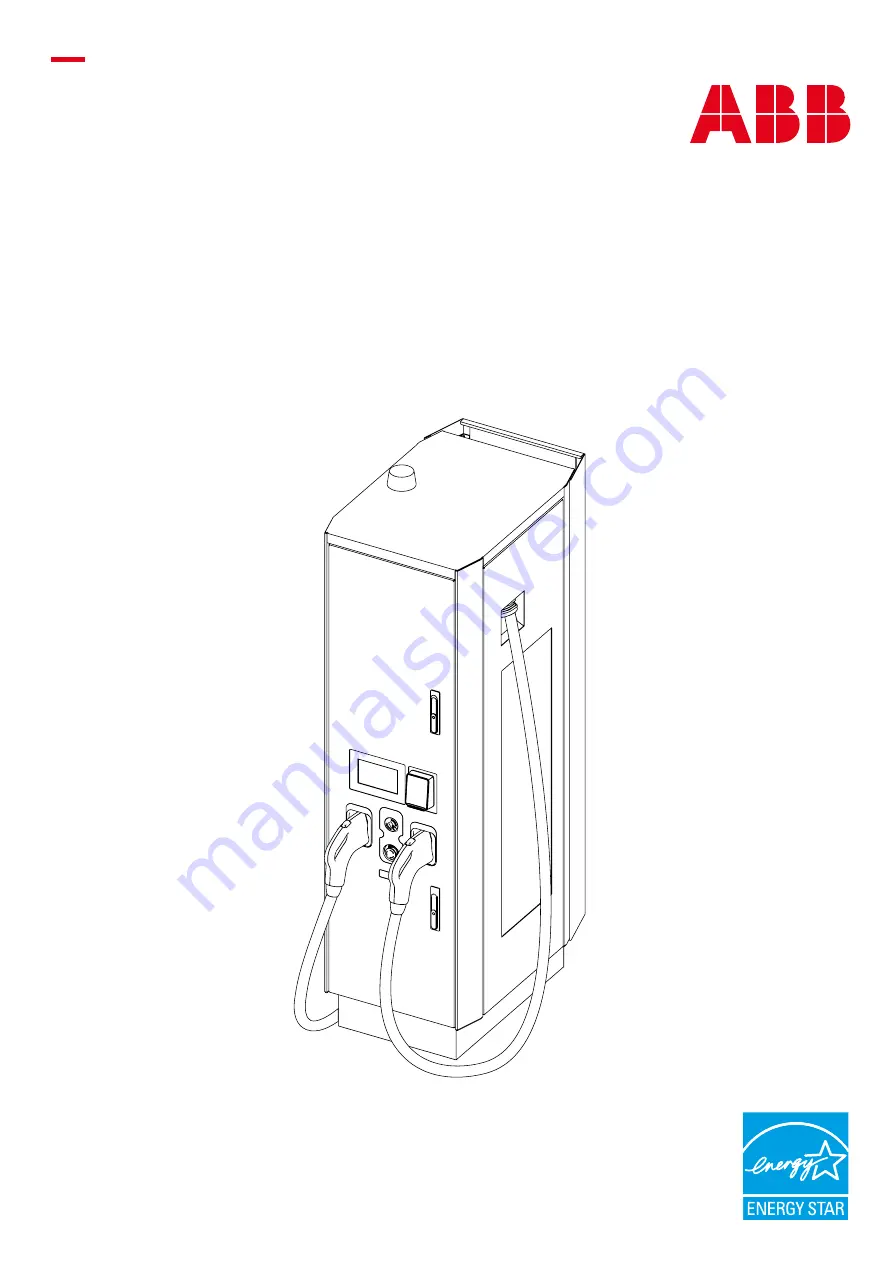
Page 19: ...EVSE when there is an emergency 10 Meter display To read the meter data 11 Removable base covers To access the EVSE s anchoring points to the foundations 12 Rear air deflector Air outlet To divert the...
Page 20: ...se of lack of cellular signal 35 Main DC breakers To connect or disconnect the power modules 36 AC Auxiliary breaker To connect or disconnect the AC auxiliary power supply 37 Tilt sensor device Option...
Page 21: ...management system option 53 50 51 52 Ref Part Function 50 Top attachment point Upper fixing point to the EVSE 51 CMS Cable management system 52 Bottom attachment point Lower installation point to the...
Page 22: ...let except for Terra 94 Dynamic Fair share Models with more than one DC outlet except for Terra 94 3 5 1 Sequential power allocation When the EVSE is configured for sequential power allocation it can...
Page 23: ...lly charged 3 5 3 Dynamic power allocation Fair Share One EV connected 100 of the power Two EV connected 50 of the power When one of the EVs disconnect if the other one can take more power the availab...
Page 24: ...board L IMI board M Interlink contactor N AC SPD O Breaker P Auxiliary transformer Q Auxiliary breaker R Heater S Power supply unit T DC EMC filter U DC cooling fans V CCB board W HMI X Power bridge...
Page 25: ...PD N Breaker O Auxiliary transformer P Auxiliary breaker Q Heater R Power supply unit S DC EMC filter T DC cooling fans U CCB board V HMI W Power bridge board Power connection Black and thin lines aux...
Page 26: ...ption A Field to select the connector type B Instruction field C Information button D Selected language Button Name Description CCS To select the CCS connector CHAdeMo To select the CHAdeMO connector...
Page 27: ...ation solutions via OCPP NOTE Authorization requires a subscription to a back office 3 9 Payment terminal The payment terminal is used to pay the charging session and supports all common credit and ba...
Page 28: ...ations that are applicable in the region of installation 3 11 2 Tilt sensors The tilt sensor device 37 and dedicated screw terminal blocks 39 for connection is an optional that disables the power from...
Page 29: ...minals ask the manufacturer The touchscreen guides the user how to use the payment terminal 04 NOTE To use and adjust the settings of the payment terminal you require the ABB Payment Web tool 3 11 4 E...
Page 30: ...t in use 51 NOTE The cable management system can be pre assembled from the factory or shipped separately from the EVSE and installed during the commissioning of the charger 3 11 6 Charging connector T...
Page 31: ...ing and unpacking EN 4 Transport handling and unpacking In this section are explained all the transport specification including handling and unpacking procedures of the EVSE Chapter recipients Owner Q...
Page 32: ...s to comply with the applicable Safety measures applicable to the working area including instructions for safe handling of the EVSE DANGER Handling personnel must wear all appropriate and applicable p...
Page 33: ...l became red creating a permanent and immediate indication of mishandling Normal movement or road shock won t affect the device Once activated the shock watch cannot be reset How to check the Tilt sen...
Page 34: ...A B Short move Short move B A B B Hoist Crane ement ng Pallet Jack Pallet Stacker Forklift Truck Wheel loader pallet fork 3 km h Hoist Crane A B A C B B Short move Short move C B A B B C Movement Lif...
Page 35: ...els of the Pallet jack and pallet stacker to avoid damaging the pallet Check that the working place conditions are safe before handling the load such as obstacle free unloading area proper flooring sa...
Page 36: ...there are no dynamic forces on the lifting points 4 1 3 1 Forklift Truck Wheel loader pallet fork Move the forks of the forklift truck in the gaps at the side of the cabinet Move the cabinet to the c...
Page 37: ...37 Access to the internal parts EN 5 Access to the internal parts In this section are illustrated all the access procedures Chapter recipients Qualified installer...
Page 38: ...r swing handle lock 03 17 and to open the front door 17 03 A B C A B C A B C Move the protection on the swing handle lock and insert the key Turn the key to unlock the handle Pull the handle forward u...
Page 39: ...Right door 13 Internal right door handle B HAZARDOUS VOLTAGE Make sure that only qualified persons have access to the door key NOTE There is one unique door key for each cabinet 5 2 1 Open the left a...
Page 40: ...s necessary to remove the Base cover 11 11 11 Unscrew and remove the 8 fasteners of the base cover 11 on the rear side of the EVSE Remove the back base cover Remove the front base cover by sliding it...
Page 41: ...he Main AC protection barriers 42 are located over the Main AC terminals 33 or AC input fuse 32 33 32 13 42 02 5 4 1 Remove the Main AC protection barriers To access the Main AC terminals 33 or AC inp...
Page 42: ...he end of operation on the Main AC terminals 33 or AC input fuse 32 is necessary to install the Main AC protection barriers 42 to ensure the safety of the EVSE 42 32 33 42 Install the three Main AC pr...
Page 43: ...43 Installation EN 6 Installation In this section are illustrated all the installation procedure Chapter recipients Owner Qualified installer...
Page 44: ...oper equipment NOTE The components of the packaging must be disposed in accordance with the regulations in force in the country of installation NOTE If you find damage or the parts are not according t...
Page 45: ...ead the cardboard on both sides Remove the two main parts of the packaging Take out the supplied components Refer to 6 1 2 Components supplied with the EVSE Remove the internal foams Remove the chargi...
Page 46: ...to open the EVSE front door 2 Nuts to install the EVSE to the floor 6 Bolts Washers Nuts to install AC and PE cables 4 8 4 Preinstalled on the AC terminals and PE busbar Caps to be installed in place...
Page 47: ...nut Install the Clamp insert on the charging cable at 8 2 in 250 cm starting from the EVSE and lock it in position by inserting the 2 springs NOTE Before installing the clamp some cable types require...
Page 48: ...ace to open the side doors 21 533 X2 Reduced side space to install the bollards 12 305 Y1 Space needed to secure the removable base cover 4 102 Y2 Increased front space to install the bollards 23 585...
Page 49: ...nduits B are in the correct position NOTE Let the concrete dry CAUTION Make sure that the top surface of the foundation is above the ground level to prevent intrusion of water Route the cables inside...
Page 50: ...ting equipment to the eyebolts installed on the top side of EVSE Hook up the lifting means and stretch the ropes leaving them slightly loose Remove the Removable base cover 11 Refer to 5 3 1 Remove th...
Page 51: ...et optional B Signals optional C 43 B C A Risk of pinching or crushing of body parts Make sure that cables do not get trapped between the EVSE and the base and that are aligned to the AC and PE connec...
Page 52: ...52 Operation and installation manual Terra 94 124 184 NEVI UL EN 7 Electrical connection In this section are listed all the electrical connection procedure Chapter recipients Qualified installer...
Page 53: ...neutral N connection is not required 7 1 2 External AC input protections General schematic to identify the position of AC protection devices A B C D E Parameter Description A Medium voltage network B...
Page 54: ...nstaller s responsibility to ensure reliable Internet connection to the charger Contingency planning and the associated costs are the responsibility of the installer There are two options for the Inte...
Page 55: ...or local electric code The earth connection must be made through the Protective Earth PE internal connection busbar 38 NOTE Any failure of the EVSE not connected to PE is not covered by the warranty 3...
Page 56: ...red by the warranty The AC connection must be made on the Main AC terminals 33 33 42 L1 L2 L3 33 B A Remove the three Main AC protection barriers 42 if not previously removed Refer to 5 4 1 Remove the...
Page 57: ...e 2 side screws A NOTE Tighten the system until the sponges close the spaces around the AC cables Do not overtighten the AC cables to avoid damaging them NOTE The AC cables entry system is not a cable...
Page 58: ...d management of chargers in real time For more information please refer to https new abb com ev charging connected services web modules NOTE We recommend using at least a CAT 5e category Ethernet cabl...
Page 59: ...ponsible for considering a voltage drop on the 24 V DC circuit The owner must make sure that the undervoltage release of the branch circuit breaker receives the correct input voltage according to the...
Page 60: ...ip the insulation from the end of the wires Crimp a ferrule A on the end of the wires B V G N D C O M N C 39 To install the wires on the screw terminal blocks 39 follow the step Open the terminal unsc...
Page 61: ...61 Operation and correct use EN 8 Operation and correct use This chapter will give instruction on the correct use of the EVSE Chapter recipients Owner Qualified installer User...
Page 62: ...urer 3 The Owner Qualified installer should check that these data are available Contact data of the contact person on site Address of the EVSE Site name Exact location of the EVSE longitude and latitu...
Page 63: ...eam breaker to ON position to provide power to the EVSE Wait four hours at least NOTE The internal heater of the cabinet heats the inside of the cabinet and lets the condensation evaporate When the pr...
Page 64: ...sion if damage is found Remove the EV charge cable from the EVSE Connect the EV charge cable to the connector on the EV On the touchscreen press the Start button If the touchscreen shows a message to...
Page 65: ...rgency stop if there is an emergency If there is an emergency Push the emergency stop button The EVSE stops the operation and the display will become red Contact the Site operator NOTE Only push the e...
Page 66: ...ration and installation manual Terra 94 124 184 NEVI UL EN 9 Maintenance and troubleshooting In this section the user will be instructed on maintenance and cleaning procedures Preliminary requirements...
Page 67: ...parts of the EVSE Exterior of the cabinet Charging cables Charging connectors Connector holders Cable management systems if present Signs of rust that cause ingress of water NOTE When the EVSE is put...
Page 68: ...e charge session Make sure that you have authorization to charge the EV The display shows this message Unable to unlock the connector from car A dangerous voltage is present on the EV charging cable W...
Page 69: ...to strengthen the door locking mechanism with appropriate tools 9 3 4 Working area preparation Unplug and remove any vehicle from the EVSE under maintenance and secure it from any vehicles connection...
Page 70: ...12 Dehn UK 25 SK p n 773 034 Dehn EKV4u1 16 G four poles earthing and short circuiting device 9 3 7 Total de energization procedure 1 Preliminary control Make sure that the unit must be turned on 2 Id...
Page 71: ...incoming line in presence of a site configured as below OPEN LOTO External LV AC Switch Cable conduit 100 m External LV AC Switch MW Switch MV distribution panel MW LV Transformer LV distribution pan...
Page 72: ...hen the tasks are completed remove any tools that were used as well as the earthing short circuiting if installed 12 Insulating barriers restore At the end of intervention it will be necessary to rest...
Page 73: ...ls of the equipment characteristics and technical data overall dimensions and equipment identification A description of the equipment characteristics is provided to identify its main components and sp...
Page 74: ...it current 65 kA Power Factor 0 99 rated DC power Total Harmonic Distortion THD 5 Stand by active power 50 W heater off 900 W heater on 1 Protection Overcurrent overvoltage undervoltage ground fault i...
Page 75: ...17 2nd R2022 1 The heater will operate daily when the outside air reaches the dew point to avoid condensation inside the cabinet 2 Min 0 94 at different output power and voltage 10 1 2 Environmental...
Page 76: ...net CAT CAT 5e recommend CAT 6 high presence of electromagnetic interference and or noise Ethernet cable diameter cable entry plate 25 64 43 64 in 10 17 mm Insulation PVC or other material that is ser...
Page 77: ...50 400 0 10000 20000 30000 40000 50000 60000 70000 80000 90000 100000 150 200 250 300 350 400 450 500 550 600 650 700 750 800 850 900 Output power W Output Voltage V Charger Output Power W Charger Out...
Page 78: ...L EN 10 4 3 CHAdeMO 200A 1 session 0 50 100 150 200 250 300 350 400 0 10000 20000 30000 40000 50000 60000 70000 80000 90000 100000 150 200 250 300 350 400 450 500 Output power W Output Current A Outpu...
Page 79: ...40000 50000 60000 70000 80000 90000 100000 110000 120000 130000 140000 150 200 250 300 350 400 450 500 550 600 650 700 750 800 850 900 Output power W Output Voltage V Output Current A Charger Output P...
Page 80: ...AdeMO 200A 1 session 0 50 100 150 200 250 300 350 400 0 10000 20000 30000 40000 50000 60000 70000 80000 90000 100000 110000 120000 130000 140000 150 200 250 300 350 400 450 500 Output power W Output V...
Page 81: ...0 400 450 0 20000 40000 60000 80000 100000 120000 140000 160000 180000 150 200 250 300 350 400 450 500 550 600 650 700 750 800 850 900 Output power W Output Voltage V Output Current A Charger Output P...
Page 82: ...00 350 400 450 500 550 600 650 700 750 800 850 900 Output power W Output Voltage V Output Current A Charger Output Power W Charger Output Current A 10 6 4 CHAdeMO 200A 1 session 0 50 100 150 200 250 3...
Page 83: ...tion additional technical drawing specification schematics are given NOTE If you need further information please contact your local manufacturer service dept Refer to section Manufacturer and contact...
Page 84: ...124 184 NEVI UL EN 11 1 EVSE dimensions 11 1 1 EVSE dimensions without CMS NOTE The measurements in the drawing are in inches and millimeters in mm 22 25 565 34 65 880 1 52 38 5 28 11 714 5 02 127 5 2...
Page 85: ...ments EN 11 1 2 EVSE dimensions with two CMS NOTE The measurements in the drawing are in inches and millimeters in mm 27 32 694 35 35 898 28 11 714 5 02 127 5 17 76 451 33 34 847 36 3 922 74 8 1900 76...
Page 86: ...cables coming from the underground cable conduit in blue NOTE The red arrow indicates the front side of the EVSE The measurements in the drawing are in inches and millimeters in mm 22 25 565 3 68 93 5...
Page 87: ...the responsibility of the installer to make sure that the EVSE complies with ADA requirements The measurements in the drawing are in inches and millimeters in mm Z5 5 140 Ground Foundation level A Z3...
Page 88: ...thout CMS The measurement in the drawing are releted to T184 model with two charging cables NOTE For the T94 and T124 models take into account a tolerance of 3 in 77 mm for each measurement NOTE The m...
Page 89: ...0 6 1 315 20 6 1 With CMS 0 16 3 4 98 45 17 1 5 21 90 17 1 5 21 153 14 3 4 34 180 13 9 4 24 225 14 3 4 34 270 14 6 4 46 315 15 4 4 69 Right charging cable Angle Distance ft m Without CMS 0 16 8 5 12 5...
Page 90: ...https e mobility abb com Terra 94 124 184 NEVI _UL Operation and installation manual EN Rev 002 EFFECTIVE 19 04 2024...