background image

Installation and maintenance guide
1ZSC000563-AAX EN, REV. A, 2019-03-21

39

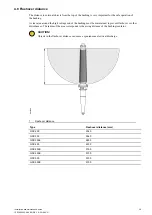
4.8 Flashover distance

The distance to external objects from the top of the bushing is very important for the safe operation of
the bushing.

A clear area around the high voltage end of the bushing must be maintained, to prevent flashover or other
disturbances. The radius of the area corresponds to the arcing distance of the bushing insulator.

CAUTION!

Objects in the flashover distance can cause a spontaneous electrical discharge.

G004180

1

Flashover distance

Type

Flashover distance (mm)

GSC 200

2045

GSC 300

3540

GSC 300E

2855

GSC 400

4230

GSC 450S

3760

GSC 450E

5100

GSC 500

5100

GSC 500E

5100

Summary of Contents for GSC Series

Page 1: ...1ZSC000563 AAX EN REV A 2019 03 21 Transformer bushing type GSC Installation and maintenance guide ...

Page 2: ...or any errors that may appear in this document ABB AB is not liable for any damage resulting from the incorrect interpretation of this document This document or parts thereof may not be reproduced or copied without ABB AB s consent It may not be distributed to others or used by unauthorized parties Any breaches to the above will be penalized with the support of applicable laws ...

Page 3: ...iew 17 4 3 2 Removing transport container and outer terminal 18 4 3 3 Lifting type GSC 200 300 300E 400 19 4 3 4 Lifting type GSC 450S 450E 500 500E 21 4 4 Installation with draw rod at the transformer factory 23 4 5 Installation with draw rod at site 29 4 6 Installation of the outer terminal 34 4 7 Grounding of the bushing flange 37 4 8 Flashover distance 39 5 Commissioning 41 5 1 Waiting time be...

Page 4: ...on and maintenance guide 1ZSC000563 AAX EN REV A 2019 03 21 8 Spare parts 51 8 1 Summary 51 9 Disposal and environmental information 53 9 1 Overview 53 9 2 Disposal and recycling 53 10 References 55 10 1 Summary 55 ...

Page 5: ...duct It is used for example to warn of such dangers as contact with high voltage explosion or fire risk risk for toxic gases risk of crushing impacts falls from high places etc CAUTION The round warning symbol warns that an accident could occur if the instructions are not observed and that this could result in personal injury and or damage to the product It is also used to warn of risks that entai...

Page 6: ...safety regulations Do not use ladders or platforms in poor weather conditions Working with heavy objects Do not walk under lifted objects Make sure that heavy objects are stable before starting work 1 3 Safety precautions Precaution Action Transformer oil Collect used transformer oil in drums Transformer oil is dangerous Fumes from hot oil can cause irritation to the respiratory organs and the eye...

Page 7: ... foil inserts for electrical stress control The core is impregnated and cured in vacuum giving a partially discharge free bushing with low dissipation factor tan δ The insulator is made of composite material and has a silicone shed The space between the condenser core and the insulator is filled with insulating gel On the flange there is a test tap The outer conducting layer of the condenser core ...

Page 8: ...000563 AAX EN REV A 2019 03 21 General schematics There can be some variation depending on type and configuration G003158 1 Outer terminal 2 Composite insulator SiR 3 Mounting flange 4 RIP condenser core 5 Test tap voltage tap 6 Ground shield ...

Page 9: ...outermost conductive layer to ground and must always be installed when the bushing is energized The maximum one minute test voltage for this test tap is 2 kVrms The test tap can be used as a power source if it is connected to an external capacitance The operating voltage is limited to 600 V CAUTION Do not energize the bushing without a test adapter or the cover installed The bushing is grounded th...

Page 10: ... is energized The maximum one minute test voltage for this voltage tap is 2 kVrms The voltage tap can be used as a power source if it is connected to an external capacitance The operating voltage is limited to 6 kV CAUTION Do not energize the bushing without a test adapter or the cover installed The cover connects the outermost conductive layer to ground and will prevent damage to the bushing G000...

Page 11: ... pollution level According to the specific creepage distance and IEC 60815 Immersion medium Transformer oil The maximum daily mean oil temperature is current dependent and project specific Maximum pressure of medium pg 100 kPa pg relative to ambient pressure Angle of installation From horizontal to vertical Test tap According to IEEE potential tap type A Ur max 600 V Voltage tap Ur 6 kV as option ...

Page 12: ...n operation at installation angle N Maximum cantilever test load N 0 90 GSC 200 3200 2000 6300 GSC 300 3300 2000 6600 GSC 300E 3300 2000 6600 GSC 400 6500 4000 13000 GSC 450S 6500 4000 13000 GSC 450E 6500 4000 13000 GSC 500 6500 4000 13000 GSC 500E 6500 4000 13000 Maximum permitted torque on the outer terminal The maximum torque that is permitted on the outer terminal Type Maximum torque GSC 200 3...

Page 13: ... threads and at some temperatures Vaseline can appear as oil 3 2 Transportation The bushing must be transported in the transport box Carefully inspect the bushing for damage after transportation 3 3 Storage Short and long term storage The transport container must be attached to the bushing during storage Replace the drying agent if it has been exposed to the atmosphere The bushing can be stored ou...

Page 14: ...the soft lifting slings are approved for the total weight of the transport box and bushing Refer to the weight in the packing list 2 Attach soft lifting slings 2 to the designated locations NOTE There are markings on the transport box were to place the soft lifting slings 3 Make sure that the angle of the soft lifting sling does not exceed 20 4 Carefully lift the transport box 5 Set down the trans...

Page 15: ...ate 2 Open the transport box NOTE The cover is attached with bolts 3 Remove the support blocks from the transport box and put them on the ground CAUTION Make sure that the ground is flat NOTE If there are no support blocks in the transport box use soft bedding 4 Attach a soft lifting sling to the bottom end housing as close to the flange as possible and then to the crane hook CAUTION Do not put th...

Page 16: ...ing to the outer terminal and then to the crane hook CAUTION Attach the soft lifting sling as close to the top housing as possible or damage will occur 6 Carefully lift the bushing 7 Lower the bushing onto the support blocks NOTE If there are no support blocks then use soft bedding End of instruction ...

Page 17: ... bushing flange Box spanner 9760 669 B For removal and installation of the bottom contact Draw rod system Tackle For installation of the bushing at a specific angle 4 2 Consumables Item Brand Part number Note Oil based Vaseline Fuchs 1171 5011 102 For treatment of contact surfases Does not react with transformer oil Mobilgrease 28 MOBIL 1171 4014 407 Lubricate and protect outer terminal gasket Mol...

Page 18: ...g Refer to net weight in the packing list 2 Attach soft lifting slings arround the transport container to the crane hook G004204 3 Remove the transport container NOTE Be carefull not to damage the condenser core when removing the transport container G004185 4 Remove the M10 bolts 8 and washers 9 and then remove the outer terminal 7 NOTE Keep the outer terminal 7 bolts 8 and washers 9 they will be ...

Page 19: ...angle arrange the lifting according to position 6 in the figure When lifting the bushing for installation at a specific angle use a shackle and arrange according to position 5 in the figure The lifting tool must be aligned with the lifting eye in the flange G004172 1 Lifting tool 2 Soft bedding e g rubber mat or woodboard 3 Lifting eye 4 Shackle 5 Lifting with a specific angle 6 Lifting vertical ...

Page 20: ... the 9760 667 A lifting tool is used NOTE Align the lifting tool with the lifting eyes on the flange G004173 Torque 40 4 Nm 2 For vertical installation attach soft lifting slings 6 from the lifting tool 1 to the crane hook G004207 3 For installation at a specific angle also attach soft lifting slings with a shackle 4 from the flange to the crane hook G004174 4 Align the crane hook with the lifting...

Page 21: ...erview When lifting the bushing GSC 450S 450E 500 500E for installation at vertical angle arrange the lifting according to position 6 with the soft lifting slings going through the lifting tool down to the lifting eyes at the flange When lifting the bushing for installation at a specific angle use a shackle and arrange according to position 5 in the figure The lifting tool must be aligned with the...

Page 22: ...67 AAA lifting tool is used NOTE Align the lifting tool with the lifting eyes on the flange G004211 Torque 40 4 Nm 2 For vertical installation attach soft lifting slings from the lifting eyes 3 through the lifting tool 1 to the crane hook G004209 3 For installation at a specific angle also attach soft lifting slings with a shackle 4 from the flange to the crane hook G004210 4 Align the crane hook ...

Page 23: ...ackle 4 until the bushing flange has the same angle as the tranformer flange End of instruction 4 4 Installation with draw rod at the transformer factory Overview The draw rod is usually installed in the bushing when it is delivered from ABB the first step at the transformer factory is therefore to remove it G004175 1 Upper draw rod 2 Flexible pull through cord 3 Lower draw rod with bottom contact...

Page 24: ... use a lubricant with equal properties to Vaseline G003144 2 Remove the M16 nut 10 on the draw rod G000238 3 Pull down the draw rod from the bottom end of the bushing and disassemble it at the lower joint 8 NOTE The upper screw thread 7 locked with thread locking fluid 1269 0014 408 G003145 4 Carefully clean the bottom end of the bushing and the inside of the center hole Look for damage ...

Page 25: ...winding cables to the bottom contact CAUTION Make sure that there is no tension in the windig cables Tension in the winding cables will cause damage to the bottom contact G003001 Torque 68 6 Nm 7 Only for the GSC 200 300 400 450S Make sure the compensating device 14 is still in the bushing G004224 8 Lift the bushing above the opening on the transformer ...

Page 26: ...e pull through cord 12 in tension while lowering the bushing onto the transformer NOTE Put plastic sleeves on two or three of the stud bolts to guide the flange and to prevent damage to the stud bolts G004176 11 Install the nuts and washers Tighten the nuts in a crosswise sequence G003146 Torque Please refer to the transformer documentation ...

Page 27: ...olykote Multilub with a rag G003144 13 Remove the lifting gear and the pull though cord 14 Tighten the nut G004182 Torque 10 Nm GSC 200 300 300E 400 450S 20 Nm GSC 450E 500 500E 15 Measure the distance a NOTE The bushing is delivered with an information sheet that specifies the measurement b a and the torque of the draw rod nut These values are measured when the bushing is manufactured and are uni...

Page 28: ...bolt must be replaced NOTE One turn of the nut corresponds to a 2 mm extension of the draw rod Type Value Torque GSC 200 7 8 mm 70 140 Nm GSC 300 8 8 mm 70 140 Nm GSC 300E 10 3 mm 70 140 Nm GSC 400 12 0 mm 70 140 Nm GSC 450S 12 0 mm 70 140 Nm GSC 450E 9 0 mm Max 160 Nm GSC 500 9 0 mm Max 160 Nm GSC 500E 9 0 mm Max 160 Nm G000187 17 If using a hydraulic jack 1 Pull the draw rod with a force accordi...

Page 29: ...gh cord 3 Lower draw rod with bottom contact 4 Bottom contact 5 Bushing Procedure NOTE This procedure is only valid if the lower draw rod with bottom contact 5 is already installed in the transformer 1 Apply Vaseline to the thread on the pull through cord 12 and then connect it to the draw rod NOTE Or use a lubricant with equal properties to Vaseline G003144 ...

Page 30: ...nd of the bushing 5 Remove the transport cover 13 from the transformer 11 and the lower draw rod 4 G004219 6 Only for the GSC 200 300 300E 400 450S Make sure the compensating device 14 is still in the bushing G004224 7 Lift the bushing to a position above the installation opening on the transformer CAUTION Make sure that there are installation markings on the bushing flange The bushing must always...

Page 31: ...4 NOTE Use thread locking fluid 1269 0014 408 G003145 9 Connect the upper draw rod 1 to the lower draw rod 4 G000185 10 Hold the pull through cord 12 in tension while lowering the bushing onto the transformer NOTE Put plastic sleeves on two or three of the stud bolts to guide the flange and to prevent damage to the stud bolts G004176 ...

Page 32: ...e refer to the transformer documentation 12 Install the washer and nut on the draw rod NOTE Apply a generous amount of Molykote Multilub on the nut washer and drawrod bolt Remove any excess Molykote Multilub with a rag G003144 13 Remove the lifting gear and the pull though cord 14 Tighten the nut G004182 Torque 10 Nm GSC 200 300 300E 400 450S 20 Nm GSC 450E 500 500E ...

Page 33: ...le value CAUTION Continuously measure the torque when turning the nut If the maximum torque is reached before the target distance then remove the nut and draw rod bolt to apply more Molykote Multilub and tighten again If the threads are damaged the nut and draw rod bolt must be replaced NOTE One turn of the nut corresponds to a 2 mm extension of the draw rod Type Value Torque GSC 200 7 8 mm 70 140...

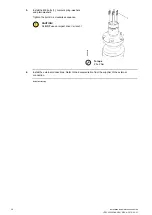
Page 34: ...kN GSC 450E 40 kN GSC 500 40 kN GSC 500E 40 kN End of instruction 4 6 Installation of the outer terminal Procedure 1 Carefully clean the contact and gasket surfaces with a soft cloth and then apply Mobilgrease 28 to the O ring 3 CAUTION Do not use a wire brush on the inner contact surfaces of aluminum outer terminals NOTE Or use a lubricant with equal properties to Mobilgrease 28 NOTE When the out...

Page 35: ...rminal 5 G004177 3 Apply Molykote Multilub to the washers and to the threads and the shank of the M10 bolts 2 NOTE Or use a lubricant with equal properties to Molykote Multilub G004220 4 Install the M10 bolts 2 and plain washers Tighten the bolts in a crosswise sequence CAUTION Do NOT use an impact driver wrench G004178 Torque 40 4 Nm ...

Page 36: ...e M8 bolts 1 conical spring washers and plain washers Tighten the bolts in a crosswise sequence CAUTION Do NOT use an impact driver wrench G000232 Torque 20 2 Nm 6 Install the external connections Refer to the documentation from the supplier of the external connection End of instruction ...

Page 37: ... grounding can cause damage to equipment or death to personnel Procedure with a cone point set screw 1 Apply a large quantity of Mobilgrease 28 to the cone point set screw 13 CAUTION The quality of the cone point set screw is important stainless steel of A4 80 quality is recommended NOTE Or use a lubricant similar to Mobilgrease 28 G004940 2 Install the cone point set screw 13 NOTE The cone point ...

Page 38: ...y a large quantity of Mobilgrease 28 to the bolt 13 CAUTION The quality of the bolt is important stainless steel of A4 80 quality is recommended NOTE Or use a lubricant similar to Mobilgrease 28 3 Install the bolt 13 Torque M12 40 Nm 4 Connect the other end of the flexible cable 14 to the transformer NOTE This makes an electrical connection between the bushing and transformer tank keeping them at ...

Page 39: ...d the high voltage end of the bushing must be maintained to prevent flashover or other disturbances The radius of the area corresponds to the arcing distance of the bushing insulator CAUTION Objects in the flashover distance can cause a spontaneous electrical discharge G004180 1 Flashover distance Type Flashover distance mm GSC 200 2045 GSC 300 3540 GSC 300E 2855 GSC 400 4230 GSC 450S 3760 GSC 450...

Page 40: ...40 Installation and maintenance guide 1ZSC000563 AAX EN REV A 2019 03 21 ...

Page 41: ...instructions Gas saturated transformer oil After the oil filling process has been completed wait for 24 hours before energizing the transformer De gassed transformer oil After the oil filling process has been completed wait for 6 hours before energizing the transformer A reduced oil level After the oil level has been restored wait 24 hours before energizing the transformer 5 2 Recommended tests be...

Page 42: ...terminal NOTE The oil level of the transformer must be above the bottom end of the bushing but below the bushing flange 2 Increase the oil level to just below the bushing flange to raise the pressure in the center tube 3 Find leaking gas with gas detector sniffer near the gasket G003147 End of instruction 5 2 4 Measurement of capacitance and dissipation factor Overview After installation of the bu...

Page 43: ...600 mm C1 C2 test tap GSC 200 617 5000 GSC 300 632 5000 GSC 300E 821 5000 GSC 400 612 5000 GSC 450S 648 5000 GSC 450E 850 5000 GSC 500 799 5000 GSC 500E 915 5000 Procedure 1 De energize the transformer 2 Disconnect the external connections from the outer terminal of the bushing 3 Remove the cover 2 Part Article number Cover 2769 522 M O ring 1ZSC00442 CAK G004942 4 Connect the measuring equipment ...

Page 44: ...resistance depends on the design of the transformer In general a current is applied from bushing to bushing The voltage drop from the outer terminal to outer terminal is measured The resistance is calculated with Ohm s law U R I U Measured voltage drop I Through current R Total circuit resistance The total through resistance is the sum of the transformer winding lead resistance the bushing conduct...

Page 45: ...o the reference temperature Then compare the calculated resistance to the reference resistance A difference of less than 2 is acceptable NOTE The transformer manufacturer gives the reference temperature for through resistance measurements 4 If the calculated difference of resistance is more than 2 from the reference resistance 1 Make sure that the external connections have low resistance and make ...

Page 46: ...46 Installation and maintenance guide 1ZSC000563 AAX EN REV A 2019 03 21 ...

Page 47: ...re water jet This can cause damage to the insulator sheds Measurement of capacitance and dissipation factor Please refer to Measurement of capacitance and dissipation factor page 42 Thermovision infrared camera check for local overheating on connectors At the maximum rated current the bushing outer terminal normally operates at a temperature of about 35 C to 45 C above the ambient temperature Sign...

Page 48: ...48 Installation and maintenance guide 1ZSC000563 AAX EN REV A 2019 03 21 ...

Page 49: ... drying agent in the transport container 1 2 Install the gasket 2 3 Carefully put the transport container on the bushing and install the bolts CAUTION Make sure that the transport container does not cause damage to the condenser core NOTE The transport container has to be ordered separately G004199 Torque 50 Nm 2 Lift the bushing Refer to Lifting the bushing out of the transport box page 15 ...

Page 50: ...e transport box CAUTION Make sure that the test tap does not make contact with the transport box or other objects 4 Attach the bushing to the transport box in the same way as when it was delivered CAUTION Make sure that the bushing cannot move or rotate in the transport box 5 Close the transport box NOTE Refer to Lifting the transport box page 14 and Transportation page 13 End of instruction ...

Page 51: ...3 AAX EN REV A 2019 03 21 51 8 Spare parts 8 1 Summary If the bushing is damaged we recommend that it is returned to ABB for repairs and re testing Some parts that are damaged or lost during transportation or installation can be ordered from ABB ...

Page 52: ...52 Installation and maintenance guide 1ZSC000563 AAX EN REV A 2019 03 21 ...
Page 53: ...ndenser core there is silicone gel Resin impregnated paper condenser core containing mainly epoxy creped paper and an embedded conductor tube in aluminum or copper The core also contains a smaller quantity of aluminum foil inserts rubber bonded cork rubber seals braided copper wire tinned braided copper strap silver glue and lead By crushing the core the conductor tube can be separated and sorted ...

Page 54: ...ickel which are used sparingly as surface coatings Plastics The different types of plastic should be separated and sent to an approved environmental waste treatment plant or recycling plant The energy content in thermoplastics and thermosetting plastics can often be recovered through combustion at a plant built for the purpose Thermoplastics can usually be melted down and reused without significan...

Page 55: ... conditioning 2750 515 142 Technical guide 1ZSC000563 AAW Test adapter Installation and maintenance guide 1ZSC000563 ACD Transformer oil IEC 60296 class 2 Handling and Cleaning of Composite Insulators SEPTPT PL T MB 2193 High voltage test techniques IEC 60060 Selection and dimensioning of high voltage insulators for use in a polluted environment IEC 60815 ...

Page 56: ...ABB AB Components SE 771 80 Ludvika Sweden www abb com transformercomponents Copyright 2019 ABB All rights reserved Specifications subject to change without notice 1ZSC000563 AAX EN REV A 2019 03 21 ...

Reviews: