background image

AW T4 20 |

  U N I V ER S A L 4 - W I R E , D UA L- I N P U T T R A N SM I T T ER  |  O I/AW T4 2 0 - EN R E V. B

5

1  Health & Safety

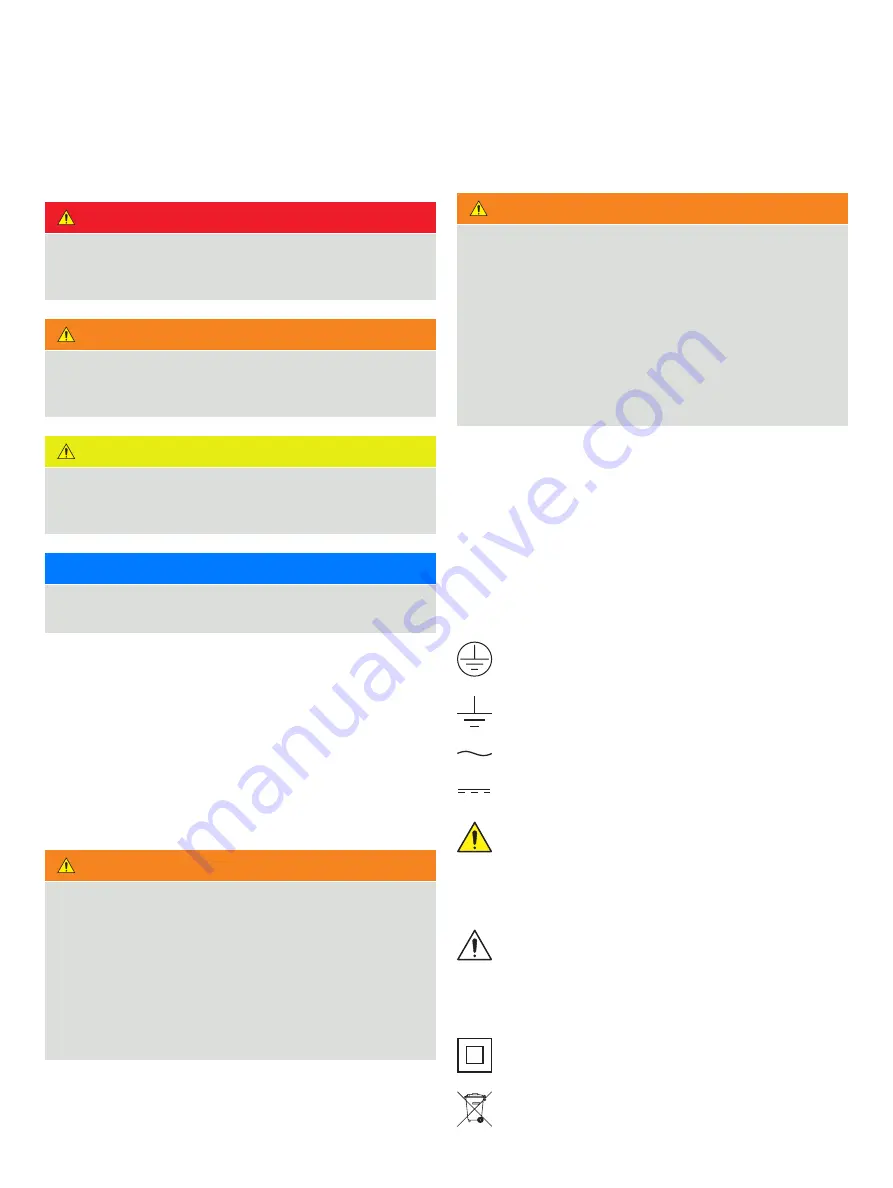
Document symbols

Symbols that appear in this document are explained below:

 DANGER 

The signal word ‘

DANGER

’ indicates an imminent danger. 

Failure to observe this information will result in death or 
severe injury.

 WARNING   

The signal word ‘

WARNING

’ indicates an imminent danger. 

Failure to observe this information may result in death or 
severe injury.

 CAUTION 

The signal word ‘

CAUTION

’ indicates an imminent danger. 

Failure to observe this information may result in minor or 
moderate injury.

NOTICE  

The signal word ‘

NOTICE

’ indicates potential material 

damage.

Note
‘Note’ 

indicates useful or important information about the 

product.

Safety precautions

Be sure to read, understand and follow the instructions 
contained within this manual before and during use of the 
equipment. Failure to do so could result in bodily harm or 
damage to the equipment.

 WARNING   

Bodily injury

Installation, operation, maintenance and servicing must be 
performed:

•  by suitably trained personnel only

•  in accordance with the information provided in this 

manual

•  in accordance with relevant local regulations

Potential safety hazards

AWT420 transmitter – electrical

 WARNING   

Bodily injury

To ensure safe use when operating this equipment, the 
following points must be observed:

•  Up to 240 V AC may be present. Be sure to isolate the 

supply before removing the terminal cover.

Safety advice concerning the use of the equipment 
described in this manual or any relevant Material Safety 
Data Sheets (where applicable) can be obtained from the 
Company, together with servicing and spares information.

Safety standards

This product has been designed to satisfy the requirements of 
IEC61010-1:2010 3rd edition ‘Safety Requirements for Electrical 
Equipment for Measurement, Control and Laboratory Use’ and 
complies with US NEC 500, NIST and OSHA.

Product symbols

Symbols that may appear on this product are shown below:

  Protective earth (ground) terminal. 

  Functional earth (ground) terminal. 

  Alternating current supply only.

  Direct current supply only.

  This symbol, when noted on a product, indicates a 

potential hazard which could cause serious personal 
injury and/or death. The user should reference this 
instruction manual for operation and/or safety 
information. 

  This symbol, when noted on a product enclosure or 

barrier, indicates that a risk of electrical shock and/or 
electrocution exists and indicates that only 
individuals qualified to work with hazardous voltages 
should open the enclosure or remove the barrier. 

  The equipment is protected through double 

insulation. 

  Recycle separately from general waste under the 

WEEE directive.

Summary of Contents for AWT420

Page 1: ... procedures refer to the specific sensor manual For more information Further publications for the AWT420 transmitter are available for free download from www abb com measurement or by scanning this code Links and reference numbers for the transmitter publications are also shown below Search for click on AWT420 transmitter Data Sheet DS AWT420 EN AWT420 transmitter Commissioning Instruction CI AWT4...

Page 2: ...ns 15 2 electrode sensors 15 4 electrode sensors 15 Power supply connection 16 Fitting the EZLink modules 18 Connecting EZLink sensors 20 Long cables 20 6 Easy Setup 21 7 Calibration and sensor setup 21 8 Hot plug in EZLink sensors only 22 Sensor setup parameters 22 Transmitter configuration parameters 22 Sensor addition 22 Sensor replacement 23 Replacing the sensor with a sensor of the same type ...

Page 3: ...matic calibration 65 In Process calibration pH 66 Sample collection 67 Sample complete 68 Temperature calibration 69 Turbidity Total Suspended Solids TSS 70 Turbidity TSS sensor verification 71 Preparing the verification tool and locking the sensor in place 71 15 Calibration procedures Turbidity TSS calibration 72 1 Point calibration 72 2 Point calibration 74 TSS calibration 76 1 Point calibration...

Page 4: ...erse acting control 105 Direct acting control 105 Dual acting control 106 Manual Reset proportional band offset 106 Output type 107 Analog output 107 Time proportioning output 107 Pulse frequency output 107 Appendix E Spares 108 Sensor module assemblies 108 AWT420 pH PCB upgrade spares kit 108 AWT420 2 electrode conductivity PCB upgrade spares kit 108 AWT420 4 electrode conductivity PCB upgrade sp...

Page 5: ...jury To ensure safe use when operating this equipment the following points must be observed Up to 240 V AC may be present Be sure to isolate the supply before removing the terminal cover Safety advice concerning the use of the equipment described in this manual or any relevant Material Safety Data Sheets where applicable can be obtained from the Company together with servicing and spares informati...

Page 6: ...an be hosed down if it has been installed to IP66 NEMA 4X standards i e cable glands are correctly fitted and all unused cable entry holes are blanked off see page 13 and page 12 Warm water and a mild detergent can be used 2 Cyber security This product is designed to be connected to and to communicate information and data via a digital communication interface It is your sole responsibility to prov...

Page 7: ...a sensor interface board The process reading is displayed on the main page and can be displayed as a graph in the Chart View refer to page 29 for details of view options Diagnostic messages inform the user of the system status and can be logged for review The system status can also be assessed remotely using optional HART MODBUS Profibus or Ethernet communications Installation and commissioning is...

Page 8: ...ion providing easy access Avoid rooms containing corrosive gases or vapors for example chlorination equipment or chlorine gas cylinders Figure 2 Transmitter location Transmitter dimensions Dimensions in mm in Figure 3 Transmitter dimensions Optional weathershield dimensions Dimensions in mm in Figure 4 Optional weathershield dimensions Sensor modules Sensor modules are fitted to the transmitter ba...

Page 9: ...on the left and right hand mounting brackets A into the recesses on the rear of the transmitter as shown and secure with the bracket securing screws Ensure the plastic washers remain in the positions fitted 2 Mark fixing centers B and drill suitable holes in the wall 3 Secure the transmitter to the wall using 2 screws C in each mounting bracket Figure 5 Wall mounting the transmitter A B Left hand ...

Page 10: ...The correct torque is critical to ensure proper compression of the panel seal and achieve the IP66 NEMA 4X hosedown rating 4 Holding assembly F together position bracket D into the left hand recess on the rear of the transmitter and secure with bracket securing screw G Ensure that the plastic washer remains in the position fitted 5 Repeat steps 3 and 4 for the right hand panel clamp assembly 6 Tor...

Page 11: ...iate holes to suit vertical or horizontal pipe secure the clamp plate to the pipe mounting bracket B using two M6 x 8 mm hexagon head screws and spring lock washers C 3 Position the pipe mounting bracket into the recesses on the rear of the transmitter as shown and secure with the two bracket securing screws D Ensure the plastic washers remain in the positions fitted 4 Secure the transmitter to th...

Page 12: ...S Profibus and Ethernet communication wiring ONLY A special cable gland is supplied with the Ethernet communications option and should be used only for the Ethernet cable The use of cable glands cable flexible cord for connection of the mains power source to the mains input and relay contact output terminals is not permitted in the USA or Canada For connection to mains the mains input and relay co...

Page 13: ...ns module PCB slot Communication module connections refer to separate supplements HART COM AWT420 HART EN MODBUS COM AWT420 MODBUS EN PROFIBUS COM AWT420 PROFIBUS EN ETHERNET COM AWT420 ETHERNET EN AC supply DC supply 100 to 240 V AC 10 50 60 Hz 90 min to 264 V max AC 45 65 Hz 100 to 240 V AC 18 to 36 V DC 15 W max Relay connections Analog output connections Digital I O connections 24 V DC nominal...

Page 14: ...onductivity connections pH ORP pIon sensor module connections NOTICE ORP Redox and Antimony pH sensors do not feature temperature compensation therefore do not have temperature sensors or related wiring Relay and analog outputs Relays 1 to 4 EXT PSU 12 to 30 V DC 150 mA max Digital input volt free Analog outputs 1 to 4 500 Ω max Digital output open collector Load Load N O COM N C Load DIO DIO DIO ...

Page 15: ...dard sensors with diagnostic functions Sensor type RTD wiring SENSE 1 GUARD 2 REF 3 S GND 4 RTD 1 5 RTD 2 6 SHIELD 7 RTD 3 8 TBX5 2 lead Blue Yellow Black Green Red White Dark green AP2xx 2 lead Clear Red Blue Green Yellow Red White 3 lead Clear Red Blue Green Yellow Red White Grey Cut and remove grey wire Conductivity sensor module connections 2 electrode sensors Sensor type RTD wiring DRIVE 1 2 ...

Page 16: ...nly 1 cable per cable gland Referring to Figure 11 page 17 1 Using a suitable screwdriver release door retaining screw A and open the transmitter door 2 Release terminal cover retaining screw B and remove terminal cover plate C 3 Slide retaining clip D off blanking plug E and remove the blanking plug if fitted 4 Fit cable gland F and secure using nut G 5 Remove gland cover H and route mains power ...

Page 17: ...T420 EN REV B 17 Figure 11 Connecting the transmitter AC mains power supply A D E F G H 1 2 3 4 5 6 7 8 1 2 3 4 5 6 7 8 GLASS GUARD REFERENCE SOLUTION EA R TH PT PT SCREEN PT 3 rd COMMUNICATIONS Sensor 1 C B L L N External protective earth stud DC version ...

Page 18: ...connector for sensor 1 passes through cable entry D b if two EZLink modules are used push fit sensor 1 module into location C and sensor 2 module into location E Note When fitting the cable assemblies the EZLink connector for sensor 1 passes through cable entry D and the EZLink connector for sensor 2 passes through cable entry F Figure 12 EZLink module positions and EZLink cable entries Referring ...

Page 19: ...onnector body using the flats on the alignment washer see Figure 13 9 Screw back nut J onto connector body and tighten using a spanner Figure 14 Securing the EZLink connector cable assembly Referring to Figure 15 10 Place EZLink cable plug M into EZLink connector block cradle A 11 Plug connector block cradle A into EZLink module N Figure 15 Connecting the EZLink cable assembly 12 If a second EZLin...

Page 20: ...and push the connectors together 2 Turn nut C clockwise to secure the connectors together The transmitter detects the type of sensor connected automatically NOTICE When installing sensor extension cables ensure the male end end with label of the cable is installed towards the transmitter Long cables If cables are longer than 30 m 94 ft or they are outside the following cables must be screened or c...

Page 21: ...evised changed at any time by selecting Enter Configuration from any Operator or View page menu followed by Advanced from the Access Level menu NOTICE If Easy Setup does not detect a key press within 5 minutes the display changes automatically to the main Operator page Refer to page 25 for details of menu navigation and parameter selection adjustment 7 Calibration and sensor setup CAUTION Do not a...

Page 22: ...ameters may also include primary variable measurement units and measurement range The transmitter maintains a copy of these parameters as long as the sensor is connected Transmitter configuration parameters Are those that define transmitter operation for example current output assignment and range relay and alarm assignment Some sensor types also store sensor setup parameters in the transmitter Se...

Page 23: ...log output the output s value is not held Sensor removal is classed as a failure by the diagnostic system and this overrides the existing analog output current 2 Connect the new sensor to the same EZLink connector see page A user prompt is displayed asking which configuration to use 3 Press the TX to use the sensor configuration saved in the transmitter used with the sensor previously connected or...

Page 24: ...utputs during temporary sensor removal press the and select Manual Hold from the Operator page menu If a failure current has been configured for an analog output the output s value is not held Sensor removal is classed as a failure by the diagnostic system and this overrides the existing analog output current If a sensor is subsequently refitted reconnection is detected by the transmitter and meas...

Page 25: ... items and decrease displayed values E Group key Toggles between Operator pages 1 to 5 when an Operator page is selected with the View key View screens Diagnostics View Signals View Alarms View and Outputs View when the Diagnostics View screen is selected with the View key Log screens Calibration Log Alarm Log Audit Log and Diagnostics Log when the Calibration Logs screen is selected with the View...

Page 26: ...ng CAL shortcut D Press the key C below the CAL prompt Figure 19 Operator menus Operator menus comprise Operator Pages displays the Operator page for each available sensor Data Views displays enabled data views Logs displays enabled Log views Alarm Acknowledge acknowledges the active alarm displayed in the Alarms View Manual Hold holds freezes the current outputs and alarms for the selected sensor...

Page 27: ...pH and turbidity The highest priority diagnostic or alarm is displayed Other active diagnostic alarm states can be viewed on the Diagnostics View see page 22 Figure 20 Operator Page multiple sensors 4 98 62 38 CAL 03 09 2019 14 33 12 Instrument tag user assignable Time and date Process value PV Chemical units Chemical units pH pH NTU Turbidity S1 Cleaning TAG 1 TAG 1 NAMUR NE107 Status Icons Calib...

Page 28: ...efer to the sensor s Operating Instruction the bargraph flashes to indicate the value is outside the specified range When multiple sensors are fitted and Autoscroll is selected from the Operator Menu see page 26 the display scrolls through each available Operator Page consecutively Figure 21 Operator pages overview ppm CAL 7 82 03 09 2019 15 31 08 C 17 3 Time and date Unit of measure Temperature r...

Page 29: ...s View 01 O2 O3 O4 CAL 04 09 2019 08 10 11 Diagnostics View PV Failure NV Error Cal Failed Cleaning NAMUR icon and message priority see page 83 Diagnostic message View icon No Message CAL 04 09 2019 08 10 11 8 201 136 01 24 0 1 055 0 000 22 2 ppm C ppm weeks Signals View Dissolved Oxygen D O Saturation Temperature Active Slope Active Offset RDO Cap Expiry Signal value Signal type Units S1 RDO Valu...

Page 30: ...e shown in Table 3 The Diagnostics Log shows the history of diagnostic messages that have been displayed in the Diagnostic View see page Log entry Description Cal Failed Calibration procedure failed due to low slope or sample temperature error Cal Aborted Calibration aborted manually by the user Cal Missed Note Sensor type specific Table 2 Calibration Log entries Log entry Description Power Failur...

Page 31: ... storing Do not expose to static electricity electrical noise or magnetic fields When handling an SD card take care not to touch any exposed metal contacts Back up critical data stored on removable media regularly SD card insertion and removal Referring to Figure 28 1 Using a suitable screwdriver release door retaining screw A 2 Open the transmitter door and remove media cover B 3 Insert removable...

Page 32: ...ximum permissible size a new file is created at 00 00 00 a m on the following day data is logged into the existing file continuously until the new file is created the daylight saving period starts or ends working files cannot be found are corrupted the date and or time is changed The filename is formatted as follows Data logs ddmmmyy hhmmss instrument tag D00 Log files The Alarm Event Calibration ...

Page 33: ...9 Access level screen Level Access Logout Displayed only after Calibrate or Advanced levels are accessed Logs the user out of the current level If passwords are set a password must be entered to access these levels again after selecting Logout Read Only View all parameters in read only mode Calibrate Enables access and adjustment of Calibrate parameters Calibration is sensor specific refer to the ...

Page 34: ...Alarm hold and clean icons Alarm indicates a user defined alarm condition 20 character and flashes intermittently with an associated NAMUR diagnostic icon Hold indicates that alarms analog outputs are in a manual hold state Cleaning indicates that a manual or automatic clean is in progress Title bar icons Media on line 0 to 20 full Media on line 20 to 40 full Media on line 40 to 60 full Media on l...

Page 35: ...ibrate Level indicates that the Calibration Level parameters are enabled for the current user Read Only Level indicates that the transmitter is in Read Only mode All parameters are locked and cannot be configured High process alarm active inactive Low process alarm active inactive High latch alarm active inactive Low latch alarm active inactive Not displayed at Operator levels Log icons Source sen...

Page 36: ...n of Data logging Load and save of configurations Refer to the relevant sensor manual for details of sensor setup menus Configuration of Process alarms Refer to the Calibration section page 55 for menu options Refer to communications manuals COM AWT420 HART EN COM AWT420 MODBUS EN COM AWT420 PROFIBUS EN COM AWT420 ETHERNET EN for details of HART MODBUS Profibus and Ethernet connections configurati...

Page 37: ... Type User Defined Set the user defined buffer characteristic curve using the five point linearizer table pH against C N A Buffer 2 Set the type value of buffer solution 2 Supported buffer solutions from table below user defined ABB Capsule 9 00pH Used Buffer 2 Note Displayed only if Buffer 2 Type User Defined Set the user defined buffer characteristic curve using the five point linearizer table p...

Page 38: ... two 2 electrode conductivity sensors are fitted Access the Calculated Values specific setup pages refer to the Sensor setup section page Device Setup Used to access standard setup parameters Menu Comment Default Initial Setup Instrument Tag Enter an alphanumeric transmitter identification tag 16 characters maximum AWT420 Temperature Units Select the units in which all temperatures are displayed C...

Page 39: ...ot be changed see page 27 View Log Enables Select to enable disable the following Views and Logs Diagnostics View See page 29 for examples of Operator pages in View mode Enable all Signals View Chart View Alarm View Analog OP View Calibration Log See page 30 for examples of Operator pages in Log mode Alarm Log Audit Log Diagnostics Log Chart View Note Chart View menus displayed only when Chart Vie...

Page 40: ...ing start hour in 1 hour increments 1 2 DS Start Occurrence Select the day within the month to start daylight saving For example to set daylight saving to start on the second Sunday of the selected month select Second Last Last DS Start Day Select the day of the month on which daylight saving is to start Note The DS Start Occurrence parameter must be valid within the month for the selected day Sun...

Page 41: ...ximum engineering range output values within the range of measurement permitted by the sensor selected as the source Enabled Failure Current Select to enable disable the output failure function When enabled the current output can be driven to a preset value if a Failure category diagnostic state occurs for the selected source see page 34 22 0 Calibrate AOP1 4 Trim 4 mA AOP1 4 Trim 20 mA Adjust 4 m...

Page 42: ...n Type set to Continuous Clean on Time Recovery Time Clean Type set to Pulsed Clean on Time Clean Off Time x Number of Pulses Recovery Time N A Next Clean Set the date and time of the next scheduled clean N A Digital input output polarity Digital input volt free polarity non inverted Input status Output state Open Inactive Closed Active Digital input volt free polarity inverted Input status Output...

Page 43: ...see Process alarm examples Figure 32 and Figure 33 below Time Hysteresis Set a time hysteresis trip value between 0 0000 and 9999 0 seconds If the alarm trip value is exceeded the alarm is not activated until the Time Hysteresis value has expired If the signal goes out of the alarm condition before the Time Hysteresis has expired the hysteresis timer is reset Process alarm examples Figure 32 High ...

Page 44: ... parameters to external media Up to 8 files can be created If a file exists in a position it is displayed as Config1 Overwrite Either overwrite the existing file or select a new position in which to save it Note Wait until the progress bar is complete and the OK soft key prompt reappears before pressing the key Pressing during a save operation cancels it prematurely resulting in an unusable config...

Page 45: ...alue limited to PV Range PV range low Control Type P P I P I D P D P Proportional Band Numeric value 0 1 to 999 9 100 Integral Action Time If Control Type P I or P I D Numeric value 1 to 7200 s 1 sec Derivative Action Time If Control Type P I D or P D Numeric value 0 1 to 999 9 s 999 9 sec Manual Reset If Control Type P or P D Numeric value 0 0 to 100 0 0 0 Output Type Analog Time Proportioning Pu...

Page 46: ... Time If Output Type Time Proportioning Numeric value 1 0 to 300 0 s 10 sec Pulse Frequency If Output Type Pulse Frequency Numeric value 1 to 120 pulses per minute 60 pulses min Power Recovery Recovery Mode Auto Manual Last Auto Default Output If Recovery Mode Manual Numeric value If Control Action Reverse or Direct Acting 0 0 to 100 0 If Control Action Dual 100 0 to 100 0 0 0 Sensor Failure Actio...

Page 47: ...w Energy module This allows users wireless communication with the transmitter using the dedicated CWA mobile application The mobile application is available for both Android and iOS operating systems Note Only mobile devices with support for Bluetooth 4 2 or newer are compatible Device Enable Enables or disables power to the Bluetooth module When disabled the module is no longer advertising and is...

Page 48: ...is is fixed by the manufacturer and cannot be changed Firmware Revision The revision number of the firmware within the Bluetooth module eLabel The regulatory approval information for the Bluetooth module S1 to S2 Sensor Type The type of sensor connected Model type Displayed only if a pH sensor is connected The type of pH Redox ORP digital sensor Glass type Displayed only if a pH sensor is connecte...

Page 49: ...r possible causes Tx Maintenance The transmitter requires maintenance see Appendix A page 42 for possible causes Tx Function Check The transmitter requires checking see Appendix A page 42 for possible causes S1 to 2 Cal in Progress A calibration is in progress for the associated sensor S1 to 2 Cal Failed The last calibration has failed for the associated sensor S1 to 2 Clean A clean is in progress...

Page 50: ...Range High View the span value used in Chart and Bargraph views N A Range Low View the zero value used in Chart and Bargraph views N A Filter Type Select the signal filtering type None Low Medium High None Temp Comp Type Set the type of temperature compensation Manual Automatic None Automatic Manual Temperature Note Displayed only if temperature compensation type Manual Enter the temperature of th...

Page 51: ... temperature compensation characteristic TC Curve for signal A should be set to NaCl Note The temperature compensation characteristic TC Curve for signal B should be set to NH3 Difference Calculates the difference between the two conductivity inputs Difference B A Ratio Calculates the ratio of the two conductivity inputs Ratio B A Passage Calculates the amount of conductivity as a percentage that ...

Page 52: ...numeric string 6 characters maximum for the custom user defined concentration units N A Conc Curve Table Set the user defined concentration curve using the 6 point linearizer table concentration against conductivity N A Range High View the span value used in Chart and Bargraph views N A Range Low View the zero value used in Chart and Bargraph views N A Filter Type Select the signal filtering type ...

Page 53: ...t Manual Automatic Note If Temperature Sensor type Manual the temperature value is not displayed in the associated Operator page or Signals View N A Low Slope Limit A pH probe degrades over time As this happens the slope calculated by a calibration procedure gradually decreases Set the slope value below which a calibration fails The low slope warning diagnostic is activated if the calibration calc...

Page 54: ...06 to 1114 mbar 380 to 835 mm Hg If the barometric pressure is unknown leave at the default sea level value of 1013 mbar 760 mm Hg 1013 mbar Reset To Defaults Select to reset all Sensor Setup parameters to their default values N A Turbidity Suspended solids Menu Comment Default Tag Enter an alphanumeric sensor tag 16 characters maximum to identify the sensor on the Operator Pages TAG1 Measurement ...

Page 55: ...be configured as a Conductivity Resistivity or Concentration device the smart one point calibration routine automatically uses the same units as the measured process variable Note Access the calibrate menu via the Calibrate and Advanced levels only Menu Comment Default Conductivity Cal See typical procedure see page 56 N A Concentration Cal See typical procedure see page 56 N A Resistivity Cal See...

Page 56: ...to select Conductivity Cal and press the The Conductivity Cal menu is displayed 4 Confirm the displayed reading is stable and the key 5 Press the key to enter a new value the transmitter takes several seconds to validate the calibration Invalid new calibration values generate an error message and the calibration value is not accepted If the new value is valid Slope and Offset values are displayed ...

Page 57: ...uctivity or concentration device the smart one point calibration routine automatically uses the same units as the measured process variable Note Access to the Calibrate menu is via Calibrate and Advanced levels only Menu Comment Default Conductivity Cal See typical procedure see page 58 N A Concentration Cal See typical procedure see page 58 N A Resistivity Cal See typical procedure see page 58 N ...

Page 58: ... the key The Conductivity Cal menu is displayed 4 Confirm the displayed reading is stable and the key 5 Press the key to enter a new value the transmitter takes several seconds to validate the calibration Invalid new calibration values generate an error message and the calibration value is not accepted If the new value is valid the Slope and Offset values are displayed Menu Calibrate Exit Select C...

Page 59: ...ion adjusts the check and slope values Note Automatic calibrations are not available for Redox ORP measurements Temperature Cal See Temperature calibration procedure page 69 Edit Cal pH Slope Note pH sensors only Edit the slope value Valid slope values range from 40 to 150 100 pH Offset Note pH sensors only Edit the offset value Valid offset values are 0 00 to 14 00pH 7 00pH mV Slope Note Redox OR...

Page 60: ... The calibration type is displayed 4 Use the key to edit the calibration type Use the keys to select the required calibration type and press the key to confirm selection Press the key to proceed to the next step The buffer temperature is displayed 5 Use the key to edit the buffer temperature Use the keys to set the temperature and press the key to confirm changes Press the key to proceed to the ne...

Page 61: ...ress the key to perform the calibration The calibration process screen is displayed On completion the result screen is displayed If the calibration passes the slope and offset values are displayed If the calibration fails the failure reason is displayed Note The calibration can be canceled at any time during the process by pressing the Abort key Calibrate Abort Continue Immerse in Buffer 1 4 0 pH ...

Page 62: ... the keys to select the required calibration type and press the key to confirm selection Press the key to proceed to the next step The buffer temperature is displayed 5 Use the key to edit the buffer temperature Use the keys to set the temperature and press the key to confirm changes Press the key to proceed to the next step The first buffer value is displayed Calibrate Back Select S1 pH Redox ORP...

Page 63: ... is displayed with the reason for failure If the calibration passes the procedure moves automatically to the high buffer calibration 9 Place the sensor into buffer 2 and press the key to perform the high buffer calibration The calibration process screen is displayed On completion the result screen is displayed If the calibration passes the slope and offset values are displayed If the calibration f...

Page 64: ...alibration type and press the key to confirm selection Press the key to proceed to the next step 5 Place the sensor into buffer 1 and press the key to perform the calibration The calibration process screen is displayed On completion the result screen is displayed If the calibration passes the slope and offset values are displayed If the calibration fails the failure reason is displayed Note The ca...

Page 65: ... and press the key to confirm selection Press the key to proceed to the next step 5 Place the sensor into buffer 1 and press the key to perform the low buffer calibration The calibration process screen is displayed If the calibration fails the result screen is displayed with the reason for failure If the calibration passes the procedure moves automatically to the high buffer calibration Calibrate ...

Page 66: ...e the sensor from the process to perform the calibration In this calibration mode the actual sample is used to calibrate the sensor In Process calibration is performed in two steps 1 Sample collection A grab sample is taken from the process and the sensor records the measured value of the sample at that time Note The grab sample should be taken as close to the sensor as possible during the data co...

Page 67: ...e data collection The Collect Sample progress screen is displayed When the procedure is complete a confirmation screen is displayed The value of the acquisition is now stored 5 Press the key to return to the Calibrate level 6 Continue to the Sample Complete section to perform the second step of the procedure Calibrate Back Select S1 pH Redox ORP S2 pH Redox ORP pH Buffers Hold Outputs S1 pH Redox ...

Page 68: ...enter the value of the pH sample from the lab 6 Press the key twice 7 The Collect Sample screen is displayed with a prompt to enter a temperature value 8 Press the key and enter the value of the pH sample from the lab When the procedure is complete a confirmation screen is displayed 9 Press the key to return to the Calibrate level In Process calibration is now complete Calibrate Back Select S1 pH ...

Page 69: ...layed 5 Use the and keys to set the temperature and press the key to confirm changes The temperature calibration process screen is displayed On completion the result screen is displayed If the calibration passes the slope and offset values are displayed If the calibration fails the reason for failure is displayed Note The calibration can be canceled at any time during the process by pressing the A...

Page 70: ...bidity TSS Sensor Verification page 71 Turbidity Cal See Turbidity calibration page 72 There are two possible calibration modes 1 point 2 point TSS Cal See TSS calibration page 76 There are two possible calibration modes 1 point 2 point TSS Manual Cal See TSS manual calibration page 78 Sample Collection See In process calibrations page 79 Collection Complete See In process calibrations page 79 Res...

Page 71: ...eys to set the value and press the key to confirm changes Press the and key to proceed to the next step 5 Ensure the sensor is inserted in the verification tool and press the key to start the verification routine The verification process screen is displayed On completion the result is displayed or Procedure Failed Note The verification process can be canceled at any time during the process by pres...

Page 72: ...ver in situations where an offset was previously determined during a 2 point calibration it is possible to retain the previously measured offset during the 1 point calibration Use the key to edit the Offset setting Use the keys to select either Remove Offset or Retain Offset and press the key to confirm changes Press the and key to proceed to the next step The High Solution Value is displayed 6 Us...

Page 73: ...utine The calibration process screen is displayed On completion the result screen is displayed If the calibration passes the new settings are displayed If the calibration fails the reason for failure is displayed Note The calibration can be canceled at any time during the process by pressing the Abort key Calibrate PV 2000 NTU mV 56 0 mV Settling Please Wait Abort ...

Page 74: ...key to proceed to the next step The Low Solution Value is displayed 5 Use the key to edit the solution value Use the keys to set the value and press the key to confirm changes Press the and key to proceed to the next step The High Solution Value is displayed 6 Use the key to edit the solution value Use the keys to set the value and press the key to confirm changes Press the and key to proceed to t...

Page 75: ...ion 8 Ensure the sensor is inserted in the solution and press the key to start the verification routine The calibration process screen is displayed On completion the result screen is displayed If the calibration passes the new settings are displayed If the calibration fails the reason for failure is displayed Note The calibration can be canceled at any time during the process by pressing the Abort...

Page 76: ... value and press the key to confirm changes Press the and key to proceed to the next step 6 Ensure the sensor is inserted in the solution and press the key to start the verification routine The calibration process screen is displayed On completion the result screen is displayed If the calibration passes the new settings are displayed If the calibration fails the reason for failure is displayed Not...

Page 77: ...o the next step The Low Solution Value is displayed 5 Use the key to edit the solution value Use the keys to set the value and press the key to confirm changes Press the and key to proceed to the next step The High Solution Value is displayed 6 Use the key to edit the solution value Use the keys to set the value and press the key to confirm changes Press the and key to proceed to the next step Cal...

Page 78: ...ressing the Abort key TSS manual calibration 1 At the Calibrate level press the key The Calibrate menu is displayed 2 Use the keys to select the sensor to be calibrated and press the key to confirm selection The TSS Manual Cal menu is displayed 3 Press the keys to select TSS Manual Cal and press the key to confirm selection The calibration slope is displayed 4 Use the key to edit the slope Use the...

Page 79: ...ep performed Sample collection 1 At the Calibrate level press the key The Calibrate menu is displayed 2 Use the keys to select the sensor to be calibrated and press the key to confirm selection The Sample Collection menu is displayed 3 Use the keys to select Sample Collection and press the key to proceed to the next step 4 Press the and key to proceed to the next step The collection process screen...

Page 80: ...on needs to be reset then select Yes To retain the details of the previous calibrations then select No adaptive calibration to fine tune the existing calibration 5 Press the key to proceed to the next step The Collection Complete screen is displayed 6 The Collection Complete screen shows PV Turbidity recorded when the sample was taken TSS Use the and keys to enter the suspended solids value measur...

Page 81: ...ayed 4 Use the key to edit the Calibration Type Use the keys to select the required Calibration Type and press the key to confirm selection Press the and key to proceed to the next step 5 Ensure the sensor is subjected to 100 saturation and press the key to start the calibration process The calibration process screen is displayed On completion the result screen is displayed If the calibration pass...

Page 82: ...If the calibration fails the result screen is displayed with the reason for failure If the calibration passes the procedure moves automatically to the high buffer calibration 6 Ensure the sensor is subjected to 0 saturation and press the key to start the calibration process The calibration process screen is displayed On completion the result screen is displayed If the calibration passes the new se...

Page 83: ...he requirements and adjust if necessary Memory Write Error Transmitter configuration data is corrupt or the transmitter s non volatile memory is faulty The device setup may be affected and changes to configuration may not be maintained after power cycle Cycle power to the transmitter If Memory Write Error persists 1 Check all configuration parameters and correct any errors 2 Backup configuration t...

Page 84: ... persists ensure that the sensor and the transmitter are compatible by upgrading the software on both via the bootloader 5 Check the Sensor Setup and correct if necessary see page 38 6 If Sensor Write Error persists contact local service organization Alarm Active One or more of the process alarms 1 to 8 is active Check the process and make any adjustments required If the alarm condition has passed...

Page 85: ...n has failed calibration coefficients have not been updated and the previous values continue to be applied Visually inspect sensor for signs of damage or dirt and clean if necessary Check that sensor is fully submerged in the solution Repeat calibration if Calibration Failed persists consider replacing the sensor S n PV Out of Limits Process value PV measured is outside the specified limits of the...

Page 86: ... is complete S n Cal Failed The most recent sensor calibration has failed calibration coefficients have not been updated and the previous values continue to be applied Visually inspect sensor for signs of damage or dirt and clean if necessary Check that sensor is fully submerged in the solution Repeat calibration if Calibration Failed persists consider replacing the sensor S n PV Out of Limits Pro...

Page 87: ...pears intact power cycle the instrument and allow 5 minutes for the signal to settle If the Reference Failure persists then the sensor must be replaced contact local service organization S n PT Failure The measurement taken from the temperature sensor is invalid indicating that the temperature sensor has failed or the associated connections are either open circuit or short circuit Visually inspect...

Page 88: ...diagnostic is activated indicating that the sensor is reaching the end of its serviceable life and soon requires replacement 1 Visually inspect sensor tip for signs of damage or dirt and clean if necessary 2 Check that sensor tip is fully submerged in the solution 3 Ensure that the buffer solutions have been made up accurately and have been correctly selected in the transmitter 4 Repeat calibratio...

Page 89: ...clean and fully submerged in the solution Repeat calibration if Calibration Failed persists then consider replacing the sensor S n User Cal Expired Recalibration of the RDO sensor is required The sensor deteriorates over time and recalibration is required to maintain accuracy Perform a calibration using ADS430205 RDO probe calibration kit S n Factory Cal Expired Recalibration of the RDO sensor is ...

Page 90: ...wer to the transmitter If PV Failure persists contact local service organization S n Wiper Failed The wiper has failed to wipe Sensor becomes soiled Measurement quality is affected due to inadequate cleaning Visually inspect the sensor and clean any obstructions blockages S n Calibrating Sensor calibration is in progress Diagnostic clears once calibration is complete S n Recovery Recovery diagnost...

Page 91: ...measuring the amount of light scattered by the sample at 90 from the direction of illumination Excessive ambient light can interfere with this and result in inaccurate readings Shade the sensor or if possible move the sensor to a location where it is not affected by ambient light S n Service Due The turbidity sensor requires servicing The sensor performance degrades over time and servicing is requ...

Page 92: ...it hubs or EZLink connectors Security Password protection Access to configuration levels is enabled only after the user has entered a password Calibrate level user assigned password Advanced level user assigned password Service level service level user assigned password Electrical Supply voltage 100 to 240 V AC 10 50 60 Hz 24 V DC 18 min to 36 V DC max Power consumption 15W Terminal connections ra...

Page 93: ...158 F Altitude 2000 m 6562 ft max above sea level Audit log and Alarm log data are stored in the same log file 2 electrode conductivity Conductivity input Measurement range and resolution Cell constant Conductivity range Display resolution Accuracy repeatability 0 01 0 to 200 µS cm 0 001 µS cm 1 0 of measurement range per decade 0 05 0 to 1000 µS cm 0 001 µS cm 0 1 0 to 2000 µS cm 0 01 µS cm 1 0 t...

Page 94: ...eference temperature 25 C 77 F Configured output range Sensor group Min span Max span A 100 µS cm 2000 mS cm B 10 µS cm 2000 µS cm pH ORP Redox pH ORP Redox input Sensor types pH Glass Antimony Sb ORP Redox Platinum Pt Gold Au Input impedance 1 1013 Ω Measurement range and resolution Type Range Display resolution Accuracy repeatability pH 0 to 14 pH 0 01 pH 0 01 pH ORP 2000 mV 1 mV 1800 MV 1 mV 20...

Page 95: ...ts of IEC61326 for an industrial environment Approvals certification and safety Safety approval cULus CE mark Covers EMC LV Directives including latest version IEC 61010 General safety IEC 61010 1 Pollution degree 2 Insulation class 1 Bluetooth The Bluetooth Low Energy Module within the AWT420 transmitter has received the regulatory approval for the following countries Europe CE Europe 0197 Japan ...

Page 96: ...correct the interference by one or more of the following measures Reorient or relocate the receiving antenna Increase the separation between the equipment and receiver Connect the equipment into an outlet on a circuit different from that to which the receiver is connected Consult the dealer or an experienced radio TV technician for help Canada ISED IC 12246A BM71S2 HVIN BM71BLES1FC2 Canada Contain...

Page 97: ...lues mVindication mV value indicated on the transmitter and proportional to the current output value T temperature of the solution in C after applying the factory and process calibration values Examples of solution coefficients for pure water applications are pure water 0 18 pH 10 C 18 F pure water with 1 ppm ammonia 0 31 pH 10 C 18 F The solution coefficient for the AWT420 transmitter either adds...

Page 98: ...t is eliminated at conductivities approaching that of ultra pure water in order to ascertain whether a conductivity variation is due to a change in impurity level or in temperature For conductivity levels above 1 µS cm 1 the generally accepted expression relating conductivity and temperature is Gt G25 1 t 25 Where Gt conductivity at temperature t C G25 conductivity at the standard temperature 25 C...

Page 99: ...ion using only a single platinum resistance thermometer and mathematically calculating the temperature compensation required to give the correct conductivity at the reference temperature Figure 34 Ultra pure water temperature compensation µS cm 1 Temperature C microSiemens cm Curve A Theoretical ultra pure water conductivity Curve B High purity water conductivity ultra pure water with slight impur...

Page 100: ...imp2 imp1 1 2 Where Gimp1 Gt1 Gupw1 Gimp2 Gt2 Gupw2 Relationship between conductivity and total dissolved solids TDS measurement The TDS factor i e the relationship between conductivity µS cm 1 and TDS in ppm is totally dependent on the properties of the solution being measured In simple solutions where only one electrolyte is present the conductivity TDS ratio can be ascertained easily e g 0 5 in...

Page 101: ...vity inputs must be configured as µS cm 1 to calculate inferred pH WARNING The calculation of inferred pH relies on the strict control of chemical conditions within the NH3 NH3 NaCl or NaOH dosed sample Contamination with chemical substances other than those with which the sample is dosed introduces significant errors in the inferred pH calculated value and in the worse case invalidates the calcul...

Page 102: ...line Monitoring on AVT systems with impurities Differential conductivity can also give an indication of sample pH on AVT systems where there are low concentrations of ionic impurities present in addition to the volatile alkaline agent e g sodium chloride ammonia In this case the exchange of ammonium and sodium ions within the cation column releases water and hydrochloric acid The sodium chloride i...

Page 103: ... 3AC F 1 Where BC the before column reading AC the after column reading F molar conductivity change for the alkaline agent 243 µS cm 1 per mmol l for sodium hydroxide The maximum after cation conductivity value is programmable between 1 00 and 100 0 µS cm 1 dependent on local conditions After cation values above this level generate an AFTER CAT HIGH error message and before cation values above 100...

Page 104: ...digital outputs and pulse frequency control outputs can be assigned to any of the available relays or digital outputs Operator pages Reverse or direct acting control A Instrument tag B Sensor specific tag C Primary value and units D Adjustable parameter icon using keys E Setpoint F Control output percentage G Status bar icons see page 35 H Diagnostic icon diagnostic message see page 83 I Icon Auto...

Page 105: ...if Control Mode Manual is selected see Figure 37 Figure 39 Direct acting control In Configuration CAL Use the keys to toggle select SPA or Output mode Output mode enabled only if Control Mode Manual is selected SPA acid setpoint Use the keys to toggle select SPA SPB or Output mode Output mode enabled only if Control Mode Manual is selected SPA acid setpoint SPB base setpoint Use the keys to toggle...

Page 106: ...oint Figure 40 Dual acting control Manual Reset proportional band offset A Manual Reset value is available on Reverse or Direct acting controllers when the integral term is disabled i e Control Type is configured for P or P D When the process variable is equal to the control setpoint the output value is equal to the Manual Reset value this effectively changes the position of the proportional band ...

Page 107: ...igned to any of the available relays or digital outputs the control output 0 to 100 is scaled linearly between 0 seconds and the configured cycle time 1 0 to 300 0 s to generate an ON period the relay or digital output is energized for the ON period The relay or digital output is de energized for the remainder of the cycle time Figure 43 Analog output Pulse frequency output Pulse frequency control...

Page 108: ...pgrade spares kit Part number 3KXA877420L0011 EZLink module assemblies AWT420 EZLink PCB upgrade spares kit Part number 3KXA877420L0015 Communications module assemblies AWT420 HART PCB upgrade spares kit Part number 3KXA877420L0051 AWT420 Profibus PCB upgrade spares kit Part number 3KXA877420L0052 AWT420 Modbus PCB upgrade spares kit Part number 3KXA877420L0054 AWT420 Ethernet PCB upgrade spares k...

Page 109: ... Ethernet qty 1 1 2 in NPT qty 4 M16 qty 2 Ethernet qty 1 Ethernet gland qty 1 M16 Ethernet M20 1 in EZLink connector assembly Part number 3KXA877420L0066 EZLink extension cable assembly Part number Description AWT4009010 AWT4009050 AWT4009100 AWT4009150 AWT4009250 AWT4009500 AWT4009000 1 m 3 3 ft 5 m 16 4 ft 10 m 32 8 ft 15 m 49 2 ft 25 m 82 0 ft 50 m 164 0 ft 100 m 328 0 ft Acknowledgments Micro...

Page 110: ...n this document and in the subject matter and illustrations contained therein Any reproduction disclosure to third parties or utilization of its contents in whole or in parts is forbidden without prior written consent of ABB ABB 2019 3KXA877410R4201 ABB Limited Measurement Analytics Oldends Lane Stonehouse Gloucestershire GL10 3TA UK Tel 44 0 1453 826 661 Fax 44 0 1453 829 671 Email instrumentatio...

Reviews: