background image

Common user tasks

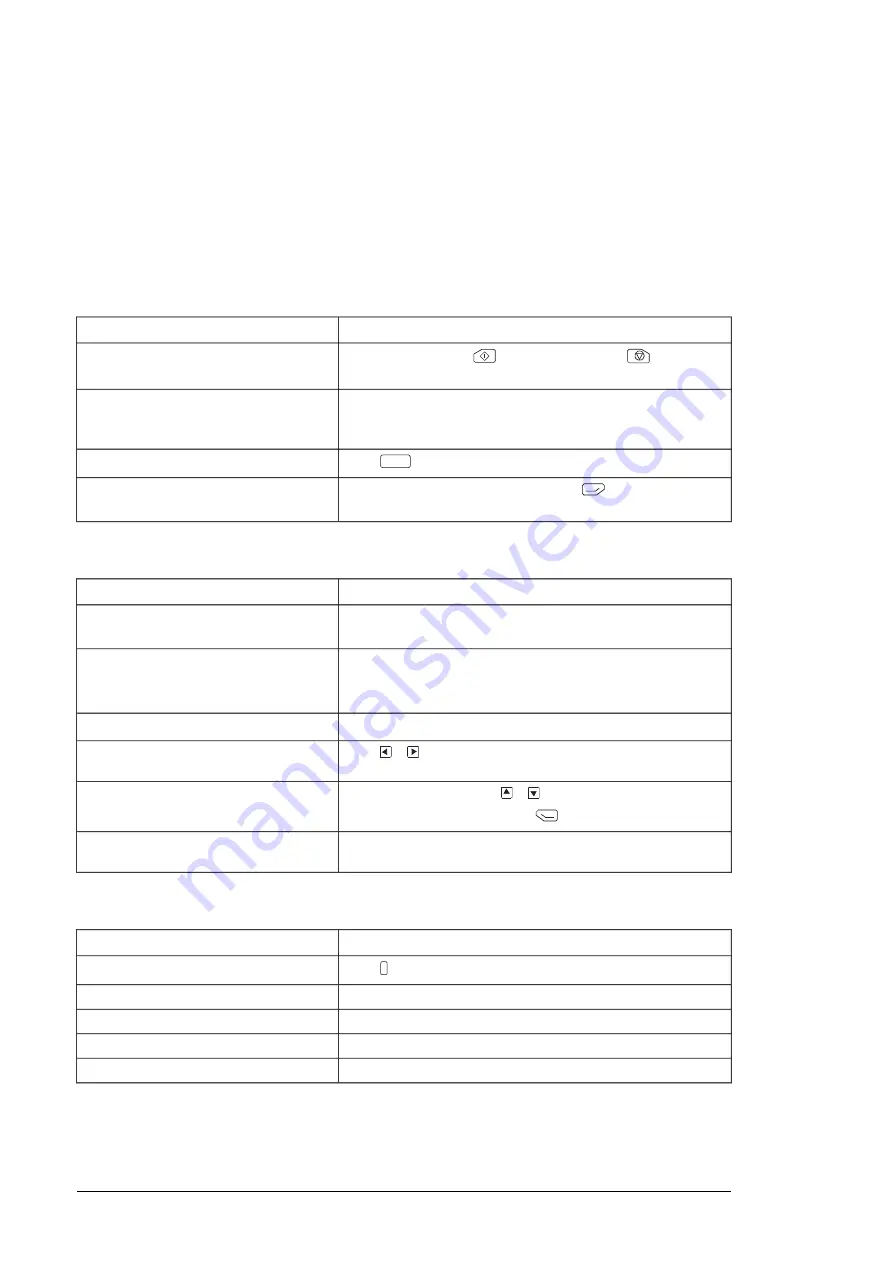
The following tables list common user tasks and describes how to complete the task. See
chapters

Functions in the main Menu (page 33)

and

Functions in the Options menu (page 53)

for detailed descriptions of functions in the menus.

Note:

The Menu options varies based on the drive/device to which the control panel is

connected.

Basic operation of the drive

Actions

Task

In local control, press

to start the drive and

stop key to

stop the drive.

Start and stop the drive.

In local control, go to

Options

>

Reference

. Set the reference

with the arrow keys. For detailed instructions, see

Setting the ref-

erence (page 54)

.

Set the reference (for example, speed) in
the

Home

view.

Press

Loc/Rem

.

Switch between local and remote control.

In local control, go to

Home

view, press

(

Options

) to open

the

Options

menu and select

Direction change

.

Change the direction of motor rotation.

Parameters

Actions

Task

Go to

Menu

Parameters

Favorites

Edit

. See also

Favor-

ites (page 35)

.

Choose parameters displayed on the Favor-
ites list.

Go to

Menu

Parameters

Complete list

to view parameters.

See

Editing parameters (page 37)

for instructions on editing

parameters

View/edit parameters.

See

Editing the contents of the Home view (page 54)

.

Add parameters to the Home view.

Press

+

.

Show/hide parameter index and group
numbers.

In the editing mode, press

+

.

To save the default value, press

(Save).

Restore parameter default value.

Go to

Menu

Parameters

Modified

.

View parameters that differ from Application
Macro defaults.

System information and help

Actions

Task

Press

?

button to open the context-sensitive help.

How to get help.

Go to

Menu

System info

Drive

.

To view drive information.

Go to

Menu

System info

Control panel

.

To view control panel version.

Go to

Menu

System info

Licenses

.

To view application program license.

Go to

Menu

System info

Product application

.

To view Product application information.

Faults and warnings

See

Fault tracing (page 63)

for detailed information on faults and warnings.

30 Basic operation

Summary of Contents for ACS-AP-I

Page 1: ... OPTIONS FOR ABB DRIVES ACS AP I S W and ACH AP H W Assistant control panels User s manual ...

Page 2: ......

Page 3: ...ACS AP I S W and ACH AP H W Assistant control panels User s manual Table of contents 3AUA0000085685 Rev F EN Original instructions EFFECTIVE 2022 01 27 ...

Page 4: ......

Page 5: ... 19 Display 21 Keys 21 Left softkey 21 Right softkey 21 Arrow keys 21 Help 21 Start and Stop 21 Off 21 Hand 22 Auto 22 Loc Rem 22 Key shortcuts 23 Control panel and panel platform holder LEDs 23 USB connector 24 RJ 45 connector 24 Type code label on the panel 24 Type code label on the panel package 25 Battery cover 25 Wireless interface 4 Basic operation 27 What this chapter contains 27 User inter...

Page 6: ...Editing parameters 37 Editing numeric parameters 37 Editing selection list parameters 39 Editing bit field parameters 40 Editing texts 40 Resetting counters 41 Assistants 41 Launching an assistant 42 Generating a QR code 42 Energy efficiency 43 Event log 43 History graphs 43 Trends 44 Load profile 44 Backups 45 Creating a parameter backup 45 Restoring a parameter backup 46 System info 48 Settings ...

Page 7: ... What this chapter contains 68 Removing the control panel cover 68 Cleaning the control panel 68 Cleaning the connectors 68 Replacing the battery 69 Control panel software updates 69 Recycling instructions and environmental information 10 Panel to PC USB connection 71 What this chapter contains 71 USB connection 72 Connecting control panel to PC USB 73 Connecting a PC tool to a drive through the c...

Page 8: ...ooth radio frequency exposure 78 Bluetooth BT 78 Bluetooth Low Energy BLE 78 FCC and Industry Canada certifications 78 FCC ID 2AFNGAPWSERIES 79 IC 20555 APWSERIES 79 Markings 79 Disclaimers 79 Generic disclaimer 80 Cybersecurity disclaimer Further information 8 Table of contents ...

Page 9: ...Introduction to the manual What this chapter contains This chapter describes the applicability compatibility intended audience and the contents of this manual 1 Introduction to the manual 9 ...

Page 10: ...D FW version GPAPI v5 80 or With panel powered up go to Menu System info Control panel Note The images and instructions in this manual are examples each based on a specific control panel and drive type combination The details may vary with different control panels or drive types Compatibility The following drive s are compatible with these panel types ACH AP H ACH AP W ACS AP W ACS AP S ACS AP I C...

Page 11: ...85685 ACS AP I S W and ACH AP H W Assistant control panels User s manual 3AXD50000009929 CDPI 01 communication adapter module User s manual 3AUA0000100140 DPMP 01 mounting platform for ACP AP control panel 3AUA0000136205 DPMP 02 03 mounting platform for ACP AP control panel You can find manuals and other product documents in PDF format on the Internet See section Document library on the Internet o...

Page 12: ...12 ...

Page 13: ...Installation and start up What this chapter contains This chapter describes how to install and start up the Assistant control panel for the first time 2 Installation and start up 13 ...

Page 14: ...the control panel 1 Place its bottom end into the bottom of the slot in the drive A 2 Pivot the control panel and push the upper part B until you hear a click To detach the control panel 1 Release the control panel by pressing the clip B 2 Pull the upper end of the control panel out of the slot in the drive B A 14 Installation and start up ...

Page 15: ...ically Wait until the control panel shows the language selection view 4 Use or to select a language 5 Press to confirm your selection Wait until the control panel completes uploading the language file The progress is indicated by a progress bar If there is a Basic set up assistant in the drive or if the control panel already contains a compatible backup or backups that could be copied to the drive...

Page 16: ...Once you are in the Home view the control panel is ready for use 16 Installation and start up ...

Page 17: ...Control panel overview What this chapter contains This chapter describes the display keys and main parts of the Assistant control panel 3 Control panel overview 17 ...

Page 18: ...nector 10 Display 1 Clip 11 Left softkey 2 RJ 45 connector 12 Right softkey 3 Type code label on the panel 13 Status LED 4 Battery cover 14 Help 5 Off 15 Arrow keys 6 Hand 16 Stop see Start and Stop 7 Auto 17 Start see Start and Stop 8 Local Remote see Loc Rem 9 18 Control panel overview ...

Page 19: ...re than one drive connected to this panel To switch to another drive go to Options Select drive Panel bus 2 Indicates the status of the drive and the motor The direction of the arrow indicates forward clockwise or reverse counter clockwise active reference direction Status icon 3 Note For non rotating driven equipment the numbers 1 and 0 are used to indicate that the drive is running or stopped re...

Page 20: ...actual content of the view in this area The content varies from view to view The example view above is the main view of the control panel which is called the Home view Content area 6 Displays the functions of the softkeys and in a given context Softkey selections 7 Displays the current time The time can be changed through the Primary set tings page 49 or Settings page 48 menu Clock 8 You can adjus...

Page 21: ...t pages and to adjust values when for example setting the time entering a passcode or changing a parameter value The left and right arrow keys and are used to move the cursor left and right in parameter editing and to move forward and backward in assistants In menus and and function the same way as and respectively Help The help key opens a help page The help page is context sensitive in other wor...

Page 22: ...specific firmware manual for more details Key shortcuts The table below lists key shortcuts and combinations Simultaneous key presses are indicated by the plus sign Effect Available in Shortcut Save a screenshot Up to fifteen images can be stored in the control panel memory For instructions on how to transfer the im ages into a PC see section Transferring files between the control panel and a PC p...

Page 23: ...drive converter inverter Blinking red The Bluetooth interface is enabled in discoverable mode and ready for pairing Blinking blue ACS AP W only Data is being transferred through the Bluetooth interface of the control panel Flickering blue ACS AP W only There is an active fault in the unit Red Control panel mounting platform or holder with the control panel removed Power supply for the control unit...

Page 24: ...1250121LL 3AXD50000025964B1250121LL Made in Country FCC ID 2AFNGAPWSERIES IC 20555 APWSERIES SW v5 95 2 3 4 10 5 1 6 11 8 7 9 ABB Oy 1 Type code 2 MRP code 3 Serial number 4 CE marking 5 SW version 6 Bar code 7 Bar code in readable text 8 FCC ID number 9 IC CANADA number 10 Manufactured in country 11 Note FCC ID and IC CANADA numbers are applicable only for ACS AP W and ACH AP W wireless control p...

Page 25: ...compartment for the battery that powers the real time clock of the control panel Wireless interface The ACS AP W and ACH AP W Assistant control panels with Bluetooth interface enable wireless interface for ABB drives The wireless panels are also embedded with powerful processor and memory that enables faster communication The functions of ACS AP W panel are same with ACS AP I and ACS AP S panels a...

Page 26: ...26 ...

Page 27: ...nctions of the control panel See the detailed description in chapter Functions in the main Menu page 33 Menu Used to set a reference change the motor direction select the drive edit Home view pages and see the fault and warning status See the detailed description in chapter Functions in the Options menu page 53 Options Provides information on the current view or menu or on possible problems associ...

Page 28: ... device to which the panel is connected Navigation memory The Assistant control panel has a navigation memory that allows you to backtrack your steps through the user interface with the arrow keys and The path you have last accessed remains in the memory for 10 minutes The left arrow key moves you backwards in the menu structure If you press repeatedly you return back to the Home view The right ar...

Page 29: ... the panel is connected The Home view opens automatically when you power up the drive The Home view is also displayed from the Options menu or the main Menu if no key is pressed for 10 minutes Tip You can return to the Home view from any view except special screens by holding down the left softkey Navigating in the Home view Use and to move between the different pages of the Home view The page num...

Page 30: ...ions Task Go to Menu Parameters Favorites Edit See also Favor ites page 35 Choose parameters displayed on the Favor ites list Go to Menu Parameters Complete list to view parameters See Editing parameters page 37 for instructions on editing parameters View edit parameters See Editing the contents of the Home view page 54 Add parameters to the Home view Press Show hide parameter index and group numb...

Page 31: ...y presses Hide view an active warning Press How to fix or button to view the help page Open help page on a warning Warnings disappear automatically once the condition that has triggered it goes away Reset an active warning Go to Menu Event log Other events View past warnings and faults Basic settings and assistants Actions Task Press and hold and press or Adjust backlight brightness Press and hold...

Page 32: ...32 ...

Page 33: ...Functions in the main Menu What this chapter contains This chapter describes the functions in the main Menu 5 Functions in the main Menu 33 ...

Page 34: ... warnings Event log 43 View the load profile History graphs 44 Save settings in the control panel memory and restore them to the drive Backups 46 View information on the drive and options System info 48 View and change time and date settings language display and other settings and edit texts Settings 49 View and change settings related to motor PID fieldbus advanced functions clock region and disp...

Page 35: ... parameters are read only and can be viewed by pressing View Complete list In the Complete list sub menu all parameter groups are listed in numerical order If you select a parameter group all parameters in that group are listed and you can view and edit the parameters Parameter numbers are always displayed in this sub menu By function This functionality is available in a future release Favorites I...

Page 36: ...er from the Application Macro defaults are listed The order is determined by the parameter number Adding parameters to the Home view When you view a read only parameter in the Parameters menu you can add the parameter to the Home view Press Add to view to open the Home view in the editing mode then you can add the parameter to an empty display slot or replace an existing parameter with it 36 Funct...

Page 37: ...t save it See the sections below for more information on editing specific parameter types Editing numeric parameters Numeric parameters include parameters with linear numeric values passcodes time and date parameters durations and exception dates For numeric parameters with linear values the minimum and maximum values are displayed in the bottom left and right corners of the content area respectiv...

Page 38: ...a list of parameters 3 Depending on the parameter you are editing you must select a parameter or an individual bit or you may choose either of the two If the right softkey label is Select you must select an individual bit as the value of the parameter you are editing Press Select to move to a bit selection list If the right softkey label is Save you can select that parameter as the value of the pa...

Page 39: ...ection The parameter or bit is now selected as the parameter value Editing bit field parameters A bit field parameter is a bit word whose individual bits can be edited The labels describe the function of each bit and the current state of the bit is shown as 1 or 0 Use and to select a bit To change a bit value press or To save the bit values and exit press Save To cancel and exit press Cancel Funct...

Page 40: ...rt adding characters The mode remains selected until you select another one To add a character highlight it with and then press To remove a letter press Press Save to accept the new setting or press Cancel to go back to the previous view without making changes Note The current software version supports only the English character set a z Resetting counters Counters are parameters that measure incre...

Page 41: ... can be read with ABB application and mobile device Launching an assistant 1 Use and to highlight the desired assistant 2 Press Select 3 Follow the instructions on the screen to complete the task defined by the assistant Use and to select settings To edit a setting press Edit or Select Use or to move between the pages of the assistant The progress bar on the upper right corner of the screen indica...

Page 42: ... collects data and generates the code Press or to navigate to the next screen You can also generate QR code from Menu System info QR code See System info page 46 Energy efficiency In the Energy efficiency menu you can view and configure parameters related to energy savings such as kWh counters 42 Functions in the main Menu ...

Page 43: ...s sub menu displays the faults that are tripped the drive Other events sub menu displays all other faults and warnings and their details Active faults and Active warnings sub menu displays the faults and warnings which are active History graphs The History graphs menu contains Trends and Load profile sub menu Trends This functionality is available in a future release Functions in the main Menu 43 ...

Page 44: ...le configuration Select the signal to be monitored in Amplitude logger 2 Peak value logger Select a signal to be monitored by a peak value logger For more information on load profiles see the appropriate firmware manual Backups In the Backups menu you can save parameter settings in the control panel memory and restore parameter settings from a backup to the drive You can store up to two backup fil...

Page 45: ...lowing step is skipped 2 Use and to select one of the existing backup files and press Replace 3 Wait until the backup is completed An animation is shown on the control panel during the backup process The control panel automatically returns to the Backups menu Note If the backup process is canceled or interrupted the previously saved backup file is not deleted or damaged Thus if you accidentally st...

Page 46: ...parameters sets select Select user sets and select the desired user set from the list and then select Restore To select production data items select Select prod data items and select the desired production data and then select Restore 4 Wait until the restore is completed An animation is shown on the control panel during the restoring process The control panel automatically returns to the Backups ...

Page 47: ...firmware version serial number type code device ID number or date of manufacture Drive Note The content of the view varies between different drive types Shows information on the hardware and software version of the control panel Control panel Functions in the main Menu 47 ...

Page 48: ... with ABB application and mobile device QR code To generate the QR code press Continue The control panel collects data and creates the code Settings The Settings menu has the following sub menus Function Sub menu Select different language in the control panel Language 48 Functions in the main Menu ...

Page 49: ... Reset all parameters This functionality is available in a future release Show or hide the numeric IDs of Show in lists parameters and groups option list items bits devices in Options Select drive Enter pass codes into this parameter to activate further access levels for example addi tional parameters Pass code Primary settings The Primary settings menu has the following sub menus Note The content...

Page 50: ...cess PID controller PID is only used in remote control PID To make the protocol configurations easier Fieldbus Contains settings for advanced functions such as triggering or resetting faults through I O or switching between entire set of settings Advanced op tions functions Contains settings for language date and time display such as brightness and settings for changing how information is displaye...

Page 51: ...ws the currently active faults and provides instructions on how to fix and reset Active faults Shows the currently active warnings and provides instructions on how to fix and reset Active warnings Shows the currently active inhibits The drive cannot start Drive is not parameterized correctly Active inhibits Lists the faults warnings and other events that have occurred in the drive Fault event log ...

Page 52: ...52 ...

Page 53: ...ed may vary based on the drive device to which the panel is connected The menu shown is only an example The Options menu has the following sub menus Function Sub menu Set the reference value by using and The changes take place when you save them with a key press See Setting the reference page 54 Reference Change the direction of the motor rotation in local control mode Direction change 6 Functions...

Page 54: ...ol mode if the text in the top left corner of the display reads Remote 2 In the Options menu select Reference 3 Change the reference by using the following keys Use or to select a digit to edit Use and to change the value of the selected digit 4 Press Save to save the reference value or Cancel to discard the changes The control panel returns to the Home view Tip To adjust the reference from the Ho...

Page 55: ...ht an area above between or below an existing parameter To edit or remove an existing parameter highlight that parameter 5 Press Edit to open the Display Slot menu 6 Choose a parameter its display settings and scaling Note Parameters whose values have textual representations such as the names of bit states or contain characters other than numbers such as dates or durations are automatically displa...

Page 56: ...bottom slot in picture 2 2 3 1 Note The data shown in the graph is not stored in the drive memory that is if you remove or restart the control panel the data is lost Display decimals Specifies how many decimals are shown Display name Enter a custom label to show in the Home view instead of the parameter name Min and Max This function depends whether Scale value range is selected or not Scale value...

Page 57: ...lay signal max as 50 00 display value 100 00 actual min 32767 actual max 32768 actual value Signal min 3000 Signal max 6000 Display unit Customize the unit shown in Home view when scaling is used Functions in the Options menu 57 ...

Page 58: ...58 ...

Page 59: ...ting multiple drives to a control panel 1 Connect the control panel A to the first drive B in the panel bus 2 Connect the first drive C to the second D the second to the third and so on by daisy chaining RJ 45 leads Note Each drive must have a node ID set with drive parameter 49 01 Node ID number A B C D 7 Control of multiple drives 59 ...

Page 60: ...rrently selected drive fails Select drive menu is shown with the other drive list In the Select drive menu any drives to which the connection is lost are shown in dimmed text Selecting a drive If there are multiple drives connected to the same panel bus you can select which drive to control with the control panel 1 In the Options menu select Select drive to open a list of connected drives 2 Use an...

Page 61: ... data for the graph format in the Home view is stored in the control panel only for the selected drive Upon changing the selected drive any stored graph data is discarded and graph data collection begins for the new drive History graphs and all related settings signal selection horizontal timescale are saved in the drive and the History graphs menu shows always the graphs for the currently selecte...

Page 62: ...k like any other remote faults They are shown normally if you switch to the drive in which the fault has occurred In the Fault view the keys have the following functions Press Hide to go back to the previous view The fault view does not reappear as with regular faults Press Switch to connect to the faulted drive Only active warnings in the selected drive are shown in the control panel To view warn...

Page 63: ...warnings are drive states that occur when the drive detects a problem in its operation The display message backlight and LED indications help you to identify the problem Some of the fault and warning icons and their descriptions are mentioned below Icon Event Fault activate Fault reset Warning activate Warning deactivate Pure event activate Pure event deactivate Refer to the table below to identif...

Page 64: ...Warnings page 65 blinking green The connection between the control panel and the drive is faulty continuous green Check that the connection cable is properly at tached The control panel type is not compatible with the drive you attempt to use it with continuous green See Applicability page 10 The connection between the control panel and the drive has been lost continuous green Check the control pa...

Page 65: ...conds if no keys have been pressed Press Reset to reset the fault and return to the previous view Press the key to open the context sensitive help The help page has a shortcut to the Fault Diagnostics Assistant which helps you solve the fault situation Warnings Warnings mean that a possible problem has been detected and may need attention and the drive can still run A warning message disappears on...

Page 66: ...66 ...

Page 67: ...Maintenance What this chapter contains This chapter describes the service and maintenance tasks of the Assistant control panel 9 Maintenance 67 ...

Page 68: ...scratch the display window Cleaning the connectors Control panel has two connectors RJ 45 connector panel back side and USB connector panel front side Clean outside around the connectors using suitable cleaning solution for example Isopropyl Alcohol IPA solution Do not use the cleaning solution to clean inside the connectors Replacing the battery The instructions below describe how to replace the ...

Page 69: ...according to local disposal rules or applicable laws Note Contact ABB for ZCU 12 Supply control unit battery replacement Control panel software updates If the control panel software needs to be updated contact ABB Recycling instructions and environmental information See the drive related Recycling instructions and environmental information Maintenance 69 ...

Page 70: ...70 ...

Page 71: ... Connecting a PC tool to a drive through the control panel page 73 It is possible to transfer data for example screenshots and backups between the control panel and the PC When connected the control panel appears as an MTP Media Transfer Protocol device on the PC The USB port is intended for temporary service WARNING Use the USB connector gently Otherwise the connector may break Pull the USB conne...

Page 72: ...or the drive through the PC tool To connect the control panel to a PC 1 Open the lid of the USB connector 2 Plug in a USB cable 3 Connect to a PC The control panel displays the USB screen The USB connector lid is attached to the panel through a loose rubber band You can always connect back the lid to the band if it disconnects accidentally 1 2 Rubber band USB connected 72 Panel to PC USB connectio...

Page 73: ...e and direction Note If you disconnect the USB cable before closing the connection a local loss fault is triggered Connecting in remote control mode When you connect the control panel in remote control mode to a PC the control panel displays the USB screen and you can only interact with the control panel through the PC tool The drive remains in remote control but you can switch over to local contr...

Page 74: ...74 ...

Page 75: ...les should be 100 meters 328 ft The panel bus can have a maximum of 32 nodes Used for connecting panel to PC It is intended for temporary service use USB 2 0 MTP protocol The maximum cable length should be three meters 9 8 ft Type B mini USB connector Display The control panel has a monochrome 240 160 pixel resolution LCD display with adjustable backlight and display contrast See Basic settings an...

Page 76: ...ted to DPMP 02 or 03 IP20 When Control panel is not mounted to DPMP 01 or 02 or 03 holder Control panel mounted to a drive provides the same protection class as the drive unit itself For more information see hardware manual of the drive product Materials PC ABS Enclosure Cardboard Packaging Polycarbonate Screen Do not dispose the control panel with municipal waste Disposal Check the local regulati...

Page 77: ...N 60082 2 6 test Fc 1g class 2M2 in acc with class 3M4 in acc with Shock EN 60082 2 27 EN 60062 2 27 IEC 60068 2 32 drop height Free fall 1 m 3 3 ft IEC 61000 4 2 IEC 61000 4 3 EMC compliance IEC 61000 4 4 IEC 61000 4 6 EN 61800 3 2004 A1 2012 LCD specifications FSTN negative transmissive LCD type 20 C to 70 C 4 F to 158 F Operating temperature 40 C to 80 C 40 F to 176 F Storage temperature 40 C t...

Page 78: ...ng band GHz BT 9 3 Maximum 1 GFSK 2400 to 2483 5 2 4 Bluetooth Low Energy BLE Transmit power dBm conduc ted Power level Data rate Mbps Modulation Frequency MHz Operating band GHz BLE 9 3 Maximum 1 GFSK 2400 to 2483 5 2 4 FCC and Industry Canada certifications The following FCC and Industry Canada certifications compliance identification numbers are valid for ACS AP W and ACH AP W panels and Blueto...

Page 79: ...The operation is subject to the following two conditions 1 The device may not cause interference and 2 The device must accept any interference including interference that may cause undesired operation of the device Markings These markings are attached to the panels ACS AP W and ACH AP W CE mark Product complies with the applicable European Union legislation For fulfilling the requirements of Radio...

Page 80: ...the product and Customer network or any other network as the case may be Customer shall establish and maintain any appropriate measures such as but not limited to the installation of firewalls prevention of physical access application of authentication measures encryption of data installation of anti virus programs etc to protect the product the network its system and the interface against any kin...

Page 81: ... by navigating to www abb com searchchannels Product training For information on ABB product training navigate to new abb com service training Providing feedback on ABB manuals Your comments on our manuals are welcome Navigate to new abb com drives manuals feedback form Document library on the Internet You can find manuals and other product documents in PDF format on the Internet at www abb com dr...

Page 82: ...www abb com drives 3AUA0000085685F Copyright 2022 ABB All rights reserved Specifications subject to change without notice 3AUA0000085685 Rev F EN 2022 01 27 ...

Reviews: