background image

Scorpio 1800 Installation Instructions

Plumbing Manifold 

Tap & Waste Connecction
Connect the taps using the flexible water pipes provided making sure they do not snag when the bath 
is lifted. Trimming of the inner lower & outer upper panels may be required to fit the panels around 
the pipe. The waste is pre-assembled. Connect the flexible pipe to the waste outlet. Fit the manifold to 
the floor and connect as detailed. 

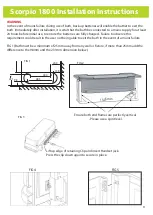
Electrical Connection
The control unit is located in the centre of the underside of 
the bath. A prewired lead is supplied and this should be run to 
the mains supply as per the pre-install connections. The 
handset should be plugged in the control box as per FIG 3.
Ensure the lead retaining clip is refitted once the 
handset has been connected.

Panel Fixing
The bath shell comes complete with the outer upper panels fitted. These should fit outside the inner 
lower panels and should not touch them. Note: if the upper and lower panels touch, marking will occur. 
Adjustment is possible on the bayonet clip if required.

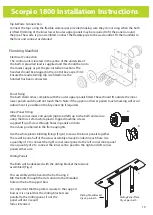
Inner Panel Fitting
Offer the corner inner end panels (right and left) up to the bath and secure 
using the M4 x 12mm white plastic topped machine screws 
supplied (Fig. a) Screw through holes in panels and into 
the rivnuts positioned in the frame uprights.

Use the white plastic binding fixings (Fig. b) to secue the inner panels together. 
There will be one half of the screw assembly already bonded in each hole. Use
a quantity of 2 to connect the right corner inner panel to the left corner inner panel.
Use a quantity of 2 to connect the inner centre panel to the right and left corner 
panels either side. 

Sliding Panels

The Bath will be delivered with the sliding bracket metal-work
assembled (Fig. c)

This assembly will be fixed to the bath using 2
M8 Hex bolts through the slots and into the threaded 
holes in the bath support bars.

It is important that the plate is square to the support 
bars as it is crucial that the sliding brackets are 
parallel to the sliding panel. If not the 
panel will not rise and 
fall as intended.

a.

b.

Sliding Panel Bracket

Qty x4 per bath

Sliding Panel Plate

Qty x2 per bath

c.

10

Summary of Contents for Aquanova Scorpio 1800

Page 1: ...ay High Carr Business Park Newcastle under Lyme ST5 7XE Tel 01782 569330 Fax 01782 569349 Sales 0800 454810 www abacushealthcare co uk e mail service abacushealthcare co uk Aquanova Scorpio 1800 Fixed Seat Transfer System Operation www abacushealthcare com 0808 256 4249 ...

Page 2: ...Contents Technical Specification Pre Installation Instructions Installation Instructions Care and Maintenance Customer Instruction Certificates 2 ...

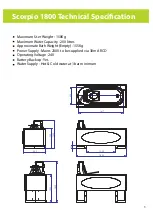
Page 3: ...50Kg Maximum Water Capacity 200 litres Approximate Bath Weight Empty 155Kg Power Supply Mains 230V to be supplied via 30mA RCD Operating Voltage 24V Battery Backup Yes Water Supply Hot Cold water at 1bar minimum 3 1020 1800 100 1617 636 1003 700 800 1000 1453 ...

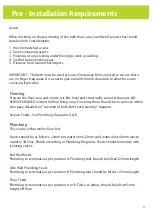
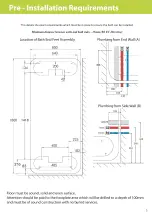
Page 4: ...e NO SERVICES BURIED within the floor fixing area For clarity there should be no services within the space detailed on Location of Bath End Feet Assembly diagram Service Feeds See Plumbing Diagrams A B Plumbing This can be either wall or floor fed Feeds should be as follows 22mm hot water inlet 22mm cold water inlet 40mm waste outlet 3ltr Sec Plumb according to Plumbing Diagrams Feeds should termi...

Page 5: ......

Page 6: ...3 Amp IP65 rated switched fused spur is required in addition Electrical Connection Earth Bonding A 30mA RCCD or RCBO is required in compliance in accordance with 17th Edition IEE regulations This should be located just outside the bathroom or on the consumer unit covering that area of the building Earth Bonding and Cross Bonding are to be fitted and tested for continuity in accordance with IEE reg...

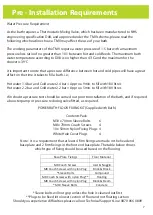
Page 7: ...ssure difference between hot and cold pipes will have a great effect on the time it takes to fill a bath i e Hot water 1 4 bar and Cold water 2 4 bar Approx 9min to fill with 180 litres Hot water 2 2 bar and Cold water 2 2 bar Approx 5min to fill with 180 litres If in doubt a pressure test should be carried out prior to installation of the bath and if required a booster pump or pressure reducing v...

Page 8: ...lternatively timber joists can be anchor bolted to the concrete sub floor to provide the needed support The finish should come level with the surface floor b If the void is small it is acceptable to drive through with Raw Coach bolts This may require a small section of the surface floor being removed and material such as sheet wood inserted to fill the area 2 This type of void requires the surface...

Page 9: ...ber on the side of the bath c Prepare the floor area and ensure it is flat level and structually sound and there are NO SERVICES BURIED within the floor fixing area Bath Fitting Ensure that the site is ready as per the Pre Installation Requirements detailed in this pack Remove transport wheels and straps if in place Base Plate Fixing THIS SECTION IS CRITICAL See the floor fixing kit for the correc...

Page 10: ...ll occur Adjustment is possible on the bayonet clip if required Inner Panel Fitting Offer the corner inner end panels right and left up to the bath and secure using the M4 x 12mm white plastic topped machine screws supplied Fig a Screw through holes in panels and into the rivnuts positioned in the frame uprights Use the white plastic binding fixings Fig b to secue the inner panels together There w...

Page 11: ...ion it is vital that the bath be connected to a mains supply for at least 24 hours before initial use to ensure the batteries are fully charged Failure to observe this requirement could result in the user not being able to exit the bath in the event of a mains failure FIG 1 Bath must be a minimum of 25mm away from any wall or fixture if more than 25mm add the difference to the 98mm and the 231mm d...

Page 12: ...reset the system Depress both Bath buttons on the handset at the same time 10 long beeps will sound and the system will reset It is worthwhile checking that the handest cord and jack are still firmly located into the control box Bath Judders Usually occurs if the bath has not been fixed to the floor correctly or the bath is not level Bath Noisy Check to ensure there is nothing touching the bath wh...

Page 13: ...tton is released Make sure the bath is in the fully lowered position using the Handset Bath DOWN button Check the pop up waste is in the fully closed position Fill the bath approximately half full with water Check the water temperature is within safe bathing limits 40 43 Raise the bath using the Bath UP button on the handset Empty the water whilst the bath is in the up position as this will help w...

Page 14: ...em will render the warranty invalid Any sealed electrical boxes must remain unopened or this will invalidate any warranty The baths are not covered for any problems that may arise from the installation or site planning unless carried out by engineers from Abacus Healthcare Any consequence arising from unskilled or incorrect handling of the product is not covered by this guarantee The following ite...

Page 15: ...the following Person Receiveing Instruction ___________________________________ Signed ______________________________ Date ________________________________ Instructed By _________________________ Signed ______________________________ Date ________________________________ Customer Copy www abacushealthcare com 0808 256 4249 Operating your Scorpio Bath Safety Warning Caring for your Scorpio Bath Tra...

Page 16: ...n the following Person Receiveing Instruction ___________________________________ Signed ______________________________ Date ________________________________ Instructed By _________________________ Signed ______________________________ Date ________________________________ File Copy www abacushealthcare com 0808 256 4249 Operating your Scorpio Bath Safety Warning Caring for your Scorpio Bath Trans...

Page 17: ......

Page 18: ......

Reviews: