+33 4 7642 9550
www.aaton.com
Cantar-X User Manual v2.26 (r13) 2009 April 27
p.51
p.51
Cantar full remote
Cantar-X2
Installed in a laptop or netbook (note1, p.52), through Ethernet
Tarkan v1.10 controls all of the Cantar's audio flow, edits the
metadata and generates PDF / CSV sound-reports.
starting-up
Cantar side:
Turn 'OFF' Cantar, plug a straight or cross-
wired CAT-5 cable into the socket in the HDD housing. The
cable must be held tightly by the canyon shaped clamp.
Laptop side:
First eliminate any other TCP/IP activity (note2,
next page). Connect the CAT-5 cable. Turn 'ON' Cantar.
Launch the Tarkan application and
wait
from 10 sec (Mac
OS-X) to 60 sec (Win-XP) to allow Tarkan to assign an IP
address to each Cantar; then click the upper/left 'start' icon
to activate the controls (soon a timer will do it for you).
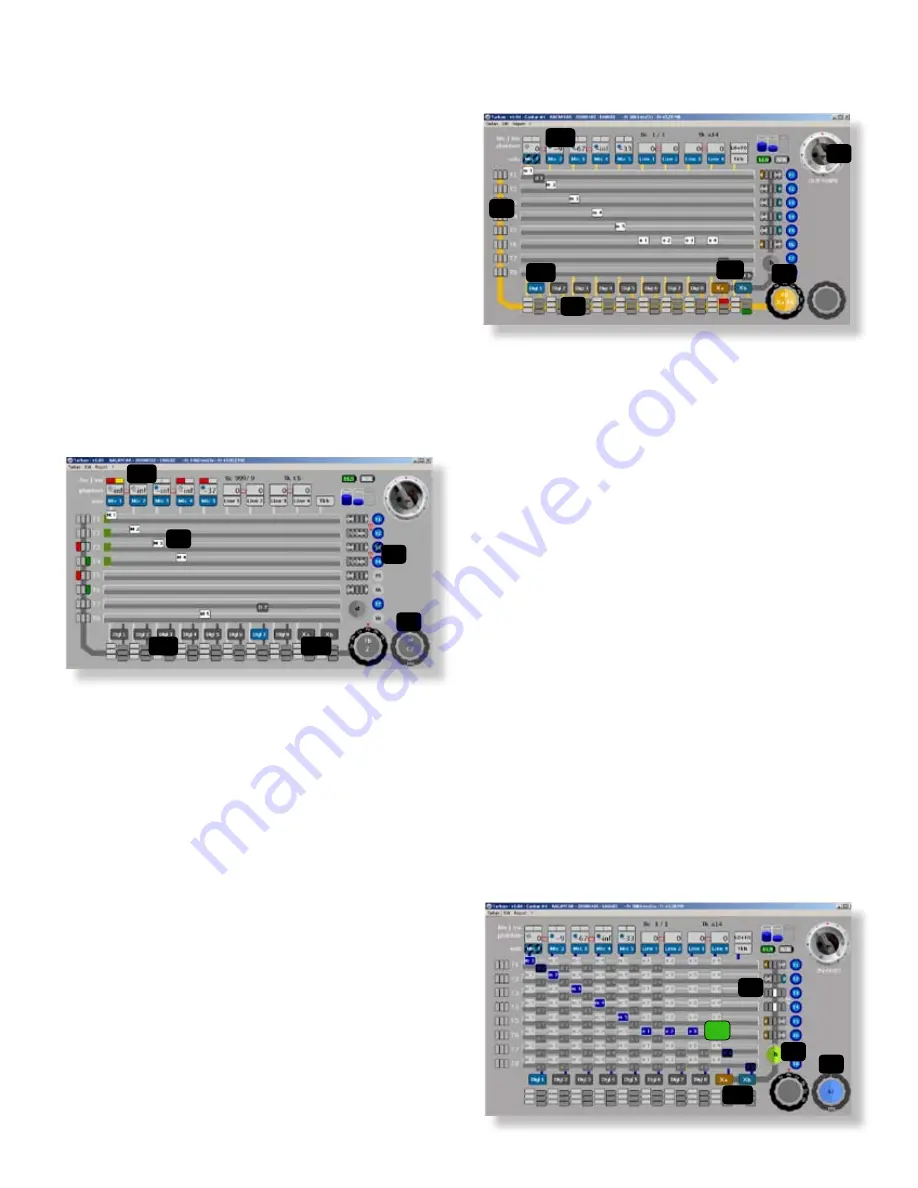
main screen
The screen is made of three layers: the first one displays the
audio flow from the digi/mic/line inputs (with their settings),
to the tracks (In-grids) and to the monitors (Out-Maps), the
second layer handles the mixer with its faders (carrying the
track-names) and panpots, the third layer displays the modu-
lometers over the tracks.
In-Grids
The analog inputs (1a) go down, the digital and mixer inputs
(1b/1c) go up to the track cross points (2). To set the inputs
for T1–T6, go to ROUTING In-Grids (8), click on the desired
cross point, it turns blue; double click to deactivate.
To set the inputs for T7T8, first click the desired T7 cross
point, it turns yellow as well as the other possible choice(s),
click the other one: they both turn blue.
If you want to turn 'OFF' T7T8, double click the cross point
routed to T7. Armed tracks (5) are high-lighted in deep
blue.
Out-Maps
The tracks go to the 'Left-Center-Right'
track monitoring
switches (6). Analog and digital inputs go directly to the
"
input monitoring
" switches (7). Both (6) and (7) go to the
monitoring crown (9).
Mixer
The mixer's faders (3) and pan-pots (4) generate the mix-
down input (1c); In PPR, TEST and ROUTING (In-Grids),
twenty-six pan-pot configurations can be stored in Tarkan.
• During the creation of a pan-pot config, either on Cantar
the usual way, or on Tarkan with successive clicks on the
colored beans (100% left/right with [ctrl] [click]), the back-
ground of the pan-pot 'crown' (10) becomes
red
. Once
done, a [ctrl] [click] in the middle of the crown stores the
config in Tarkan's memory and pushes it into Cantar where
it becomes the active mixer pan-pot, as indicated by the
crown background which turns
grey
.
• Labeled from a to z, all the pan-pot configurations are
stored in Tarkan memory where they are displayed against
a
green
background. Browse them by cliking the left or
right half-moon. A [ctrl] [click] in the middle of the crown
pushes the selected config into Cantar: becoming 'active', it
turns from green to grey.
COMPANIONS
TARKAN (1)
7
1b
1c
1a
6
9
11
1c
8
10
4
3
2
5
1b
1c
1a
8


