


15
5 Assembly
5.1 Handle unit
WARNING - The handle unit must be securely fi xed with the locking screw so that it is safely
joined to the climbing unit!
WARNING - Plug-in contacts must be dry!
A 9-pin sub-D coupling in the receptacle provides the electrical connection.
Connect the handle unit and
the climbing unit to each
other.
»
Control panel on the right!
Secure the connection with
locking knob for stanchion
tube. Both units must have
been securely joined.
5.2 Battery pack
WARNING - The battery pack must be fi xed and locked to prevent immediate detachment!
Assembly
Insert the battery
pack into the opening
provided in the climbing unit.
»
The battery locking device
is activated automatically.
Disassembly
Release the
locking device.
»
Press the release button on
the climbing unit downwards,
then pull out the battery
pack.
i
i
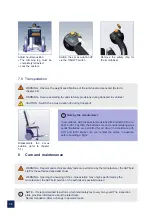
Disassembly:
Switch s-max aviation off
and proceed in reverse
order


