background image

AD-4407A Weighing Indicator


Page 41 


10.2.


Setpoint Comparison 


  This function includes the weighing sequence and is uses for acquiring a 

preset target weight. 


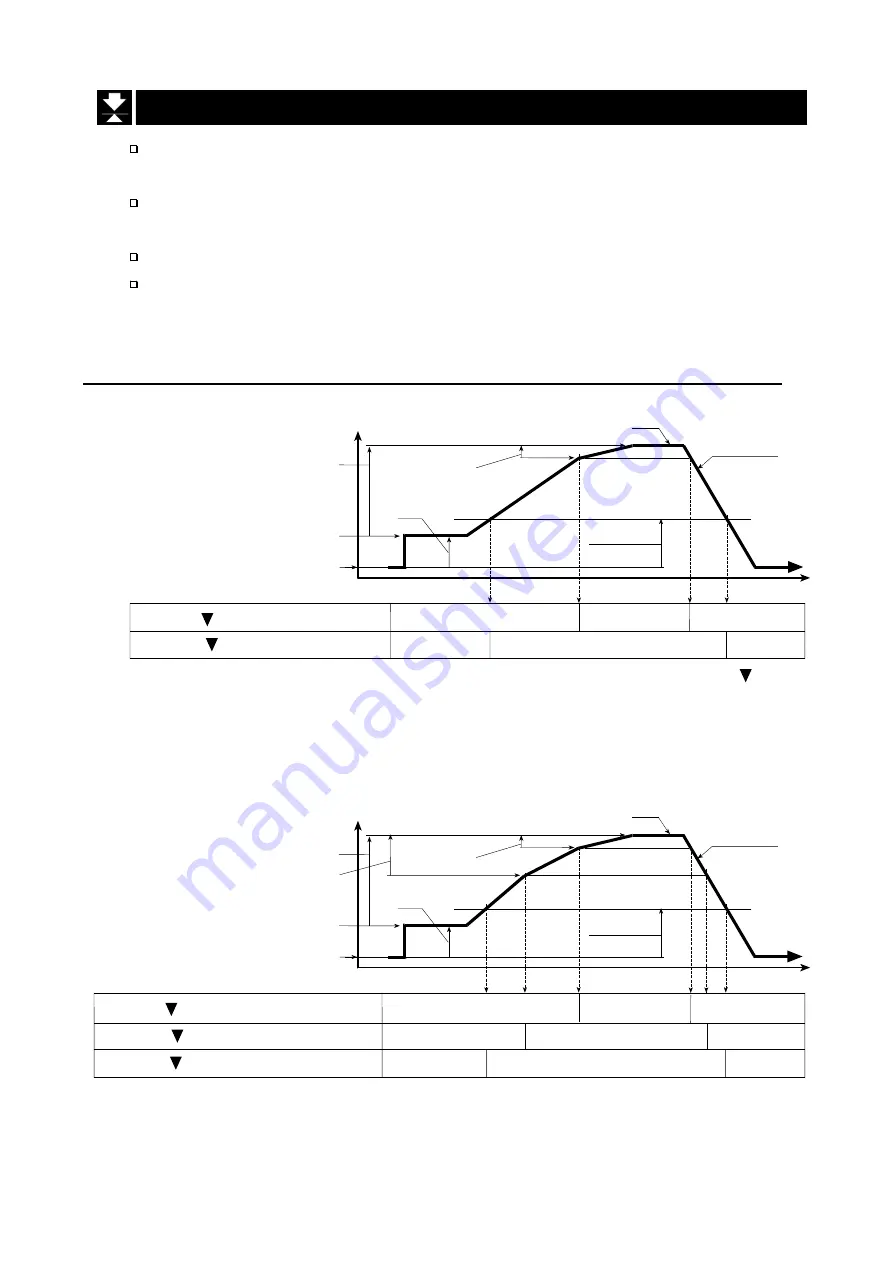
  Four parameters of "Final", "Preliminary", "Free fall" and "Zero band" are used 

for the setpoint comparison. 


  The result of the sequence is output to the three relays of OP-03, OP-05 or OP-08. 


  It is not necessary to enter the F-function 

f22

  again unless comparison 

conditions are changed. 


10.2.1. 

Description of Input Parameters and Outputs 

f22

 = 

7

 (Check weighing 1) 


Output and Condition 


  Relay OK output can be changed to OVER or UNDER by 

f24

. The triangle  2 is 

not displayed. 


  OVER/UNDER is judged always and the result is output to the LED and the relay. 


f22

 = 

8

 (Check weighing 2) 


Output and Condition   


OVER/UNDER is judged always and the result is output to the LED but not to 
the relay. 


Final 

Weighing value 

Calibrated Zero 

Tare 

Tared Zero 

Zero band 

Free fall 

Preset target weight 

Time 

Weighing trace 

Relay HI,  1, Net 

  (Final - Free fall) 

Relay LO,  3, Gross 

  Zero band 

ON 

ON 

ON 

OFF 

OFF 

OFF 

Final 

Preliminary 

Weighing value 

Calibrated Zero 

Tare 

Tared Zero 

Zero band 

Free fall 

Preset target weight 

Time 

Weighing trace 

Relay HI,  1, Net 

  (Final - Free fall) 

Relay OK,  2, Net 

  (Final - Preliminary) 

Relay LO,  3, Gross 

  Zero band 

ON 

ON 
ON 

ON 

OFF 

OFF 

OFF 

OFF 

OFF 


10.2. Setpoint Comparison 

Summary of Contents for OP-03

Page 1: ... L L 1WMPD4002032D A A AD D D 4 4 44 4 40 0 07 7 7A A A O O OP P P 0 0 03 3 3 0 0 05 5 5 0 0 07 7 7 0 0 08 8 8 W W WE E EI I IG G GH H HI I IN N NG G G I I IN N ND D DI I IC C CA A AT T TO O OR R R I I IN N NS S ST T TR R RU U UC C CT T TI I IO O ON N N M M MA A AN N NU U UA A AL L L ...

Page 2: ...for the user to operate the instrument This is a hazard alert mark 2016 A D Company Limited All rights reserved No part of this publication may be reproduced transmitted transcribed or translated into any language in any form by any means without the written permission of A D Company Limited The contents of this manual and the specifications of the instrument covered by this manual are subject to ...

Page 3: ... Symbols 12 4 4 Accessories and Options 12 5 Calibration 13 5 1 Items of Calibration Mode 13 5 2 Calibration Procedure 14 5 2 1 Configuring a Weighing Instrument 14 5 2 2 To Get Stabilized Data 16 5 2 3 Zero Calibration 17 5 2 4 Span Calibration 17 5 2 5 Exiting the Calibration Mode 18 5 3 Weighing Range Function 19 5 3 1 Selecting the Division and Range 20 5 4 Digital Linearization Function 20 5 ...

Page 4: ...d Function 44 11 1 Setting the Hold Functions 44 12 Counting Function 46 12 1 Using the Counting Function 46 12 2 Unit Weight Registration 46 13 RS 232C Interface 48 13 1 Specification 48 13 2 Data Format 49 13 3 Command Format 49 13 3 1 Command to Request Data 50 13 3 2 Commands to Control the Indicator 51 13 3 3 Commands to Set Parameters 53 13 3 4 Commands for Hold Function 54 13 3 5 Commands t...

Page 5: ...gainst harmful interference when the equipment is operated in a commercial environment This equipment generates uses and can radiate radiofrequency energy and if not installed and used in accordance with the instruction manual may cause harmful interference to radio communications Operation of this equipment in a residential area is likely to cause harmful interference in which case the user will ...

Page 6: ...Universal Flex Coms function to customize the protocol of outputting data using the serial interface 0 9 keys enables easy operation such as specifying comparator values IP 65 dust water proof stainless housing The following interfaces are available as options One interface can be installed in the indicator at a time An RS 232C serial interface is standard to communicate with a computer printer or...

Page 7: ...urned off the power is on while the power cord is connected to the AC power source Even if the indicator complies with IP 65 do not immerse the indicator in water To maintain water proof performance tighten the cable clamp firmly when connecting the load cell cable or interface cable And tighten the bolts on the rear panel firmly The recommended torque is 1Nm 3 2 Load Cell Connections Connect the ...

Page 8: ...vision or more Satisfy the following inequality when you design a weighing instrument using the indicator and load cell s Caution A change in input voltage sensitivity is required to cause a one division change of the display Select as large an input sensitivity voltage as possible so that the weighing interval becomes stable Consider the leverage if a lever is used Weighing instrument using one l...

Page 9: ...main board in the front panel unit using the option cable OP 03 RS 422 485 Relay output J2 Main board J2 J3 Main board J6 OP 05 RS 232C I O J5 Main board J6 OP 07 4 20mA Analog output J2 Main board J2 J5 Main board J6 OP 08 RS 232C current loop output I O J5 Main board J6 Step 6 Pass the interface cable through the cable clamp to the external equipment Step 7 Connect the interface cable to the opt...

Page 10: ... HI OK LO Indicates the results of comparison 8 Capacity label To note the capacity and division provided as an accessory 9 CODE key The key to select the code memory SAMPLE key The key to store the unit weight for counting function SETPOINT key The key to store the comparator value PT key The key to store the PRESET TARE value TOTAL key The key to display the total weight M key The key to perform...

Page 11: ...ff OFF hold for 3 seconds 4 2 Rear Panel Description Inner sideoof the real panel No Name Description 10 Adjustment knob Adjust the viewing angle 11 Power cord Connect to the AC power source 12 CAL key cover The CAL key is located inside the panel 13 Grounding terminal Connect to earth ground 14 Load cell cable clamp Connect the load cell cable 15 Interface cable clamp Connect the interface cable ...

Page 12: ...200mA for 200 230 VAC or FS EAWK 315MA 315mA for 100 120 VAC Annunciator label 1 Capacity label 1 Bracket 1 Rubber foot 4 Caution Please confirm that the receptacle type and local voltage is correct for your indicator scale Options OP 03 AD 4407 03 RS 422 485 Interface 3 Relay outputs OP 05 AD 4407 05 RS 232C Interface 3 Relay outputs and 3 Control inputs OP 07 AD 4407 07 4 20mA Analog output OP 0...

Page 13: ...indicator to function as a weighing instrument These parameters do not need to be changed again unless the indicator itself is replaced For details refer to 5 2 1 Configuring a Weighing Instrument Cal 0 Calibrates zero and span This is required after installation to get accurate data For details refer to 5 2 3 Zero Calibration and 5 2 4 Span Calibration Optional Items to be Performed as Necessary ...

Page 14: ...mum capacity Calibrate the scale if it is moved to other location or the environment has changed It is not necessary to input the gravity acceleration correction when calibrating the scale with a calibration mass at the place where the scale is used Enter the stable weight data while the STABLE mark is displayed If unstable data is used it may cause a weighing error Arrange the condition using the...

Page 15: ...he unit for calibration first unit is displayed and the alternate unit second unit is blinking ENTER The key to store the parameter displayed and proceed to the next step ESC The key to proceed to the next step without changing the parameter Specifying the Resolution Decimal Point Position and Format Step 2 The resolution will be displayed as d 0 1 with decimal point The indicator displays triangl...

Page 16: ... greater than the first range Press the ENTER key to store the parameter and proceed to the next step When pressing the ESC key regardless of what is displayed the indicator will proceed to the next step without changing the parameter Specifying the Second Range Capacity Step 5 After displaying Cap2 for 2 seconds the capacity with unit and decimal point is displayed Specify the capacity in the sam...

Page 17: ...ess the key to display the input voltage parameter of the zero point in the unit of mV V Adjust the input voltage using the 0 9 keys ENTER The key to store the zero point parameter and proceed to the next step ESC key The key to proceed to the next step without changing the parameter 5 2 4 Span Calibration Step11 After displaying Cal f for 2 seconds the capacity is displayed Select a span calibrat...

Page 18: ...STABLE mark to turn on and press the ENTER key Proceed to step 17 ESC key The key to proceed to step17 without changing the parameter Caution Do not press the ENTER key while the STABLE mark is off detecting motion Arrange the condition using the F00 filter function Digital Input Step16 Press the key to display the input voltage parameter of the span in the unit of mV V Adjust the input voltage us...

Page 19: ... value Caution When single range is used this function is not used Example 1 The gross display Specified parameters First range Range 50 00 kg division 0 02 kg Second range Range 100 00 kg maximum capacity division 0 1 kg Display 0 kg to 50 kg The first range division 0 02 kg 50 kg to 100 kg The second range division 0 1 kg Division 0 02 kg Division 0 1 kg 0 kg 50 kg 100 kg Gross Weighing value Ex...

Page 20: ...ghing points except zero and capacity Up to three weighing points can be specified Caution This function does not improve repeatability or hysteresis Use the mass on the condition that lnr 1 lnr 2 lnr 3 Do not press the ENTER key while the STABLE mark is off Step 1 When Cal 0 is displayed press the MODE key to display lnr 0 Step 2 Enter the zero point Refer to 5 2 3 Zero Calibration Step 3 The val...

Page 21: ...to display CanCel Then no parameters are changed and the calibration mode is finished Press the ON OFF key to turn the display off Step 2 The parameter is displayed with triangle 1 Enter the gravity acceleration of the calibration location using the 0 9 keys The parameter xxxx is the gravity acceleration ENTER key The key to store the new gravity acceleration and proceed to step 3 ESC key The key ...

Page 22: ... 809 m s2 Chicago 9 803 m s2 Rio de Janeiro 9 788 m s2 Copenhagen 9 815 m s2 Rome 9 803 m s2 Cyprus 9 797 m s2 San Francisco 9 800 m s2 Djakarta 9 781 m s2 Singapore 9 781 m s2 Frankfurt 9 810 m s2 Stockholm 9 818 m s2 Glasgow 9 816 m s2 Sydney 9 797 m s2 Havana 9 788 m s2 Tainan 9 788 m s2 Helsinki 9 819 m s2 Taipei 9 790 m s2 Kuwait 9 793 m s2 Tokyo 9 798 m s2 Lisbon 9 801 m s2 Vancouver BC 9 80...

Page 23: ...capacity Use the calibration mass less than the maximum capacity err 5 The selected calibration mass is smaller than the minimum division err 6 The new input sensitivity is less than 0 15 µV division Increase the input sensitivity Refer to 3 4 Verifying Load Cell Output and Input Sensitivity err 7 When a mass is placed on the weighing unit the load cell output becomes a negative value Check the lo...

Page 24: ...ys at the same time In the function setting mode f00 will be displayed Selecting an Item Step 1 Select an item using the 0 9 keys ENTER key The key to display a parameter of the selected item Proceed to step 2 ESC key To finish the function setting mode and enter the weighing mode CAL key The key to switch between F functions and CF functions Selecting a Parameter Step 2 Select a parameter using t...

Page 25: ...0 5 d 1s 2 1 0 d 1s 3 1 5 d 1s 4 2 0 d 1s 5 2 5 d 1s 6 0 5 d 2s 7 1 0 d 2s 8 1 5 d 2s 9 2 0 d 2s 10 2 5 d 2s f02 STABLE mark Motion detection condition 0 No motion detection The function to set the condition of judgment whether a weight value is unstable or stable The ZERO key and TARE key are active in the stable state If these keys need to be active in the unstable state select 1 for Cf04 If Cf0...

Page 26: ...s 00 to 99 Command address or Device ID Initial setting is 00 f07 Counting function 0 Disable 1 Enable Initial settings s second Key Switch Item Parameter Description f12 Type2 Disabling key switches 2 0 Left Key Right 0 Enable 1 Disable ZERO key to select a key f The same function as the CAL key 0 1 key to select Enable Disable When f13 f14 and f15 are set to 17 and the terminal is connected to t...

Page 27: ...ng the terminal Ignores the f12 temporarily 18 Inhibit memory code reading when shorting the terminal 19 Start averaging to hold 20 Release holding data f14 EXT2 0 to 17 19 and 20 Same as f13 18 Memory cord BCD 1 f15 EXT3 0 to 17 19 and 20 Same as f13 18 Memory cord BCD 2 Initial settings Accumulation Item Parameter Description f20 Type2 Accumulation Mode 10 11 Do not add 0 Add 1 Left Sub item sel...

Page 28: ... Stable 0 All time 1 40 41 All time 0 Start stop 1 f23 f22 10 to 12 Type2 Sub function for batch weighing 10 11 Tare when start 1 Initial settings are 11 21 31 and 40 20 21 Stop after Full by key 0 Auto 1 30 31 Over Under judgment after dribble flow 0 Batch finish 1 40 41 No function f24 Relay output selection 0 Over Effective when f22 7 9 10 or 12 1 Under 2 Finish f22 10 Full f22 9 12 f22 9 10 12...

Page 29: ... NET GROSS key Expand or shorten output data length x 1 Device ID selected at f06 x 2 Code memory number x 3 Data number x 4 Result of comparison x 5 Reserved x 6 Reserved x 7 Accumulated data x 8 Accumulation count x 9 Stable Over x a Displayed weight x b Gross weight x C Net weight x d Tare weight x e Weight type G N T refer to Cf06 x f Weight unit Refer to Cf07 1 Comma of the parameter display ...

Page 30: ...ion f40 Output mode 0 Stream mode command is not acceptable 1 Manual mode command is effective 2 Auto print mode command is effective 3 Auto print mode command is effective 4 When accumulation automatically output 5 Command mode output by command only f41 Accumulated data output at accumulated data display 0 No output 1 Manual Fixed format 2 Auto Fixed format 3 Manual Format 1 f34 4 Auto Format 1 ...

Page 31: ...Manual Print Function f37 1 f40 1 Operation When the PRINT key is pressed the stable weight data is output just once Description of Auto Print Mode Function f37 2 f37 3 f40 2 or f40 3 Operation When the weight data enters the inhibit region for output and becomes stable in the permission region of output the stable data is output or printed just once To use this mode set f02 to 1 to 10 but not 0 F...

Page 32: ...e TARE ZERO in motion TARE at negative gross 0 Not accepted Not accepted 1 Execute Not accepted 2 Not accepted Execute 3 Execute Execute Cf05 Output overload and unstable data 0 Not to output unstable or overload data Effective in key mode 1 To output data always Cf06 Header 2 GROSS NET TARE Preset TARE 0 GR NT TR TR 1 GR NT TR PT 2 G_ N_ T_ PT _ Space 20h Cf07 Figure number of unit 0 Two digits S...

Page 33: ...e unit of division weighing interval In the case of Cf02 1 2 or 3 power on zero the displayed value will be zeroed when turning the display on When using a multi interval scale the usable input range is the first range In the case of Cf09 1 To inhibit preset tare preset tare can not be used Preset tare is stored as one of the code memory data Refer 9 Code Memory Preset tare value can be set via th...

Page 34: ...n be selected from result of comparison is OK only or all results Accumulation Condition F21 of the F function In the case of manual accumulation mode press the M key to accumulate weight data when the STABLE mark is displayed Data can be accumulated after the weight data enters the inhibit region for output When turning the display on the accumulation mode takes the same action Inhibit region for...

Page 35: ...TAL key to display total and the accumulated data Step 2 Press and hold the key for more than 3 seconds The display blinks once and the data accumulated before the last weight data is displayed Caution External input can not be used Clearing the Accumulated Data Step 1 Press TOTAL key to display total and the accumulated data Step 2 Press and hold the ZERO key for more than 3 seconds The display b...

Page 36: ...lated data Step 2 If automatic output is selected the data is output once Step 3 If manual output press the PRINT key while the accumulated data is displayed to output data Fixed data format 9 Code Memory This indicator has four code memories 1 through 4 Each code memory stores a set of setpoints preset tare and the unit weight for piece counting The data is stored in non volatile memory and is no...

Page 37: ...e data Refer 7 2 Digital Input ESC key The key to return to step 1 ENTER key The key to store the selected code memory number s data and return to the weighing mode Step 3 Copy is displayed for 2 seconds and then C x y is displayed with y blinking Here x is the code memory number specified at step 1 and y is the destination code memory number Use the following keys 0 4 key The key to input the des...

Page 38: ...and outputs the results to the three relays of HI OK and LO Use this comparison when judging whether a weight is proper Set the F function f22 to 1 2 or 3 to use upper lower limit comparison and f22 to 4 5 or 6 to use 5 stage comparison Select a parameter of the F function f23 for the comparison condition Set the F function f26 zero band if f23 is set to10 not to compare in the zero band Specify t...

Page 39: ... lost even if the power is turned off except code 0 memory When the displayed value becomes an overload positive over HI over is output When the displayed value becomes an under load negative over LO under is output This function compares the Hi HiHi limit value first This function does not check the relationship between the upper and lower limit values 10 1 2 Setting the Upper Lower Limit Values ...

Page 40: ... Lo Comparator OK HI LO 3 Upper Setpoint Target Upper Lower Lower 3 Class tG Hi Lo Comparator OK HI LO Unit 4 5 stage Setpoint HiHi Hi Lo LoLo 1 Class HH Hi Lo LL Comparator HI HI LO LO Triangle 2 3 5 5 stage Setpoint Target HiHi Hi Lo LoLo 2 Class TG HH Hi Lo LL Comparator OK HI HI LO LO Triangle 2 3 6 5 stage Setpoint Target HiHi Hi Lo LoLo 3 Class TG HH Hi Lo LL Comparator OK HI HI LO LO Unit T...

Page 41: ...an be changed to OVER or UNDER by f24 The triangle 2 is not displayed OVER UNDER is judged always and the result is output to the LED and the relay f22 8 Check weighing 2 Output and Condition OVER UNDER is judged always and the result is output to the LED but not to the relay Final Weighing value Calibrated Zero Tare Tared Zero Zero band Free fall Preset target weight Time Weighing trace Relay HI ...

Page 42: ...minary and Free fall are off from weighing completion to the next start 5 Weighing completion can be output by f24 and f25 6 The start signal can be accepted after weighing completion even the weight is not within the zero band 7 Over Under output is set by f23 3x Start Tare automatically when the Start is input if f23 11 The READY mark turns off when the Start is input Weighing Completion The wei...

Page 43: ...n and the value does not belong to a specific code memory but is used commonly Setting Order and Display for Setpoint Comparison and Simple batch f22 MODE Display 1 2 3 4 5 7 Setpoint Setpoint Final Free fall Over Under Comparison Class Fi FF Hi Lo 1 Comparator OK HI LO Triangle 1 8 Setpoint Setpoint Final Free fall Preliminary Over Under Comparison Class Fi FF Pr Hi Lo 2 Comparator OK HI LO Trian...

Page 44: ...nd the Data Output of Hold and Average The weight display blinks during the averaging period The output data in the averaging period is the actual weight at the time The weighing unit blinks when the weight display is in the hold state The output data format of the hold weight data is the same as that of the normal weight data except the header of stable state is HD in the response to the RW or RW...

Page 45: ...on and stable No Yes Yes Weight is entering the inhibit region at averaging Continue Stop Stop Weight becomes over at averaging Pending Stop Pending Hold key input at averaging Stop Stop Stop Release input from external input at averaging Stop Stop Stop Release command input at averaging Stop Stop Stop Hold key input at hold Release Release Release Release input from external input at hold Release...

Page 46: ...ne item of the code memory data Select the code memory number and start the unit weight registration in the counting mode The unit weight registration can not be done from the code memory number display The counting accuracy improvement function by re calculating the unit weight based on the actual weight is not available Weigh Actual Samples When the unit weight is unknown prepare some samples to...

Page 47: ...isplay Digital Input When the unit weight is known digital input is available Step 1 Start with the normal weighing mode Step 2 Press the SAMPLE key U xxx and the unit weight is displayed with unit pcs blinking Use the following keys 0 9 key The key to set the unit weight Maximum is 5 digits key The key to select the weight unit of the unit weight ZERO key The key to clear the digital input U is d...

Page 48: ... or Non parity for 8 data bits Start bit 1 bit Stop bit 1 bit Code ASCII Terminator CR LF CR CR 0Dh LF 0Ah Connector Terminal block Circuit and Pin Connection Pin No Signal name Direction Description 1 TXD Output Transmit data 2 RXD Input Received data 3 DSR Output Data set ready 4 SG Signal ground 5 FG Shield Frame ground Bit Format data 7 bits data 8 bits 13 RS 232C Interface RS 232C J21 1 2 3 4...

Page 49: ...laced with spaces except the decimal point Unit f34 35 f unit In case of Cf07 0 the unit length is 2 digits In case of Cf07 1 the unit length is 3 digits Depending on circumstances an A D printer may not work correctly 13 3 Command Format Description of Command When performing a command the received command or reply data is sent back When the received command can not be performed such as in the bu...

Page 50: ...ands 13 3 1 Command to Request Data Request Display Data 1 When receiving this command returns the displayed data immediately Template RW Command Reply Request Display Data 2 When receiving this command returns the displayed data immediately with format 1 or 2 Template RW 1 or RW 2 Command or Reply Format1 f34 or Format2 f35 Request Gross weight When receiving this command returns the gross data i...

Page 51: ...format of 8 2 Display and Operation Output of Accumulated data Is Zero When receiving this command returns at zero point or no immediately Template RZ Command Reply when at ZERO Not at ZERO 13 3 2 Commands to Control the Indicator Zero Display Sets the current display to the zero point Template MZ Command Reply Tare Sets the current display to zero of the net data Template MT Command Reply Clear T...

Page 52: ...emplate CA Command Reply Changing the Weight Unit Changes the weight unit Template UC Command Reply Changing the Code Memory Changes the code memory number Template SC m m code memory number 0 4 Command Reply Disabling Key Switches Disables the key switches Once power off no effect remains by this command Template DK n n key switch number 0 all keys 1 F refer F Function f12 Command Example to disa...

Page 53: ...point order number Refer to 10 1 2 Setting the Upper Lower Limit values and 10 2 3 Setting the Parameters of Setpoint Comparison Command Reply Set Zero Band Sets the f26 value zero band of the comparison The decimal point is not necessary Template SZ value Command Reply Set Preset Tare Sets the preset tare value The decimal point is not necessary Template PT m value m code memory number 0 4 Comman...

Page 54: ... mode Template HC Command Reply Request Hold State When receiving this command returns the average hold state immediately Template HD Command Reply Not hold nor averaging Averaging now Hold 13 3 5 Commands to Set Serial Data Output Format UFC Set Serial Data Format Sets the serial output data format Format 1 2 data is stored in the same memory area of f34 f35 Template SFf parameters f Format numbe...

Page 55: ...arameters are stored next to the last parameter stored by the last UFC command Clear all of the data first if storing a new set of parameters The parameters in the stored data can not be changed partially The various types of parameters and their descriptions are shown below data Weight result of comparison etc CL Clear previous settings UFC command parameters can not be changed partially WT Displ...

Page 56: ...rs preceded by is hexadecimal code Example 09 7C The FF code can not be used because it is used for internal control Example SF1 ID DN CR LF GR UT CR LF Serial output data format 1 ID number data number carriage return and line feed Gross weight unit carriage return and line feed SF2 Welcome to A D LF Total weight AN TL LF LF Serial output data format 2 the strings Welcome to A D and line feed the...

Page 57: ...n Description RS 422 RS 485 1 SDA Output Transmission A terminal 2 SDB Output Transmission B terminal 3 RDA Input Receive A terminal 4 RDB Input Receive B terminal 5 TRM Terminator resistor 100Ω Relay output 6 HI Output Relay output HI 7 OK Output Relay output OK 8 LO Output Relay output LO 9 COM Relay output common Adaptable connector TM BLA9 provided with the OP 03 Switching Between RS 422 RS 48...

Page 58: ... SDB RDA RDB TRM SDA SDB RDA RDB TRM SDA SDB RDA RDB TRM SDA SDB RDA RDB TRM SDA SDB RDA RDB TRM A B Some computers have terminators inside Connect a terminator to the end connection Internal termination resister is effective when the TRM terminal is connected to the RDB terminal SDA SDB RDA RDB TRM AD 4407A 32 Address f06 32 AD 4407A 32 Address f06 32 AD 4407A 2 Address f06 2 AD 4407A 2 Address f...

Page 59: ...for the On time and Off time ON Make OFF Break Pin connections and Circuits Function Pin No Signal name Direction Description RS 232C 1 TXD Output Transmit data 2 RXD Input Received data 3 DSR Output Data set ready 4 SG Signal ground Relay output 5 HI Output Relay output HI 6 OK Output Relay output OK 7 LO Output Relay output LO 8 COM out Relay output common Control input 9 EXT1 Input Control inpu...

Page 60: ...t f31 to f33 Item Parameter Remarks Data output f30 0 No output Initial setting Data output 1 Analog output Must be set to 1 2 Serial in out 1 3 Serial in out 2 Analog output f31 0 Displayed value Initial setting Output data 1 GROSS weight 2 NET weight f32 Weight value at 4mA 999999 to 999999 Initial setting is 0 Decimal point is set at Cal5et f33 Weight value at 20mA 999999 to 999999 Initial sett...

Page 61: ...e and Off time ON Make OFF Break Pin connections and Circuits Function Pin No Signal name Direction Description RS 232C 1 TXD Output Transmit data 2 RXD Input Received data 3 DSR Output Data set ready 4 SG Signal ground Relay output 5 HI Output Relay output HI 6 OK Output Relay output OK 7 LO Output Relay output LO 8 COM out Relay output common Current loop 9 CL1 Output Current loop output 1 10 CL...

Page 62: ...eripheral unit Set f36 f37 f38 and f39 of F Functions Please note the initial setting of f37 is disabling the current loop output Data format The data format is the same as that of the initial setting of f34 of RS 232C data format The current loop output data format is fixed and can not be changed The header 2 and the unit selection are common to RS 232C Cf06 Cf07 Line feed 0Ah Carriage return 0Dh...

Page 63: ...balt blue Character height 20 mm State indicator Symbol Minus sign Zero point Stable Net Preset tare value Storing accumulated data Percentage Various state indicator triangle 1 2 3 Character color Cobalt blue Comparison result HI OK LO Character color Red for HI and LO Green for OK Unit kg g t lb oz lb oz catty tl catty tl depends on the region Character color Cobalt blue Interface RS 232C interf...

Page 64: ...5 45Hz to 65Hz Power consumption Approximately 20VA Operation temperature 10 C to 40 C 14 F to 104 F Operation humidity 85 R H no condensation Mass Approximately 2700 g including the bracket Dimensions 246 2 W x 223 H x 96 8 D mm including protrusions Accessories Refer to 4 4 Accessories and Option 18 1 Dimensions Unit mm 18 1 Dimensions ...

Page 65: ...AD 4407A Weighing Indicator Page 65 MEMO ...

Page 66: ...Page 66 AD 4407A Weighing Indicator MEMO ...

Page 67: ......

Page 68: ...ngdeungpo gu Seoul 07331 Korea 전화 82 2 780 4101 팩스 82 2 782 4264 OOO A D RUS OOO ЭЙ энд ДИ РУС Почтовый адрес 121357 Российская Федерация г Москва ул Верейская дом 17 Юридический адрес 117545 Российская Федерация г Москва ул Дорожная д 3 корп 6 комн 8б 121357 Russian Federation Moscow Vereyskaya Street 17 тел 7 495 937 33 44 факс 7 495 937 55 66 A D Instruments India Private Limited 509 Udyog Viha...

Reviews: