background image

GX-A/GF-A Maintenance manual 


Page 29 

SAMPLE 

PRINT  

SAMPLE 

PRINT  

SAMPLE 

PRINT  

SAMPLE 

PRINT  

SAMPLE 

PRINT  

SAMPLE 

PRINT  

SAMPLE 

PRINT  

SAMPLE 

PRINT  

SAMPLE 

PRINT  

SAMPLE 

PRINT  

PRINT  

SAMPLE 

SAMPLE 

PRINT  

SAMPLE 

PRINT  

SAMPLE 

PRINT  

SAMPLE 

PRINT  

SAMPLE 

PRINT  

SAMPLE 

PRINT  

SAMPLE 

PRINT  

SAMPLE 

PRINT  

SAMPLE 


SAMPLE 

PRINT  

PRINT  

SAMPLE 

PRINT  

PRINT  

SAMPLE 

SAMPLE 

SAMPLE 

SAMPLE 

SAMPLE 

SAMPLE 

SAMPLE 

SAMPLE 

PRINT  

typE


Apr


cp0


cp5


cp0t 


cp5t 


p2t0


p2tt


tLnr


tc


5-iir


b2d


in it


PRINT  

PRINT  

SAMPLE 

SAMPLE 

SAMPLE 

PRINT  

SAMPLE 

SAMPLE 

SAMPLE 

SAMPLE 

SAMPLE 

SAMPLE 

SAMPLE 

SAMPLE 

SAMPLE 

SAMPLE 

in itHF


in itV5


in itp5


MAXdi5p


Pt


SAMPLE 

L d


nEt


SAMPLE 

An i


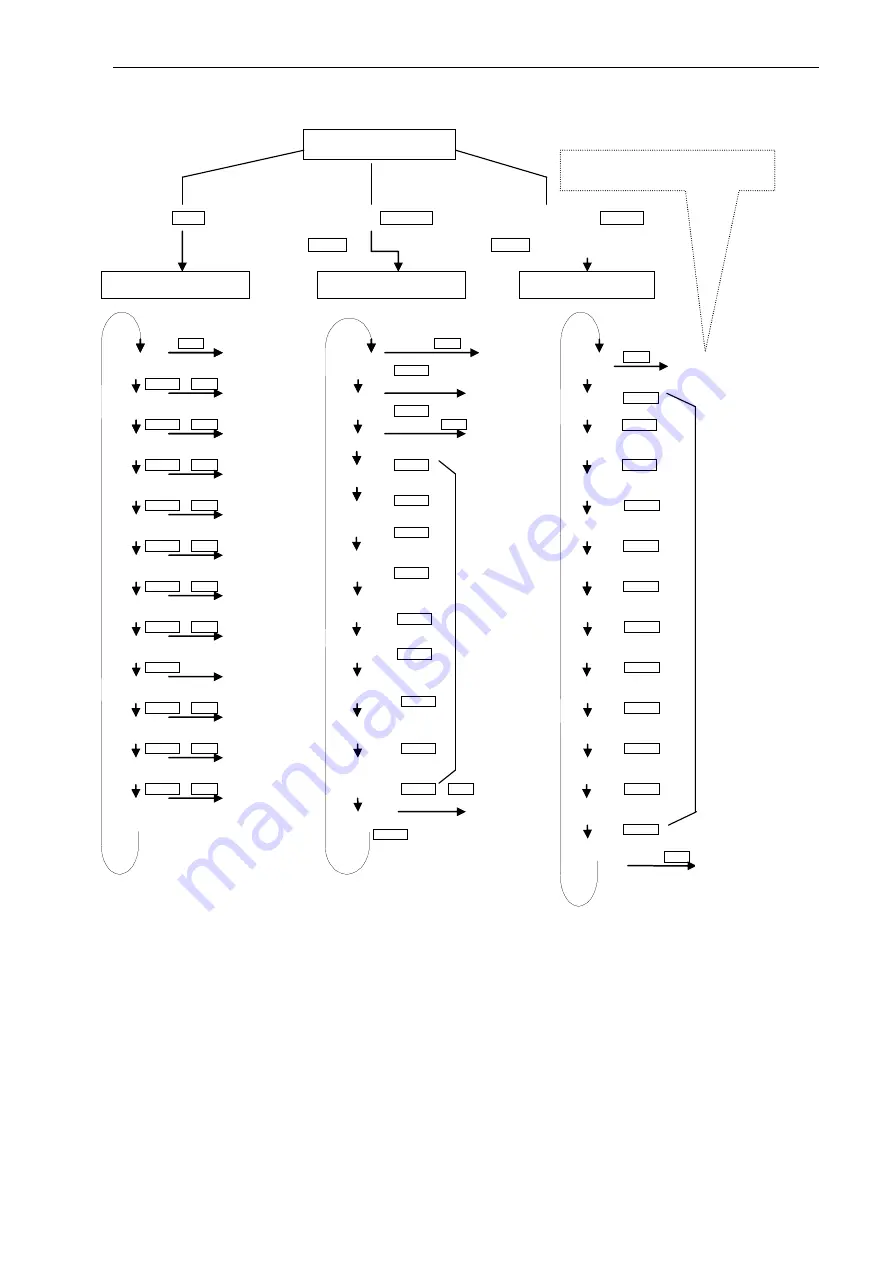
2. Check mode menu 


    Press 

PRINT

                        While holding down 

RE-ZERO

                    While holding down 

SAMPLE


                                                    Press   

PRINT


PRINT

    press twice.             


d-d5P                                                Un it 

Lnr-2                                                  Uct


Lnr-3                                                    5n 


CALout                                                 


CAL in                                                   


CAL5Et                                           


    tH                                                     


    tL                                                   


  CPout


in tE5t                                               


rE tE5t                                             


VE tE5t


Note:  In  the  above  content,  the way  of  displaying  may  differ  depending  on  the  software 

version.


Start from step 5


Data adjustment mode 


Only the maintenance main board 
display  this  Item.(The  usual  product  do 
not display) 


Function setting mode 


Basic setting mode 

Internal 

count 

display


Secondary 
linearity


input


Third 

linearity 

input


External 

mass 

calibration


Internal 

mass 

calibration


Fine


adjustment  of 

linearity 


High  temperature 
input


Low 

temperature 

input


Not used


calibration test


Repeatability 
test


ECL test


Internal 

count 

display


Selecting  the 
model


Not used


Third 

linearity 

input


Saving 
serial 
number


Half- 
initialization


Not used


Initialization


Saving 
weighing 
units


Not used


  bL


Summary of Contents for GF-A Series

Page 1: ...GX 203A 303A 403A 603A 1003A 1603A 2002A 3002A 4002A 6002A 10002A 6001A 10001A GF 123A 203A 303A 403A 603A 1003A 1603A 1202A 2002A 3002A 4002A 6002A 10002A 6001A 10001A 1WTPD4003782...

Page 2: ...overed by this manual are subject to change for improvement without any notice and obligation on the part of the manufacturer Under the copyright laws the software program described in it are copyrigh...

Page 3: ...ASSEMBLY 18 5 2 ASSEMBLY 20 5 3 CLEANING THE MAGNET ASSEMBLY AND BOBBIN 25 6 ADJUSTMENTS 26 6 1 ADJUSTMENT FLOW CHART 26 6 2 GENERAL PRECAUTIONS 27 6 3 CHECK MODE 28 6 4 CHECK MODE MENUS 30 6 5 INITIA...

Page 4: ...mbling guide of the lever A nipper 6 A square For the tension flexure adjustment 7 A soldering iron 25 40 W For soldering wires on force motor 8 Masses Model Cylinder type Masses Slotted type Masses 1...

Page 5: ...for holding the beam 1 GXA 3 8 4 A bord for positioning the beam 1 GXA 4 8 5 A plate for positioning the beam 1 GXA 5 8 6 A jig for positioning the fulcrum flexure GXA 6 8 7 A jig for positioning the...

Page 6: ...receiving photocurrent from the Photodiodes converting it to voltage and boosting it back to the Force Coil As the voltage increases so does the magnetic power pulling the Force Coil back until the Po...

Page 7: ...intenance defects must be located and their cause determined The easiest way to locate a defect is to perform an operation check Corrective maintenance procedure Corrective maintenance is described by...

Page 8: ...rect pan assembly 3 Use the breeze break for 0 001g model in GX A GF A series Functions 1 Verify that each key functions correctly ON OFF key CAL key MODE key SAMPLE key PRINT key RE ZERO key 2 Verify...

Page 9: ...Masses Specifications 123 100g 0 001g 203 200g 303 300g 403 400g 603 600g 1003 1000g 1603 1600g 0 002g 1202 1kg 0 02g 2002 2kg 0 01 g 3002 3kg 4002 4kg 6002 6kg 10002 10kg 0 02g 6001 6kg 0 1 g 10001 1...

Page 10: ...the center and at each position the cross marks 2 3 4 and 5 are half the distance from the center of the pan to the corner edge is within the specifications GX A GF A series Model Masses Specificatio...

Page 11: ...eviation from the 10 data and verify that it is within the specifications If not perform another two sets of test and obtain the standard deviation for each set Verify that the two standard deviations...

Page 12: ...display value linearity After reaching weighing capacity remove the mass one by one and check the difference between an increase and decrease hysteresis GX A GF A series Model Masses Linearity Hystere...

Page 13: ...play beam is not balanced AC adapter Is it the correct AC adapter for the power source used Replace with the correct AC adapter F Is the output voltage correct Measure the output voltage of the AC ada...

Page 14: ...embly and Reassembly A Force motor assembly Check that the flexures are in good conditions and are correctly installed Repair the force motor assembly Refer to 5 Force Motor Disassembly and Reassembly...

Page 15: ...rrectly installed Install the pan assembly correctly F Check for foreign matter between the pan and dust plate Clean the area around the pan assembly and the dust plate F Check that the dust plate doe...

Page 16: ...calibration in check mode A Defective pump Only GX A Check the pump Replace the pump or pump control board F Defective solenoid valve Only GX A Check the solenoid valve Replace the solenoid valve or...

Page 17: ...Check point Check pad Voltage generation element Vdd 3 1V 3 5V Vdd LG U6 Vgc 4 7V 5 3V Vgc LG U7 U8 Vcc 9 5V 10 5V Vcc LG U8 VLCD 3 0V 3 5V VLCD GS U101 PZ6596 Table 2 Specifications of each power sup...

Page 18: ...tenance Flowchart Yes No Confirming the operation of internal mass GX A Analog board 7PZ46595 Disassemble the force motor Clean the force motor Reassemble the force motor Coarse adjustment of the forc...

Page 19: ...If you do not have the proper facilities to do the temperature adjustment do not attempt to adjust the temperature feature Jig set 7PA GXA JIG for GX A GF A mechanical unit disassembly and reassembly...

Page 20: ...chanical unit Allen head screw M5x10 with coned disk spring 2pcs 3 Disassembling the mechanical unit Remove the shock absorber Short head torx screw M5x8 3pcs Remove the Counter weight Pan head screw...

Page 21: ...between the 1st beam and the roberval and secure the 1st beam with the bolt for holding the beam 1 Remove the 2nd beam Allen head screw with coned disk spring M4x8 2pcs Remove the Fulcrum flexure Pan...

Page 22: ...xure folder 1pc 3 Assembling the Mechanical unit Secure the Roberval to the base jig using the allen head screw M5x10 3pcs and the allen head screw M5x14 1pc Assemble the 1st Beam temporarily using th...

Page 23: ...bobbin on the base jig insert the jig for positioning the fulcrum flexure 1 under the beam 2 unit and secure the 2nd Beam unit using the 2nd tension flexure folder Allen head screw with coned disk spr...

Page 24: ...r for positioning the beam 1 Secure the Magnet support by pressing it against the base jig and the roberval Allen head screw with coned disk spring M5 x8 60kgf cm 4pcs Secure the pan support arm Short...

Page 25: ...x6 WS 2 pcs Secure the under hook to the roberval Connect the beam flexible print circuit and the sensor flexible print circuit with two wires Make sure that the two soldered wires do not touch the Al...

Page 26: ...he resistance between one end of the force coil and the frame Confirm that the measured value is the same as that of when the electrodes of the multimeter are open Make the confirmation before connect...

Page 27: ...ttracted to the magnet The screws used in this balance are non magnetic Do not substitute screws made of magnetic material Prepare a 5 cm long adhesive tape for cleaning Use a paper backed or cloth ta...

Page 28: ...on check A D operation Coarse adjustment calibration and corner load adjustment Temperature adjustment enter high and low temperature data Fine adjustment corner load adjustment linearity hysteresis I...

Page 29: ...he bottom are more basic If the specific data is adjusted all data listed above the adjusted data must also be adjusted Calibration Linearity Temperature adjustment Corner load adjustment Repeatabilit...

Page 30: ...02A 6002A 10002A 6001A 10001A Step 1 Verify that the display is OFF Step 2 Press and hold the RE ZERO and PRINT keys and press the ON OFF key Release the PRINT and ON OFF keys while still holding the...

Page 31: ...While holding down RE ZERO While holding down SAMPLE Press PRINT PRINT press twice d d5P Un it Lnr 2 Uct Lnr 3 5n CALout CAL in CAL5Et tH tL CPout in tE5t rE tE5t VE tE5t Note In the above content th...

Page 32: ...RINT key to display the internal count Use the SAMPLE key to go to the next data Digital offset While in the D0 D1 display while holding down the RE ZERO key and MODE key the balance enters the digita...

Page 33: ...edure Follow the procedure below to completely initialize the data stored in the non volatile memory Step 1 See the check mode menu flowchart on page 29 to display basic setting mode type or apr Step...

Page 34: ...t and it should be adjusted for a maintenance board Step 2 See the check mode menu flowchart on page 29 to display basic setting mode typeE Step 3 Press the PRINT key Confirm the type on the display a...

Page 35: ...oad full Subtract the count without load from the count with load to obtain the span value Verify that the span value and full value are within the range shown in the table below In the D0 data mode W...

Page 36: ...ly GF A 1kg 1003A 1603A 1kg 2002A 3002A 2kg 4002A 4kg 6002A 5g 10002A 10kg 6001A 5g 10001A 10g Step 5 With nothing placed on the pan press the PRINT key Cal 0 is displayed Step 6 After it stabilized 2...

Page 37: ...s listed in table below on the front back left and right of the weighing pan and work again after the drift of the center zero point is confirmed to be within 3 digits Model GX A GF A series Masses Sp...

Page 38: ...check mass in the table below one by one on the pan After reaching the weighing capacity remove each mass one by one and check that the difference between increasing points and decreasing points are w...

Page 39: ...on page 28 29 Step 2 Press the SAMPLE key six times tH appears Press the SAMPLE key two more times Then tl appears Input high temperature data in the tH display low temperature data in the tl display...

Page 40: ...balance at that temperature for at least 4 hours Leave the balance with D2 data mode Step 4 Note the zero point reading Step 5 Press the RE ZERO key to display zero Step 6 Place a mass in table below...

Page 41: ...Adjustment When adjusting the corner load error by turning the four corner adjust screws zero point drift may be generated After turning the four corner adjust screws load the mass listed in table bel...

Page 42: ...e lnr 3 is displayed Step 3 Press the PRINT key The motor starts and adjusts the internal mass position correctly Then lnr 0 is displayed Press the CAL key to cancel this procedure Step 4 With nothing...

Page 43: ...t method and actual load on the pan Lnr0 Lnr1 Lnr2 Lnr3 Lnr4 Lnr5 A B C No load A B B A B C B C A 123 Only GF A 2 50g 50g 0g 50g 50g 100g 203 100g 100g 100g 100g 200g 303 100g 200g 100g 200g 300g 403...

Page 44: ...ghing capacity remove each mass one by one and check that the difference between increasing points and decreasing points are within the specifications hysteresis Model Calibration masses Check masses...

Page 45: ...d d5p after getting into check mode shown on page 28 29 Step 2 Press the SAMPLE key three times Calout is displayed Step 3 Press the PRINT key The motor starts and adjusts the internal mass position c...

Page 46: ...d d5p press the SAMPLE key four times Cal in is displayed Step 2 Press the PRINT key The motor starts and adjusts the internal mass position correctly Step 3 The display changes in turn as follows Ca...

Page 47: ...lectronically controlled load Also it can be operated in the following command FP7 0 electronically controlled load ON FP7 1 electronically controlled load OFF When the electronically controlled load...

Page 48: ...displayed Step 3 Press the PRINT key Then the display starts to blink Step 4 Using the following keys input the serial number on the label attached to the each balances RE ZERO key changes the value...

Page 49: ...veral times initHf is displayed Step 3 Press the PRINT key Hf is displayed To cancel the operation press the CAL key or PRINT key Step 4 Press the RE ZERO key Hf is displayed To cancel the operation p...

Page 50: ...ld RE ZERO key and press MODE key 1 is displayed on the upper left display in offset mode seven segments With a same key operation the mode can be moved to 2 3 See the example at the bottom of this pa...

Page 51: ......

Page 52: ...3 23 14 Higashi Ikebukuro Toshima ku Tokyo 170 0013 JAPAN Telephone 81 3 5391 6132 Fax 81 3 5391 6148...

Reviews: