background image

15

4.2.3 Printer initialization

The printer initialization function is to clear the downloaded files in the memory (DRAM)

and restore the print parameters to the factory default settings. After enabling the printer

initialization function, the printer will reset.
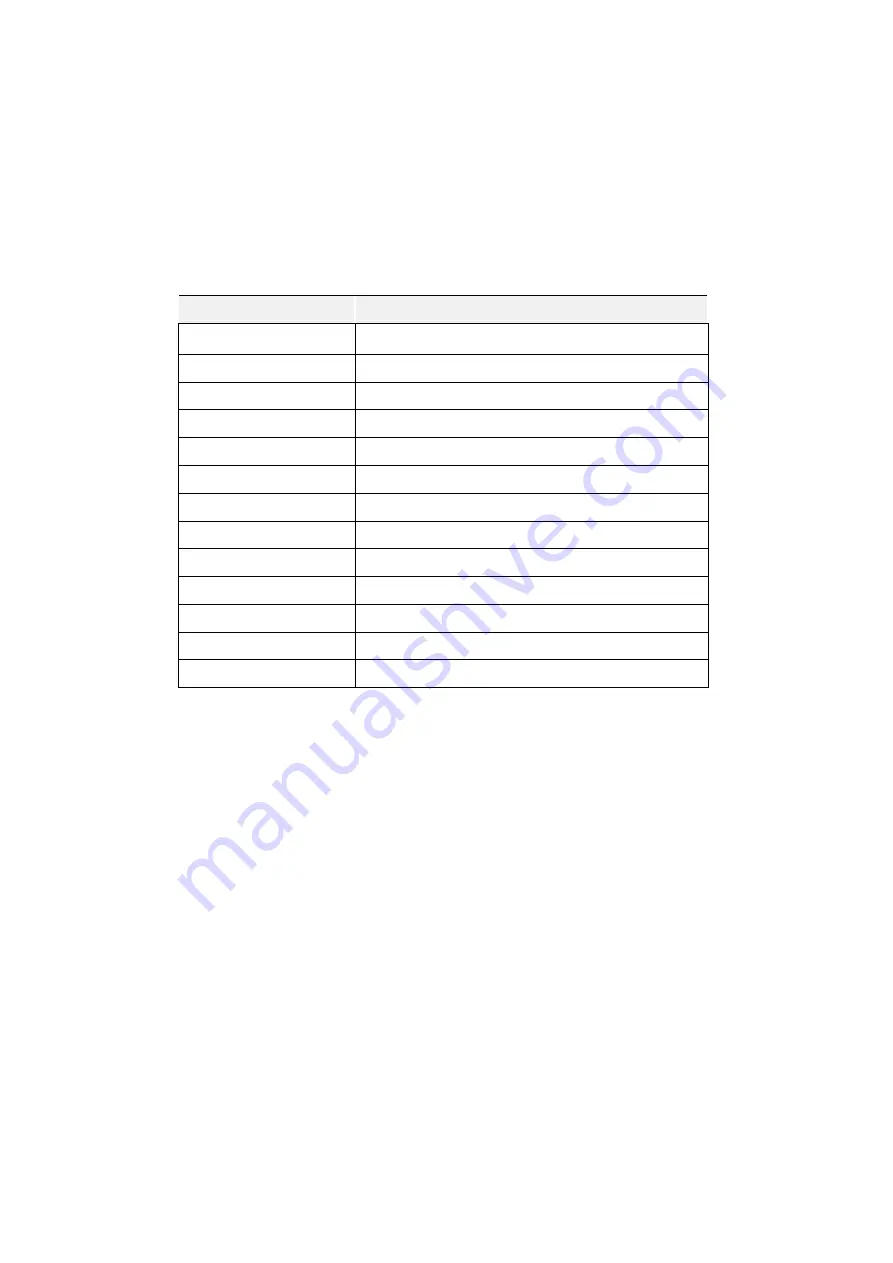
After initialization, the printer configuration is restored to its default values as follows:

Parameters

Defaults

Speed.

76 mm/sec (3 ips) (203DPI)

Density

8

Label width

2.83” (72 mm)

Label height

4.0” (108 mm)

Sensor type

Gap sensor

Gap setting

0.12” (3.0 mm)

Printing direction

0

Reference point

0,0

Offset

0

Tear-off mode

On

Characters

850

Country code

001

Clear flash

No

4.2.4 Skip the AUTO.BAS program

The XPL programming manual

command language allows the user to load an auto-execute

file (AUTO.BAS) into the flash memory. When the printer is turned on, it will be

automatically executed according to the file loaded by the user. When you want to skip the

AUTO.BAS after power-on, you can use this boot function to ignore this auto-execute file.

4.3 Switching between barcode/bill mode

1) Barcode mode --> bill mode:

Enter the main menu -> Set -> Print the settings -> Instruction mode -> Select ESCPOS.
The printer is automatically restarted, and ESC is displayed at the top right of the standby

interface; at this time, the printer switches to the bill mode.

2) Bill mode --> barcode mode:

Press and hold the POWER button first, then press the MENU button or the FEED button,

and then release all the buttons, and the printer is restarted automatically, and EZD is
displayed at the top right of the standby interface; at this time, the printer switches to
the barcode mode.

Summary of Contents for PPT305

Page 1: ...PPT305 UserManual Portable Printer http www 3nStar com...

Page 2: ...with different types of label paper 10 IV Display Screen and Button Functions 11 4 1 Button names and display screen 11 4 2 Power on function 11 4 3 Switching between barcode bill mode 15 V LCD Operat...

Page 3: ...commitment on the part No part of this manual may be reproduced or transmitted in any form by any means for any purpose other than the purchaser s personal use without the expressed written permissio...

Page 4: ...functions affordable price and the best printing quality this printer will be your best choice for portable barcode printers at the same level Please refer to the information provided by your volume l...

Page 5: ...or plastic case Adjustable gap sensor penetration type Adjustable black mark sensor reflection type Printhead open sensor USB 2 0 communication interface 8 MB SDRAM memory 8 MB FLASH memory Date time...

Page 6: ...AC 110 240V Output DC 9V 2A 18W DC 5V 2A 10W Specific in kind Environmental conditions Operation environment Temperature 5 40 C 41 104 F humidity non condensing 25 85 Storage environment Temperature...

Page 7: ...hickness of paper label body paper Maximum 0 25 mm 10 mil Minimum 0 06 mm 2 36 mil Axis size of paper roll 12 7 mm 25 4 mm 0 5 1 Length of label 10 1778 mm 0 39 70 Remark If you are using a label in t...

Page 8: ...age Please keep the packaging materials for returning the printer Once you have received your barcode printer place it on a clean steady table and carefully remove the packaging materials Check if the...

Page 9: ...ponents Appearance 6 1 2 3 5 4 7 77 7 8 9 10 1 Paper exit 2 Power on off button 3 Clamshell 4 Display screen 5 Clamshell switch 6 Transparent clamshell lens 7 Medium frame 8 Paper feeding button 9 Bas...

Page 10: ...7 Interior 1 Printing rubber roller 2 Print head 3 Battery 1 2 3...

Page 11: ...erface Note The transmission interface of the printer as shown in the picture will vary depending on the type of the printer purchased by you Please refer to the catalog and specification of the produ...

Page 12: ...ter via mobile phone Bluetooth WIFI Note Please turn off the power switch of the printer and insert the power cable into the power socket of the printer The transmission interface of the printer as sh...

Page 13: ...osition 2 Installation of battery Remove the battery protective film before use otherwise the battery will not provide the power or the printer will not be turned on Note This series of paper sensors...

Page 14: ...isplay screen The state of printer capacity of battery and other messages can be displayed on the display screen 4 2 Power on function This printer has the following power on functions which can be us...

Page 15: ...set values of the printer will be printed and the printer will enter the debugging mode Self test When the sensor calibration is completed the printer prints out the self test value Before connecting...

Page 16: ...self test is printed the printer system enters the debugging mode In the debugging mode all the volume labels will be printed in machine code The ASCII strings on the left are the data received by the...

Page 17: ...debugging mode data 2 Turn off and on the power to leave the debugging mode and return to the normal printing mode or press the FEED button to return to the standby state ASCII string Hexadecimal val...

Page 18: ...ge allows the user to load an auto execute file AUTO BAS into the flash memory When the printer is turned on it will be automatically executed according to the file loaded by the user When you want to...

Page 19: ...shall be used as the OK button and backspace button respectively after entering the menu List of Main Menu Functions Main menu Setting Printing setting Sensor setting Date time Exit File management L...

Page 20: ...tting Date time Date State Printing speed Time Sensor calibration Printing density Exit Printing direction Printing mode Offset X printing line adjustment Y printing line adjustment X axis reference p...

Page 21: ...Y printing line adjustment 000 999 X axis reference point 000 999 Y axis reference point FRE DAN SPA ITA GER BRI USA Character set 863 860 852 850 437 SWI SWE 737 866 855 862 857 861 865 1253 1252 125...

Page 22: ...Use this option to set the printing density of the printer The adjustment ranges from 0 to 15 The gap of increase and decrease is 1 each time Press FEED to select the value Press MENU to confirm the s...

Page 23: ...n can be used to adjust the stop position after the label paper is printed When the stripping or cutter function is used it can be used to adjust the stop position of the label when printing the next...

Page 24: ...s on the label paper relative to the origin point Press MENU to move the cursor to the right side Press FEED to set or the value from 0 to 9 Press POWER to cancel the setting and return to the previou...

Page 25: ...or state This option can be used to check the state of printer s sensor When entering this option the following message can be viewed 5 1 2 2 Sensor calibration This option can be used to set the dete...

Page 26: ...ll appear and the printer will feed 2 3 sheets of label paper for calibration of the sensor When the calibration is completed it will return to the previous menu B Black mark mode Automatic calibratio...

Page 27: ...ge will be viewed and the printer will automatically calibrate the sensor for the paper When the calibration is completed it will return to the previous menu 5 2 File management With this option it is...

Page 28: ...the files stored in the memory Display of files Delete file Press SCROLL DOWN to delete the file Execute file Press MENU to execute the file 5 2 2 Memory space This option can be used to check the re...

Page 29: ...er will enter the debugging mode Note The Printing self test page and Debugging mode are consistent with the functions in the versions without LCD 5 4 Language Use this option to set the language to b...

Page 30: ...nter information This option can be used to initialize the printer or check the serial number and the mileage printed Press FEED to select the mode to be set Press MENU to complete the setting Press P...

Page 31: ...creation and download of dot matrix fonts transmission of commands or files and so on By using it you can complete the printer setup check the printer status and troubleshoot the printer usage problem...

Page 32: ...need to be made to the settings 2 Click on a function you intend to set in the Printer Settings 3 The printer functions in the Printer Settings management page are described as below Description Sens...

Page 33: ...h the gap sensor or black mark sensor Gap sensor Black mark sensor 2 Turn on the printer 3 Start the Diagnostic Tool and set the transmission interface the default is USB The default communication int...

Page 34: ...AC socket and the power supply plug are properly connected to the printer Turn on the power switch The Diagnostic Tool displays Printer On The print head holder is not closed Close the print head hold...

Page 35: ...does not match The print head pressure setting is inappropriate Reinstall the consumables Clean the print head Clean the rubber roller Adjust the printing density and printing speed of the printer Pri...

Page 36: ...BarTender software is used set the vertical offset in the printer driver Print missing on both left and right sides The label size setting is incorrect Set the correct label size The RTC time is not...

Page 37: ...in medical alcohol When installing a new roll of label paper Paper tearing off piece Wipe it with a cotton cloth dipped in medical alcohol When needed Sensor Remove dust from the sensor with an air br...

Page 38: ...35 Update history Date Content Editor July 8 2019 Issue Gzs...

Reviews: