4
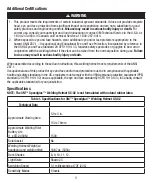
Table 1 Continued. Specifications for 3M
™
Speedglas
™
Welding Helmet G5-02
Number of Sensors
4
Delay (Recovery)
Adjustable 50 – 1000 milliseconds (approx.)
Welding Helmet & Welding Filter
Operating Temp Range
23°F to 131°F (-5°C to 55°C) RH ≤ 90%
Standards Compliance
ANSI Z87.1
Auto-Darkening Filter Warranty
3 Years
Welding Helmet Warranty
90 Days
Head sizes
6 3/8 to 8 (50-64 cm)
Welding Helmet
Polyphthalamide (PPA),
Auto-Darkening Filter
Polyamide (PA), Thermoplastic Elastomer (TPE), Polycarbonate (PC)
Welding Helmet Headband
Polyamide (PA), Polypropylene (PP), Thermoplastic Elastomer (TPE)
Visor & Protection Plates
Polycarbonate (PC)
Storage Temperature Range*
-22°F to 122°F (-30°C to 55°C) RH ≤ 90% *
*-4°F to 131°F (-20°C to 55°C) suggested storage temperature range if product will be stored for an extended
period of time before first use without batteries. Lithium batteries are suggested to be stored for long term at
50°F to 77°F (10°C to 25°C) RH ≤ 60%.
OPERATING INSTRUCTIONS
Unpacking
Inspect the package contents for shipping damage and ensure all components are present. The product should
be inspected before each use following the procedures in the
Inspection & Maintenance
section of these
User
Instructions
. Any damaged or defective parts must be replaced before use.
Assembly
3M
™
Speedglas
™
Welding Helmet G5-02
Prior to use, ensure any protective coverings or films that may have been placed over the clear protection plates
or viewing surfaces of the auto-darkening filter viewing areas to protect it during manufacturing or shipping are
removed.
Donning & Fitting
1. With the helmet in the up position, place the welding helmet on your head.
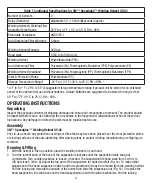
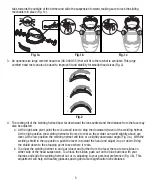
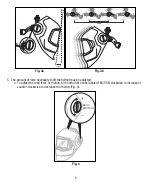
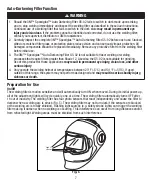
2. Turn the ratchet knob at the back of the suspension clockwise until the suspension feels snug but
comfortable. Turn counterclockwise to loosen, if needed. The suspension fits head sizes from 50-64 cm
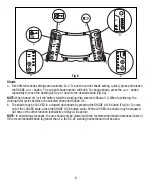
(US hat sizes 6 3/8 to 8). Adjust the top part of the suspension for added comfort (Fig. 1a). To make initial
adjustment of the head suspension easier (and for replacement) it may be removed from the welding helmet.
Pull the locking tab towards the outside of the helmet and slide the suspension out (Fig. 1b). To replace the
head suspension, line the tracks on the head suspension up with the slide mechanism. Pull the locking


