background image

11

It takes around 60-90 seconds for your 

Pen to heat up. If, after 

that time, the 

Pen still does not heat up and the Light remains 

RED, turn the Pen ON and OFF and try again. If that still does not 
work, please contact us at 

[email protected] and we will 

assist further.

8. My Pen won’t heat up! 

    (light stays red).

SECTION 4: TIPS AND BEST 

PRACTICES

• For optimal Doodling, we suggest using the correct temperature 
settings for your 

Plastic

• DO double check which type of Plastic you are using before you 
turn on the 

3Doodler  and insert a Plastic strand. If your 

Plastic strands get mixed up, here is a handy table for sorting and 
identifying what you’re working with. 


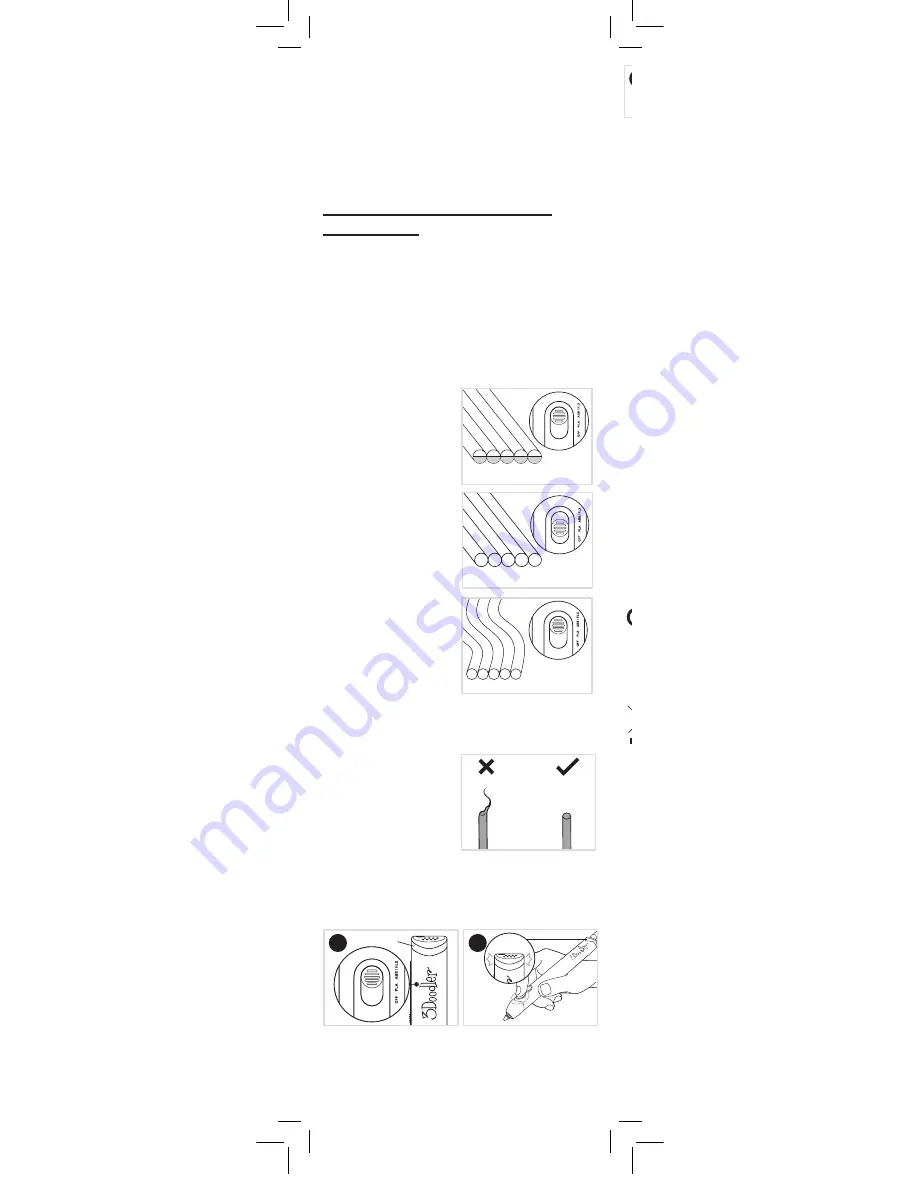
Pay attention to Plastic types 

and settings

ABS (MATTE):

Temp: ABS / FLX Temp 
Light: BLUE
Feature: Great for drawing in the air.
How to tell: Plastic has white 
semi-circle ends.


PLA (GLOSSY / CLEAR / 


METALLIC / SPARKLE ): 

Temp: PLA Temp
Light: GREEN
Feature: Gossy and making it perfect 
for artistic creations.
How to tell: Very rigid, no white 
semi-circle ends.

FLEXY:

Temp: ABS / FLX Temp 
Light: BLUE
Feature: Make flexible, 
bendable Doodles.
How to tell: Plastic is very flexible.

Unsnipped Ends

VS

Snipped Ends

• DO give your 3Doodler  a rest after every 2 hours of 
continuous Doodling. 30 minutes of down time should be plenty.

Once the

 Plastic stops reversing, it is safe to remove it from the 

Pen by gently pulling on the back of the strand.

• If you ever remove your 
Nozzle, DO NOT remove it 
when your 

3Doodler  

is cold. 

Light should be BLUE 

or 

GREEN.

  
• If you ever need to tighten 
your 

Nozzle, DO NOT force 

the 

Nozzle or overtighten it, 

as you could break the 

Nozzle 

and permanently damage your 
3Doodler .

Treat your Nozzle right

Do not forget to snip your 

Plastic ends

Take a break

• After removing a Plastic strand 
from the 

3Doodler , cut 

and remove any partially melted 
material at the end of your 
strand before re-feeding it into 
the

 3Doodler . This will 

reduce blockages or clogging 
issues. 

This device complies with Part 15 of the FCC Rules. Operation is subject 

to the following two conditions: (1) this device may not cause harmful 

interference, and (2) this device must accept any interference received, 

including interference that may cause undesired operation.

Warning: Changes or modifications to this unit not expressly approved by 

the party responsible for compliance could void the user’s authority to 

operate the equipment. 

NOTE: This equipment has been tested and found to comply with the lim-

its for a Class B digital device, pursuant to Part 15 of the FCC Rules. These 

limits are designed to provide reasonable protection against harmful 

interference in a residential installation. This equipment generates, uses 

and can radiate radio frequency energy and, if not installed and used 

in accordance with the instructions, may cause harmful interference to 

radio communications. However, there is no guarantee that interference 

will not occur in a particular installation. If this equipment does cause 

harmful interference to radio or television reception, which can be 

determined by turning the equipment off and on, the user is encouraged 

to try to correct the interference by one or more of the following 

measures: 
- Reorient or relocate the receiving antenna. 
- Increase the separation between the equipment and receiver. 
- Connect the equipment into an outlet on a circuit different from that to

  which the receiver is connected. 
- Consult the dealer or an experienced radio/ TV technician for help. 

CAN ICES-3 (B)/NMB-3(B)

SPECIFICATIONS

Output Power: 6W

Output Voltage: 5V

Input Voltage: 5V

CARE & MAINTENANCE

For care and maintenance information, and more advice on how to use your 

3Doodler, please refer to our website: 

the3Doodler.com

To troubleshoot, please visit: 

the3Doodler.com/troubleshooting

This marking indicates that this product should not be disposed of with 

other household wastes. To prevent possible harm to the environment or 

human health from uncontrolled waste disposal, recycle it responsibly to 

promote the sustainable reuse of material resources.

LIMITED WARRANTY

For more details on your limited warranty, pleae visit:

the3Doodler.com/warranty

For 3DoodlerÕs Terms and Conditions and other notices please refer to our 

website: 

the3Doodler.com/terms-and-conditions

This device complies with part 15 of the FCC Rules. Operation is subject to the 

following two conditions: (1) This device may not cause harmful interference, and 

(2) this device must accept any interference received, including interference that 

may cause undesired operation.

SPECIFICATION OF POWER ADAPTER

Input: 100-240V AC, 0.5A MAX, 50-60Hz

Output: +5V DC, 1.2A

CARE & MAINTENANCE

For care and maintenance information, and more advice on how to use your 

3Doodler , please refer to our website: 

the3Doodler.com

To troubleshoot, please visit: 

the3Doodler.com/troubleshooting

LIMITED WARRANTY

For more details on your limited warranty, please visit:

the3Doodler.com/warranty

For 3Doodler’s Terms and Conditions and other notices please refer to our 

website: the3Doodler.com/terms-and-conditions

Specifications are subject to change and improvement without notice.

• DO NOT pull Plastic from the back of the 3Doodler  

other than as directed.

Double click either 

Speed 

Button and the Light will start 
flashing to signal the 

Plastic is 

reversing.

With the 

Pen set to ABS / FLX

wait for the 

BLUE Light to 

come on.

Reverse and remove Plastic 

correctly

BLUE Light

x2

Flashing 

BLUE

1

2

3Doodler_Bob_User_Manual_MAIN_Inner_20180511.indd   11

11/5/2018   11:37 AM

Summary of Contents for Create+

Page 1: ...lich sehr angestrengt um sie so nützlich und lesbar wie möglich zu machen Conservare queste istruzioni La realizzazione di questo manuale ha richiesto un intenso lavoro al fine di offrire la massima utilità e comprensione Gooi deze instructies niet weg aub We hebben hard gewerkt om deze zo gebruiksvriendelijk en leesbaar mogelijk te maken EN FR ES DE IT NL P 1 P 13 P 26 P 39 P 52 P 66 Revised May ...

Page 2: ...he 3Doodler Create should only be used with ABS or PLA FLEXY plastic filament approved by us Misuse of your 3Doodler Create setting your pen to the wrong heating temperature and or use of non approved plastics or other materials may result in damage to your pen or injury to you and will void your warranty Injuries to the user may include but are not limited to harm sustained from inhaling substanc...

Page 3: ...ing you to draw on surfaces and in the air This User Manual will show you how We created this User Manual as a step by step guide to get you comfortable with your 3Doodler Create and its features Once you are familiar with these steps you will be able to Doodle with confidence Skipping steps may result in a less enjoyable time with your 3Doodler Create LIGHT LEGEND Solid RED Heating up Please wait...

Page 4: ...ill hear the Drive Gear start After 10 15 seconds Plastic will begin extruding from the Nozzle Extruded Plastic will harden after a few seconds Press the FAST button once to stop extruding x1 1 x1 3 4 3 2 2 5 Step 3 Doodle your name Use box below to create your first Doodle your name Write your name in the box provided using marker pen pencil or any other writing utensil of your choice We suggest ...

Page 5: ...eate your first Doodle your name Write your name in the box provided using marker pen pencil or any other writing utensil of your choice We suggest cursive or block with the letters connected Doodle your name in a continuous unbroken Doodle by dragging the Plastic along the paper as if you were writing with a pencil with all letters connected Keep your movement slow and steady Bend the paper outwa...

Page 6: ...g it is safe to remove it from the Pen by gently pulling on the back of the strand With Pen set to ABS FLX wait for BLUE Light to come on Plastic that is shorter than 5 3 inches cannot be reversed You should feed it all the way through your 3Doodler Create and use it up Alternatively you can push Plastic out the back see Section 3 Step 3B NOTE Before we continue it s time you learned about the dif...

Page 7: ... reversing x2 Flashing BLUE 5 3 inches Plastic that is shorter than 5 3 inches cannot be reversed You should feed it all the way through your 3Doodler Create and use it up Alternatively you can push Plastic out the back see Section 3 Step 3B NOTE Before we continue it s time you learned about the different types of Plastic you can use with the 3Doodler Create and which settings to use for each typ...

Page 8: ...ring down and giving your 3Doodler Create a 30 minutes break after every 2 hours of continuous use After 5 minutes of inactivity the 3Doodler Create s heating system will automatically power down You will need to press one of the Speed Buttons OR toggle the Control Switch OFF and then ON again to continue use NOTE SECTION 3 TROUBLESHOOTING Tools Provided in Box Before showing you how to troublesho...

Page 9: ...ox Before showing you how to troubleshoot issues with your 3Doodler Create we want to introduce you to three handy tools provided in your box Mini Spanner Used for tightening and removing the Nozzle Do not remove Nozzle when Pen is cold Do not overtighten the Nozzle as you may break it Unblocking Tool Used for pushing short pieces of Plastic down into the Drive Gear to help with extrusion from Pen...

Page 10: ...firmly down into the paper allowing Plastic to stick to the surface Drag the Plastic along the paper or surface in a continuous unbroken line as if you were writing with a pencil Keep your movement slow and steady The Plastic should hold to the paper and not curl up around the Nozzle Blue or Green Light Unblocking Tool Nozzle may loosen with continued usage or in transit While Pen is hot BLUE or G...

Page 11: ...anner provided Stop tightening once you first feel resistance so as to avoid over tightening the Nozzle and breaking it A Click either the FAST or SLOW button once B If Step A does not solve this problem please unplug your 3Doodler Create and then plug it in and try again 5 My Plastic won t stop extruding 4 My Plastic is leaking from around the Nozzle While the Pen is on and hot BLUE or GREEN Ligh...

Page 12: ...l installation This equipment generates uses and can radiate radio frequency energy and if not installed and used in accordance with the instructions may cause harmful interference to radio communications However there is no guarantee that interference will not occur in a particular installation If this equipment does cause harmful interference to radio or television reception which can be determi...

Page 13: ...termined by turning the equipment off and on the user is encouraged to try to correct the interference by one or more of the following measures Reorient or relocate the receiving antenna Increase the separation between the equipment and receiver Connect the equipment into an outlet on a circuit different from that to which the receiver is connected Consult the dealer or an experienced radio TV tec...

Page 14: ...obbleWorks S il vous plaît voir la liste des brevets de Wobbleworks à Este producto está protegido por propiedad intelectual y pertenece a WoobleWorks Consulte la lista de patentes de WoobleWorks en Dieses Produkt ist durch WobbleWorks geistiges Eigentum geschützt Sie finden die Liste von Wobbleworks Patenten unter Dit product valt onder de bescherming van het intellectueel eigendomsrecht van Wobb...

Page 15: ...allo EN FR ES DE IT NL Revised May 11 2018 Manufactured by Fabriqué par Fabricado por Hergestellt von Fabbricato da Gemaakt door WobbleWorks HK Limited Distributed by Distribué par Distribuido por Vertrieben von Distribuito da Gedistribueerd door WobbleWorks Inc WobbleWorks HK Limited 89 5th Avenue Suite 802 NY NY 10003 WobbleWorks Inc 2018 3Doodler_Bob_User_Manual_MAIN_Cover_ Back_20180511 indd 1...

Reviews: