background image

1.  

2.  

3.  
4.  

5.  

6.  

1.  

2.  

3.  
4.  

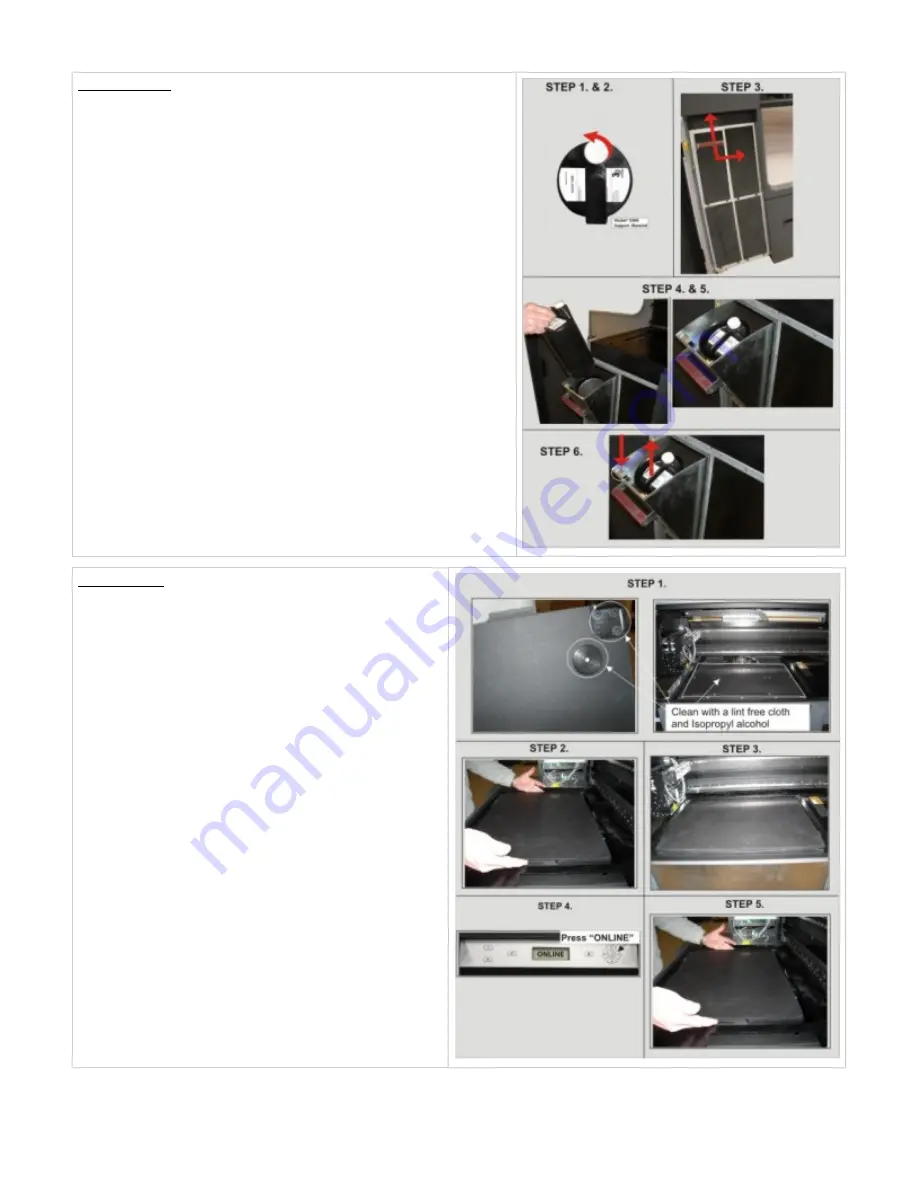
Material Bottles: The printer has up to four material delivery modules for build
materials and up to four material delivery modules for support materials. The
support delivery modules are located on the left side and the build is located on
the right side of the printer. Each delivery module holds one (1) bottle of material.
NOTE: Before handling the build material bottle, read the Material Safety
Data Sheet (MSDS).

Install Material Bottles: Unpack bottles and the MSDS/SDS Sheet from
cartons.
Open left and/or right material delivery doors. Pull material delivery
module (MDM) handle down and out to open.
Install bottle into the MDM; press bottle down until a click sounds.
To ensure that bottle is locked in place, gently pull on bottle. If bottle is
loose, press bottle down to ensure it is secured in MDM.
Loosen bottle cap 1/2 to 3/4 turn counterclockwise to allow the bottle to
vent.
Before removing bottle from the MDM, re-tighten bottle cap to prevent
spillage. To remove bottle, open material delivery module and press
release latch down and lift bottle out of module.

Build Platform:

Ensure that the corner guides on the backside of platform
are clean and free of debris. If debris exists when installing,
the platform guides will not lock into the platform elevator. 
NOTE: Clean platform elevator and platform using a lint
free cloth and Isopropyl alcohol. When cleaning
platform, clean the front and back sides.
Lift build chamber door; place platform with corner guides
and pads facing down onto the platform elevator. Seat onto
elevator. The corner guides will affix the platform to the
elevator and if properly installed, platform will not move. It
should sit squarely on the elevator and be firmly located by
the corner guides. Use caution not to drop the platform or
hit the printhead.
Close build chamber door and press ONLINE.
To remove platform, lift from the sides; pull up and out from
the platform elevator.

The ProJet™ Production Printing System can now be used to produce prints.

Summary of Contents for ProJet 5000

Page 1: ... 5 3 05 3 Unit Portability 6 1 5 4 05 4 Electrical 7 1 5 5 05 5 Client Workstation Requirements 7 1 5 6 05 6 Network Interface 8 1 5 7 05 7 Material Storage 8 1 5 8 05 8 Material Bottle Disposal 9 1 5 9 05 9 Weights and Measures 9 1 6 06 0 Operating Enviroment 9 1 6 1 06 1 Air Conditioning 9 1 6 2 06 2 Humidity 10 1 6 3 06 3 Lighting 10 1 6 4 06 4 Vibration and Shock 10 1 7 07 0 Preparation for Sh...

Page 2: ...ng 06 4 Vibration and Shock 07 0 Preparation for Shipment Arrival 08 0 MDM Bottle Build Platform Installations 09 0 Limitation of Liability 10 0 Thank You 11 0 Contacting 3D Systems 12 0 Printer Advance Preparation Checklist 01 0 About this Manual This document includes all of the overall facility requirements that will be needed to have a successful installation when our 3D Systems Customer Suppo...

Page 3: ...th bypass engaged is accessible in the vicinity of this sign or behind the access panel Avoid contact Hot surfaces can cause severe A hot surface burns Access panels are for service only and should be opened only by certified service personnel or trained maintenance personnel Indicates that skin or eye irritation could result while exposed to a chemical composition Harmful Irritant Warning When ac...

Page 4: ...ow is a suggested floor plan for a ProJet Production Printing System installation Each printer requires use of a dedicated circuit Multiple printers CAN NOT be located on a single circuit An additional 110 or 220 VAC outlet is recommended for service needs A phone near the printer is recommended to facilitate machine support Each location of the machine requires a standard wall power outlet or pow...

Page 5: ......

Page 6: ... for use on rough or uneven surfaces including deep carpet To avoid the risk of tipping the printer when moving between locations only push from the side of the printer The printer is intended to be lifted from its crate base using a fork lift device and place on casters to roll to its final destination Leveled fork lift pads have been placed beneath the machine to accommodate this need The front ...

Page 7: ...specially in areas where circuits may be affected by an outside source i e lightning required strikes power interruption etc They should have a Some examples of suppliers are Toshiba or APC Power loss during a build will fail the build and minimum rating of 3KVA can cause damage to your printer Uninterruptible power is critical to the successful operation of the machinery 05 5 Client Workstation R...

Page 8: ...k Not all networks have the TCP IP installed Make sure to have a network administrator check that TCP IP are both installed and are running as required PRIOR TO THE ARRIVAL of the printer 05 7 Material Storage VisiJet part and support materials should uie stored in a conveniently located storage cabinet in proximity to the printer itself A cabinet is recommended to protect against long term exposu...

Page 9: ...acing the printer in any environment with airborne contaminant including cigarette smoke fumes and mechanical particulates that can adversely affect the long term functioning of this equipment Each ProJet Production Printing System undergoes an operational test at the factory and is shipped with a limited residual amount of build and support material already in its internal reservoir When ordering...

Page 10: ... qualified 3D Systems Field Service Engineer or an authorized reseller The following topics should be arranged PRIOR TO THE ARRIVAL OF THE SYSTEM to simplify installation of the ProJet Production Printing System Refer to later sections of this guide for details of this procedure Make sure the following resources are available ____ A forklift or similar heavy duty equipment required for unloading t...

Page 11: ...t Before removing bottle from the MDM re tighten bottle cap to prevent spillage To remove bottle open material delivery module and press release latch down and lift bottle out of module Build Platform Ensure that the corner guides on the backside of platform are clean and free of debris If debris exists when installing the platform guides will not lock into the platform elevator NOTE Clean platfor...

Page 12: ...ing System or other products or services 3D Systems strives for higher quality better products and comprehensive services to benefit our customers 11 0 Contacting 3D Systems For information or assistance contact 3D Systems corporate headquarters at 3D Systems Corporation 333 Three D Systems Circle Rock Hill SC 29730 Toll Free Number 800 889 2964 Phone Number 803 326 4080 Web www 3dsystems com Emai...

Page 13: ...________________ Email _____________________________________________________________________ Please place a check in each box once that item is complete Check Box Final installation site selected The intended physical location for each ProJet Production Printing System s should be selected in advance and checked for adherence to the guidelines set out in this guide If required by the shipper a met...

Page 14: ...nter is installed we agree not to alter any requirements without consulting with 3D Systems Customer Service Representative If alteration are made without consulting 3D Systems it may void the system s warranty ___________________________________ _______________ Customer Signature Date Please return a copy of the check list by FAXING it to the appropriate fax number provided in Contacts ...

Reviews: