background image

4


CONTROL PANEL AND FUNCTION  


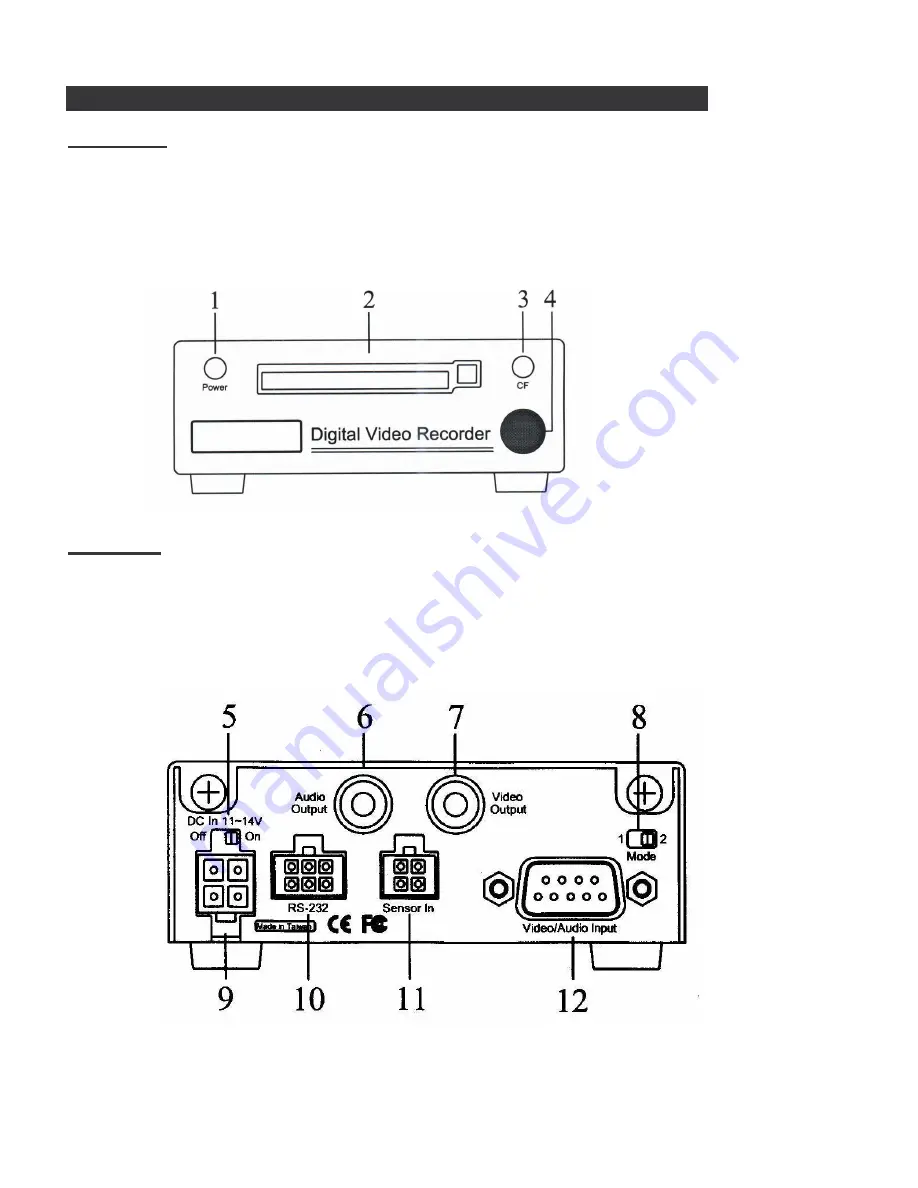
Front Panel


1.   Power indicator 

2.   CF card slot 

3.   CF card busy 

4.   IR remote control receiver 


Rear Panel


5.  Power On/Off switch 

6.  Audio output terminal 

7.  Video output socket 

8.  Mode Switch 

9.  DC Input socket 

10. RS-232 signal to DVR socket 

11. Sensor input socket 

12. Video/Audio input socket 


Summary of Contents for 104CF-V3

Page 1: ...Mobile Digital Video System User Manual 104CF V3 Please read this user manual completely before operating this DVR system and keep it in a safe place for future reference ...

Page 2: ...t in electrical shock Handle all components with care Inspect regularly for damage to components and cabling 2 You shall be responsible to ensure that the installation of this product does not void or affect the vehicle manufacturer s warranty 10 8 Video or its branches are not liable in full or in part for improper installation resulting in loss or damage to your property or for voiding all or pa...

Page 3: ...alled so you may want to put it under a seat under the dash in the trunk or since it is so light just Velcro it to the firewall or anywhere else that is convenient for you It is recommended that it be in the front of the vehicle for the best reception Now just run the power and the audio cables Run power to your power distribution point and audio to the DVR audio cable labeled 1 Now mount the mirr...

Page 4: ...ng record in case the sensor wires are used 5 Audio Video Input Harness Black leads are camers 1 4 Red leads are audio 1 2 6 Detecting wire Sensor control connection If you select Mode 2 you can also connect the detecting wire for switching record Connect the detecting wire to this socket Please refer to the following drawing as for the connecting 7 Power connection a Plug the power cord to Batter...

Page 5: ... use it It makes it easy to power the 4 components in our system with just one power and one ground from the vehicle It uses male spades for the input and female spades for the output Use at your own risk 10 8 Video is not responsible for it s use or mis use If you decide to use it be mindful of polarity with each connection ...

Page 6: ...stallation 2 of these leads will be used Connect 1 lead to the output side of you control box for your pursuit lights This way the recorder will start anytime you are running emergency traffic The second lead will be connected to a manual switch that you will activate when you want to start the recorder without lights activated You can use the small switch provided or any switch of your choosing t...

Page 7: ...ation 9 OSD Setting Operation 12 Title Setup Operation 12 Date Time Daylight Saving Time Setting 13 Video Setup 14 Motion Detect Setting 15 Event List Selection 16 Auto Sequence Setting 17 Record Setup Operation 17 System Setup Operation 20 Peripheral Setting Operation 23 Key Lock Function Setting Operation 23 Network Setting Operation 24 CF HDD Lock ON Function Setting 24 Play Back Record Data 25...

Page 8: ...quid cleaners or aerosol cleaners Use a damp cloth for cleaning 4 Do not use this product near water 5 Do not place this product on an unstable cart stand or table 6 Do not allow anything to rest on the power cords Do not place this product in a location where the cords can be stepped on or where someone can trip over them 7 Do not use this product near an area where there is a potential of gas le...

Page 9: ...ur 10 8 system will include the following 1 x DVR 1 x Remote Control 1 x User s Manual 1 x Mirror Monitor 1x Wireless Microphone System 1x Front View Camera 1x CF Memory Card in DVR 1x Power Dist Block 1x Camera Windshield Mount ...

Page 10: ...ator 2 CF card slot 3 CF card busy 4 IR remote control receiver Rear Panel 5 Power On Off switch 6 Audio output terminal 7 Video output socket 8 Mode Switch 9 DC Input socket 10 RS 232 signal to DVR socket 11 Sensor input socket 12 Video Audio input socket ...

Page 11: ...ey Camera 1 6 Down key Camera 3 7 Left key Camera 2 8 Right key Camera 4 9 Select button 10 Play button 11 Fast forward button 12 Fast back button 13 Pause button 14 Audio 1 button 15 Audio 2 button 16 Audio Mute button 17 Zoom in button 18 Zoom out button 19 PTZ auto button 20 Number keys ...

Page 12: ...inal 4 System Camera installation Connect one end of camera cable to Camera and the other end to Video Input 1 terminal at the back of DVR Please number the camera if using more than 1 camera 5 Power connection 5 a Connect the power supply unit to the DVR 5 b Plug the power supply to Battery e g car battery 5 c Plug the power supply the other wire for Key On and key Start wire connection Connect t...

Page 13: ...o avoid the DVR working on unstable voltage It can also delay switch off time from 10 minutes to 60 minutes selected by switch depending on the user requirement Switch on off voltage 10 5 10 8V Delay switch on time while starting the car 10 seconds Red Audio In Black Video In 1 2 3 4 1 2 Red Key On Power Black Ground ...

Page 14: ...rd is formatted Or enter the Main menu record setup and select HDD information to format the CF card 3 If the system time has not yet been set the DVR will display the time setting screen please press MENU ESC key to exit after setting the time 4 If NO HD signal shows on screen please turn off the power then check that a CF card is correctly inserted If yes please turn the power on again 5 If scre...

Page 15: ...up key or down key to select the item for setting 3 Press key to enter sub menu to select item for setting 4 Press Left key or Right key to select the value for your setting 5 Press key to exit to previous menu or Press key and hold for more than 2 seconds to exit OSD menu Key and Function for Operation 1 MENU operation key Key Operation Remarks MENU Enter OSD menu Up Key Go Up 1 Press key to ente...

Page 16: ...E STOP REC operation key Key Operation Remarks REC RECORD PTZ control key operation only with PTZ camera installed Key Operation Remarks PTZ PTZ IN ZOOM IN OUT ZOOM OUT Go Up Go Down Go Left Go Right 1 Press key to enter the function 2 Press function key to operate 3 Press direction to select the area 5 Display operation key Key Operation Remarks AUTO Auto sequence view ...

Page 17: ...re are 2 channels or 1 channel selected then setting under MENU will not function SELECT CHANNEL MODE CHANNEL 1CH key to select 4CH 2CH 1CH for setting key to exit On Screen Information ACH1 CH01 REC 4CH C R 99 2006 01 01 18 08 08 ACH1 Audio in channel 1 ACH2 Audio in channel 2 REC Recording LIV View mode Without recording BOT The DVR system is booting PB Playback mode 4CH 4 channels mode C Contin...

Page 18: ...E SETUP setting section C Press key to enter channel select mode TITLE SELECT CH CH01 CH02 CH03 CH04 D Use key to select channel going setting title E Press Key to enter selected channel for title setting TITLE SETUP CH01 CH01 CH01 F Use key to select alphabet A Z or digital 0 9 for title maximum 4 alphabet or digits can be setting for one channel title G Press key to exit for select other channel...

Page 19: ...ING TIME d Press key to enter DATE TIME setting mode SETUP DATE TIME YEAR 2006 MONTH 01 DAY 01 HOUR 18 MIN 08 SEC 08 MODE YY MM DD e Use key to select area for setting f Use key to select value for setting g Press key to exit for select other setting mode B Daylight Saving Time setting If you want setting daylight saving time then you can use key to go daylight saving section and use key to turn d...

Page 20: ...ct other setting mode or press key and keep more than 2 seconds to exit OSD setting operation 3 Video Setup A Press key to enter menu selection mode B Use key to select VIDEO SETUP setting section C Press key to enter VIDEO SETUP select mode VIDEO SELECT CH CH01 CH02 CH03 CH04 VIDEO SYSTEM NTSC or PAL D Use key to select channel going setting video E Press Key to enter selected channel for video s...

Page 21: ...n hue to the proper setting and then use the same setting for each camera F Use key to select the section G Use key to select value H Press key to exit to previous menu or press key and hold more than 2 second to exit completely 4 Motion Detect Setting Not Used for Patrol Car Installations A Press key to enter menu selection mode B Use key to select MOTION DETECT setting section C Press key to ent...

Page 22: ...5 08 21 15 44 58 0025 1 L 05 08 21 15 04 25 0026 2 A 05 08 21 15 14 17 0027 3 A 05 08 21 15 17 20 0028 4 A 05 08 21 15 17 22 0029 1 A 05 08 21 15 17 23 0030 2 A 05 08 21 15 17 25 Each page can display 10 events maximum 1000 events can be recorded The event log will be cleared simultaneously when format CF Card EVENT is recorded in the CF card It can be searched for playback when the CF card is rem...

Page 23: ...rn Off for not viewing F Press key to select view each channel time G Use key to select the time to view each channel 0 25 0 5 0 75 1 0 1 25 1 5 1 75 2 0 2 25 2 5 2 75 3 0 10 0 H Press key to exit for select other OSD setting to set or press key and keep more than 2 seconds to exit OSD setting operation 7 Record Setup Operation A Press key to enter menu selection mode B Use key to highlight RECORD...

Page 24: ...vel record quality and 6 kinds frame rate for record CONTINUOUS RECORD RESOLUTION CIF QUALITY STANDARD REC RATE 30_FPS Resolution 0 25CIF CIF 2CIF Quality Standard Super High Normal REC Rate Set up frame per second fps as below NTSC 30 15 8 4 2 1 0 25CIF or CIF or 15 12 8 4 2 1 2CIF File size Resolution Quality NTSC K High 21 Mid 15 720 x 480 N 720 x 576 P Low 10 High 7 Mid 6 352 x 244 N 352 x 288...

Page 25: ...the highest d HDD information for show CF Card information HDD INFORMATION CIRCULAR ON HDD FORMAT HDD CAPACITY USB SLAVE If you choose CIRCULAR ON the recorder will continue and overwrite previous recordings starting with oldest first when CF card capacity is full If you choose CIRCULAR OFF the recording session stops when all CF card capacity is full If you select HDD format the CF card will be f...

Page 26: ...N3 ALARM IN4 ALARM IN1 ALARM IN NORMAL CLOSE RE ACTION CH01 CH01 04 ALARM OUT OFF or ON Normal Close The signal loop is closed under normal conditions When the loop becomes open alarm will be triggered until the loop becomes closed again In other words if the loop keeps on open for a period of time alarm will keep on triggering in that time interval Normal Open The signal loop is open under normal...

Page 27: ...t to ON AUDIO SETUP AUDIO REC ON or OFF e Display information to display Channel Name Record Mode HDD Mode HDD Space Date and Time on the screen DISPLAY CHANNEL NAME ON or OFF REC MODE ON or OFF HDD MODE ON or OFF HDD SPACE ON or OFF DATE ON or OFF TIME ON or OFF f Dialer GPS Optional Not Used DIALER GPS DEVICE GPS BAUDRATE 9600 DIAL MODE TONE PHONE 1 _ _ _ _ _ _ _ _ _ _ _ _ _ _ _ _ _ _ _ _ PHONE ...

Page 28: ... i Update code from CF card For program Updates When you press Key the DVR will ask to key in password PASSWORD After you key in the correct password it will enter update code from CF Card UPDATE CODE EXIST VER 01 09RA RCLT02 01 00 NEW VER NOFILE RUN D Press Key to enter the selected section E Use key to select section for setting and use key to select value for setup F Press key to exit or press ...

Page 29: ... LOSS ON or OFF MOTION ON or OFF ALARM IN ON or OFF KEY MOVE ON or OFF BEEP TIME 01 Beep Time 01 10 D Use key to select section for setting and use key to select value for setup E Press key to exit for other setting or press key and keep more than 2 second to exit OSD setting operation 10 Key Lock Function Setting Operation A Press key to enter menu selection mode B Use key to select key lock func...

Page 30: ...00 000 DNS 000 000 000 000 Resolution 0 25CIF CIF 2CIF C Press key to select other section for setting or press key to exit OSD menu setting function 12 CF HDD LOCK ON Function Setting B Press key to enter menu selection mode MAIN TITLE SETUP DATE TIME VIDEO SETUP MOTION DETECTION EVENT LIST AUTO SEQUENCE RECORD SETUP SYSTEM SETUP PERIPHERAL SETUP KEY LOCK ON OFF NETWORK CF HDD LOCK ON B Use key t...

Page 31: ... Enter button to playback 4 2 Press Menu button into menu list and select Event list use up down right left enter buttons to select event which you want to play back then press Enter button to playback In the play mode you can use play bar to control play function The play bar buttons introduction as below FF fast forward Press the FF once the playback speed will change to x2 speed to play press a...

Page 32: ...5 TX terminal and RX insert into the RS485 RX terminal and tight it 3 PTZ control setting 3 1 Go to DVR menu and select system into system list and select subject of PTZ Keyboard then use left and right keys to select protocol to match your PTZ camera setting 3 2 Use up and down keys to select subject of baud rate then use left and down keys to select baud rate to match your PTZ camera setting 3 3...

Page 33: ...quit PTZ control mode PC PLAYER SOFTWARE OPERATION Install the 10 8 Player software by installing the CD supplied with your system Is the CD is not available you may download it from the 10 8 video web site by entering the following address in your browser http www 10 8video com dvr dvr exe This will download the player to your computer When asked select run and the software will install Double cl...

Page 34: ...ing 1 Click on Open New File Button 2 Click on Browse and select the file location If the files are already on the hard drive just select the location or if on a CF card select the drive letter associated with your card reader ...

Page 35: ... extension and then selecting Open Select the file on the next screen and select Open to play Or select Search All Event to bring up a screen with all events that were recorded sorted by date and time Select the event you wish to play and select Open ...

Page 36: ...the video The 2 arrows on either side of the pause button will play the video in slow motion Repeated use of the pause button will advance frame by frame Pressing the Save to JPEG button will save the current frame in the display to a common jpg file on your hard drive The Create Media File button will allow you to save to avi and wmv files Note however that the avi files are quite large and the w...

Page 37: ...h to begin recording and then select the Set time button next to the Start time window For finer adjustment use the left and right arrow buttons Move the slider to the time that you wish to set for the end of the video and select Set time button on the End Time line Once the start and end times are correct select the Copy file to PC button to save the file ...

Reviews: