ZyXEL Communications ISDN 202H Plus Скачать руководство пользователя страница 13

Prestige 202H Plus Quick Start Guide 

13


2. 

Click the 

Next 

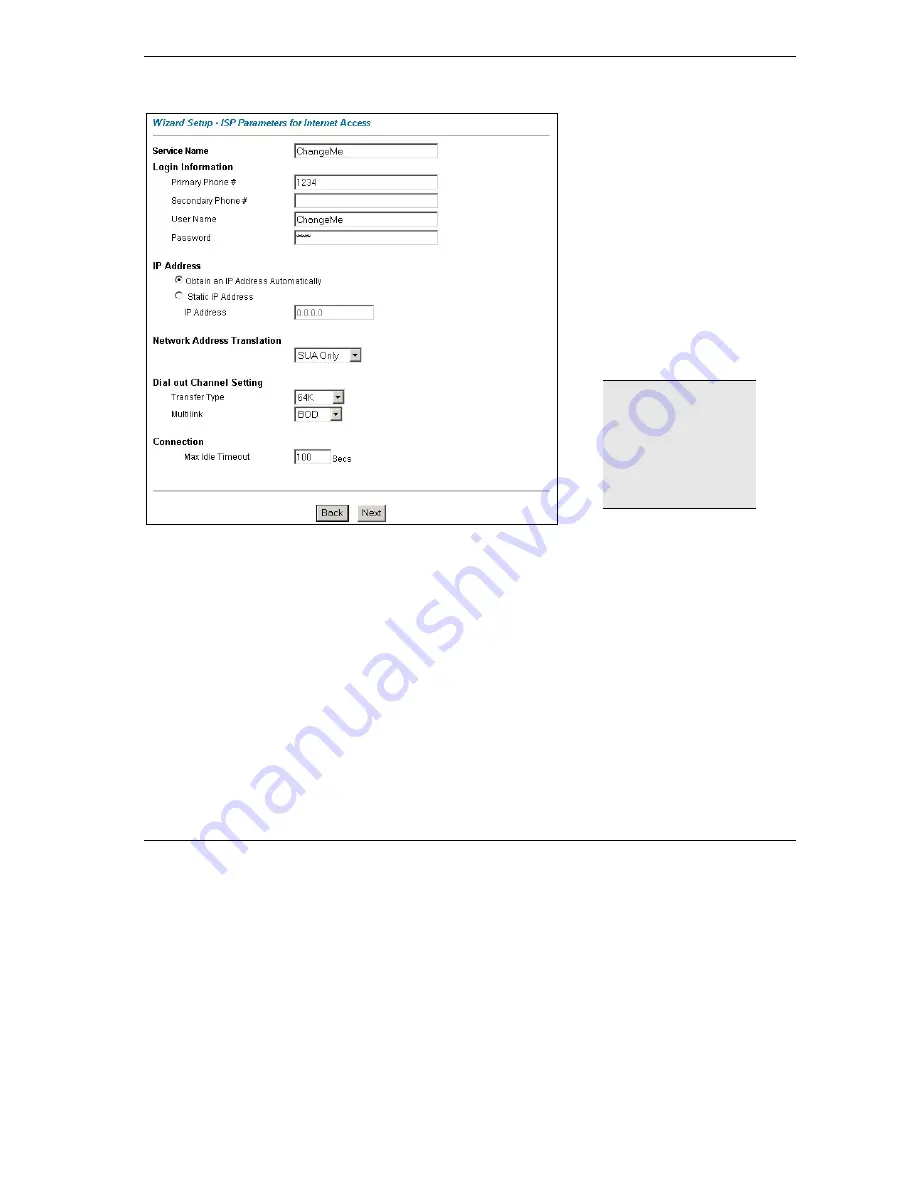
button to continue. The second wizard screen helps you set up your Prestige for Internet access. 

In the 

Service Name 

field, enter your 

ISP’s name. Enter the 

Primary

 and the 

Secondary Phone

 numbers to connect 

to the ISP. Next, enter the user name 
and password 

exactly

 as your ISP 

assigned them. 
Select 

Obtain an IP Address 

Automatically

 if you have a dynamic IP 

address; otherwise select 

Static IP 

Address

 and type your ISP assigned IP 

address in the text box below. 

Choose the type of Network Address 
Translation (NAT) you need. Select 

Full 

Feature

 if you have multiple public 

WAN IP addresses for your Prestige. 
Select

 SUA Only

 if you have just one 

public WAN IP address for your 
Prestige. Select 

None 

to disable NAT. 

When you select 

Full 

Feature

 you must 

configure at least one 
address mapping set. 

For more information 

about NAT and the 

choices listed refer to 

your 

User's Guide

 
In the 

Transfer Type

 drop-down list box, choose the type of connection between the router and this remote node. Select 

64K

, or 

Leased

.  If you selected 

64K

, select a PPP 

Multilink

 protocol.  

 
In the 

Max Idle Timeout

 field, enter the amount of time (in seconds) after which you want the connection to timeout if 

the line remains consistently idle. 
 

3. 

Click 

Next

 to finish configuring the Prestige or 

Back

 to return to the previous screen. Verify the settings in the 

screen shown next.  

Содержание ISDN 202H Plus

Страница 1: ...Prestige 202H Plus ISDN Internet Access Router Quick Start Guide Version 3 40 12 2004...

Страница 2: ...Computer s IP Address 9 4 Configuring Your Prestige 10 4 1 Accessing Your Prestige Via Web Configurator 10 4 2 Common Screen Command Buttons 12 4 3 Using the Wizard to Configure for Internet Access 1...

Страница 3: ...You should have an Internet account already set up and have been given most of the following information INTERNET ACCOUNT INFORMATION Your device s WAN IP Address if given __________________ DNS Serve...

Страница 4: ...nsole cable to the console port of the router and the female end to a serial port COM1 COM2 or other COM port of your computer ISDN Connect the router to the ISDN network using the included ISDN cable...

Страница 5: ...1 B2 line is not sending or receiving data On The telephone s connected to this port is are in use Blinking The telephone s connected to this port is are ringing Phone 1 2 Green Off The telephone s co...

Страница 6: ...click Add b Select Adapter and then click Add c Select the manufacturer and model of your network adapter and then click OK If you need TCP IP a In the Network window click Add b Select Protocol and t...

Страница 7: ...If your IP address is dynamic select Obtain an IP address automatically If you have a static IP address select Specify an IP address and type your information into the IP Address and Subnet Mask fiel...

Страница 8: ...Verifying Your Computer s IP Address 1 Click Start and then Run 2 In the Run window type winipcfg and then click OK to open the IP Configuration window 3 Select your network adapter You should see yo...

Страница 9: ...DNS servers click Advanced the DNS tab and then configure them using Add 6 Click Advanced Remove any previously installed gateways in the IP Settings tab and click OK to go back to the Internet Proto...

Страница 10: ...minal Access the SMT via o Console port using terminal emulation software o LAN or WAN using Telnet 4 1 Accessing Your Prestige Via Web Configurator 1 Launch your web browser Enter 192 168 1 1 as the...

Страница 11: ...n panel to configure advanced Prestige features such as Password setup WAN and LAN settings NAT Dynamic DNS Firewall and VPN Click MAINTENANCE in the navigation panel to see Prestige performance stati...

Страница 12: ...A B Adapter 1 2 PHONE1 2 The Incoming Phone Number Matching setting governs how incoming calls are routed If you select Multiple Subscriber Number MSN or Called Party Subaddress a call either ISDN dat...

Страница 13: ...f you have multiple public WAN IP addresses for your Prestige Select SUA Only if you have just one public WAN IP address for your Prestige Select None to disable NAT When you select Full Feature you m...

Страница 14: ...Prestige 202H Plus Quick Start Guide 14 4 To change the LAN information on the Prestige click Change LAN Configuration Otherwise click Save Settings to save the configuration and skip to step 5...

Страница 15: ...ool field Enter the IP address es of the DNS server s in the Primary DNS Server and or Secondary DNS Server fields Enter the LAN IP address of your Prestige in dotted decimal notation in the LAN IP Ad...

Страница 16: ...ull feature mapping types see the User s Guide for more details NAT supports five types of IP port mapping They are 1 One to One One to one mode maps one local IP address to one global IP address Note...

Страница 17: ...Prestige 202H Plus Quick Start Guide 17 Figure 1 NAT Mode 2 Click Edit Details Figure 2 SUA NAT Server The following table describes the labels in this screen...

Страница 18: ...l and is designed to protect against Denial of Service attacks when activated The Prestige s purpose is to allow a private Local Area Network LAN to be securely connected to the Internet The Prestige...

Страница 19: ...en Enable or activate the firewall by selecting the Enable Firewall check box as seen in the following screen Figure 4 Enabling the Firewall 5 5 Procedure for Configuring Firewall Rules From the main...

Страница 20: ...the firewall silently discards the packet Default Permit Log Click this check box to log all matched rules in the Access Control List ACL default set The following read only fields summarize the rule...

Страница 21: ...s the firewall silently discards the packet Log This field shows you if a log is created for packets that match the rule Match don t match the rule Not Match both Both or no log is created None Rules...

Страница 22: ...table describes the labels in this screen Table 3 Creating Editing A Firewall Rule LABEL DESCRIPTION Source Address Click SrcAdd to add a new address SrcEdit to edit an existing one or SrcDelete to de...

Страница 23: ...packets that match this rule be blocked or forwarded Make your choice from the drop down list box Note that Block means the firewall silently discards the packet Log This field determines if a log is...

Страница 24: ...daptor connected to the Prestige and plugged in to an appropriate power source Check all cable connections If the LEDs still do not turn on you may have a hardware problem In this case you should cont...

Отзывы: