background image


Changing the Sound of a Patch


ZOOM GFX-3


13


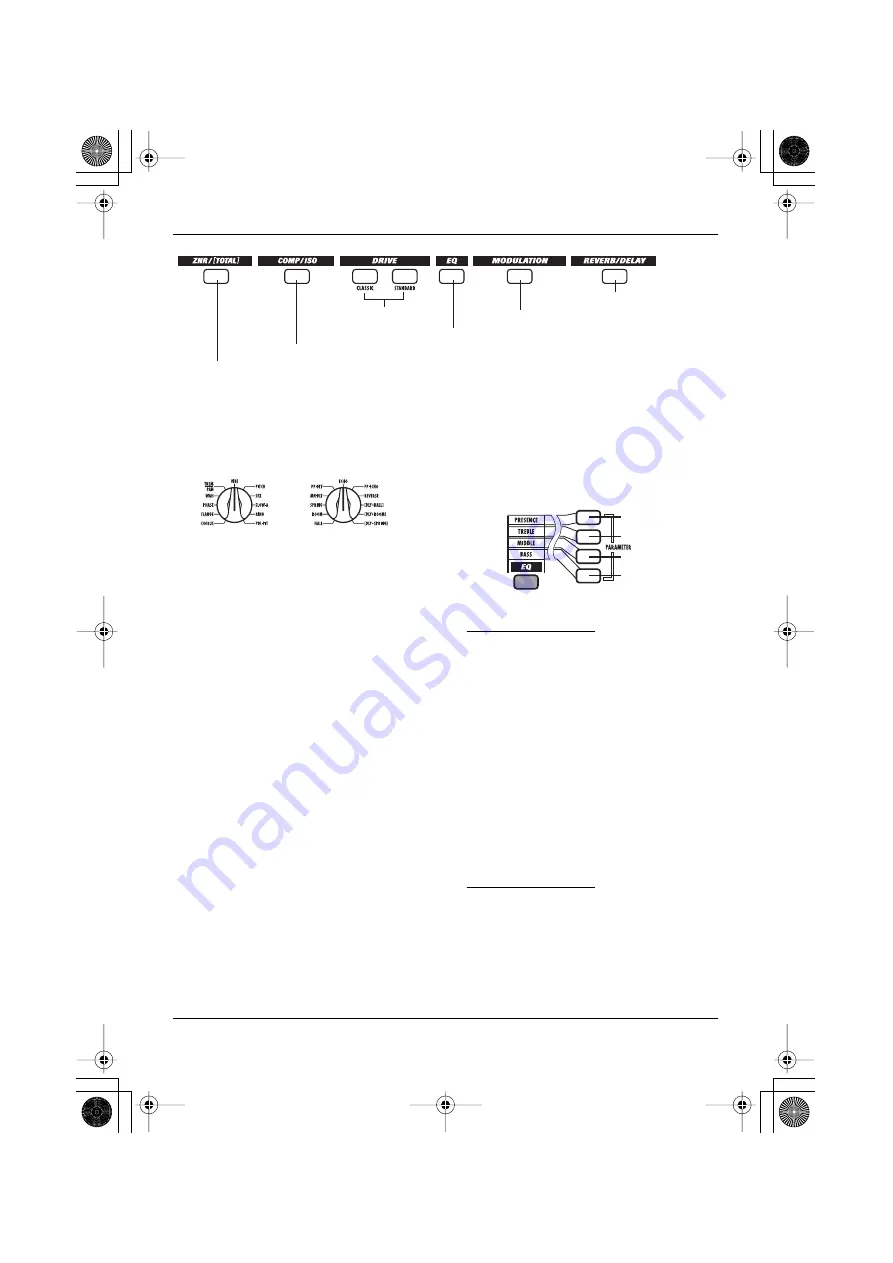
ZNR/[TOTAL] module

COMP/ISO (Compressor/Isolator) module 

DRIVE module

EQ(Equalizer) module

MOD(Modulation) module

REV/DLY(Reverb/Delay) module


The effect type of the MOD and REV/DLY 
modules is set with the [MOD] selector and 
[REV/DLY] selector respectively. 


4.


Use the module keys to select the 
module to edit. 


The module keys serve for selecting an effect 
module to work with. The assignment of keys to 
effect modules is shown above. 

The keys for modules that are ON in a given 
patch are lit. When you press a key to select the 
module, the light flashes. (If you select a module 
that is currently off, the key flashes more 
slowly.) 


5.


To switch the module between ON 
and OFF, press the module key 
once more. 


6.


Select the parameter to edit with 
the parameter keys. 


The parameter keys serve for choosing a 
parameter within the currently selected module. 
Each push of the key brings up the next 
parameter, and the setting value of that 
parameter is shown on the display. 
 

The parameters that are assigned to the 
parameter keys for each module are printed on 
the panel. When the EQ module is selected, the 
parameter keys correspond to the following 
parameters. 


NOTE 


When you use the selector to switch the 
effect type, the parameter type also changes. 
Select the effect type first, and then select the 
parameter. 


7.


Use the [VALUE] dial to change the 
setting. 


The [VALUE] dial controls the setting value of 
the currently selected parameter. The current 
setting value is shown on the display. 


8.


Repeat steps 3 - 7 to edit other 
modules and parameters. 


NOTE 


To keep the patch, be sure to perform the 
steps for storing it (


 p. 14). Otherwise all 

changes will be lost when you switch to 
another patch. 

[MOD] Selector

[REV/DLY] Selector

EQ modul

PRESENCE

TREBLE

MIDDLE

BASS

Parameters

En-GFX3.book 13 ページ 2004年11月8日 月曜日 午後4時30分

Содержание GFX-3

Страница 1: ...g a Patch 14 Resetting the GFX 3 to the factory default condition 14 Other Functions 15 Using the expression pedal to vary an effect 15 Adjusting the expression pedal 16 Effect Types and Parameters 17...

Страница 2: ...here it will be exposed to Extreme temperatures Heat sources such as radiators or stoves High humidity or moisture Excessive dust or sand Excessive vibration or shock Handling Never place objects fill...

Страница 3: ...tches which can be freely modified plus 60 preset patches Together these 120 settings let you make great music straight away Mode free editing for creative flexibility The selectors and keys arranged...

Страница 4: ...ZOOM GFX 3 4 Controls and Functions Top Panel Rear Panel Control section p 5 Foot switches 1 3 INPUT jack OUTPUT PHONES jack POWER switch DC IN jack BANK Q W keys Expression pedal En GFX3 book 4...

Страница 5: ...if not installed and used in accordance with the instructions may cause harmful interference to radio communications However there is no guarantee that interference will not occur in a particular inst...

Страница 6: ...are almost exhausted Replace the batteries as soon as possible with fresh ones Getting connected 1 Make sure that the amplifier and the GFX 3 are switched off Turn the volume at the amplifier to minim...

Страница 7: ...emphasis of the low range and lower setting values in stronger emphasis of the high range The oF setting means that the Energizer function is turned off 8 To turn the system off proceed in the opposit...

Страница 8: ...u which can be modified and preset groups A b which are read only Each group comprises ten banks numbered from 0 to 9 and each bank has three patches The BANK Q W keys select groups and banks in the...

Страница 9: ...reset group was selected the patch number 1 of user group bank U0 will automatically be selected as store target To carry out the store process press the STORE key once more To cancel the operation pr...

Страница 10: ...etting contents will be lost Selecting a patch 1 To select a patch press one of the foot switches 1 3 whose LED is not lit The LED of the foot switch for the patch that is currently selected is lit NO...

Страница 11: ...that the indicator shows the desired note 3 To change the reference pitch of the tuner use the VALUE dial The current reference pitch is briefly shown on the display The default setting after power o...

Страница 12: ...es will have different parameters Basic editing The most common steps for editing a patch are shown below For a detailed description of effect types and parameters in each module see the section Effec...

Страница 13: ...rameter keys serve for choosing a parameter within the currently selected module Each push of the key brings up the next parameter and the setting value of that parameter is shown on the display The p...

Страница 14: ...ed as store target 3 Press the STORE key once more The patch is stored and the display shows the group and bank of the store target Since the edited contents are now stored the EDITED dot on the displ...

Страница 15: ...or some effect types The distortion amount changes MOD Expression pedal adjusts effect type currently selected in MOD module The parameter depends on the effect type REV DLY Expression pedal adjusts e...

Страница 16: ...isplay 2 Fully raise the expression pedal and press the STORE key The indication UP appears on the display 3 Push the expression pedal fully down and release it 4 Press the STORE key The adjustment is...

Страница 17: ...NR ZOOM Noise Reduction patch level and other parameters that are common to all patches COMP ISO Compressor Isolator module The compressor serves to reduce excessive signal levels The isolator allows...

Страница 18: ...ASSIC VX CRU STANDARD JAZZ C Old style crunch sound Clean and bright combo amp sound TYPE 5 HI GAIN H H H HG G G G CLASSIC MP 1 STANDARD PV DRY High gain tube preamp sound Tube stack amp sound for hea...

Страница 19: ...Adjusts body resonance Parameter 3 CABINET Parameter 4 LEVEL oF bo Zb bC CM CE St SE 1 8 Selects the cabinet type Adjusts signal level after passing module Parameter 1 PRESENCE Parameter 2 TREBLE 12...

Страница 20: ...s modulation intensity Parameter 3 RATE Parameter 4 CLIP 1 30 0 10 Adjusts modulation speed Higher values result in stronger modulation character through clipping of the modulation waveform TYPE 6 VIB...

Страница 21: ...al sound and effect sound TYPE 11 PDL PIT P P P PP P P P Pedal Pitch This effect lets you vary the pitch in real time using the expression pedal Parameter 1 COLOR Parameter 2 MODE 1 8 UP dn Selects th...

Страница 22: ...nly when parameter 1 is t1 t9 Settings of 100 and above are shown with a dot between the two figures Value t1 t2 t3 t4 t5 t6 t7 t8 t9 Corresponding note half note dotted quarter note quarter note dott...

Страница 23: ...OOGIE 1 SOUTHERN CLEAN Bros style clean sound VOLUME 2 SKYNYRD OD SKYNRD style OD sound ROOM 3 AFTER BURNER 80 s ZZ style OD sound GAIN u 0 b0 JAM ROCK 1 CLEAN RHYTHM PHISH style clean sound SPRING 2...

Страница 24: ...eter of DRIVE module Expression pedal on off switching does not work properly Try the procedure described in Calibrating the Expression Pedal on page 16 Bypassed sound is unnatural The Energize works...

Отзывы: