background image

2

Usage and Safety Precautions

SAFETY PRECAUTIONS

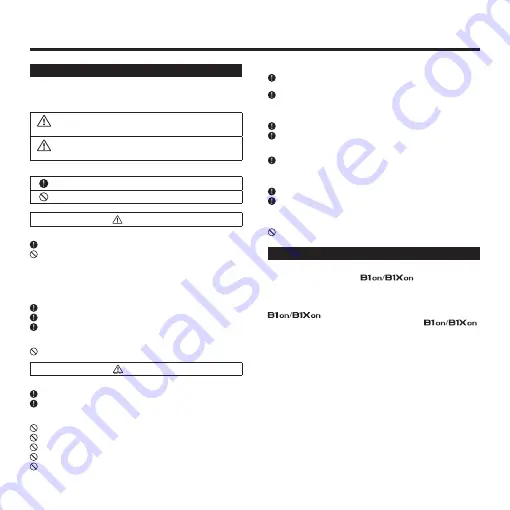
In this manual, symbols are used to highlight warnings and cautions 
that  you  must  read  to  prevent  accidents. The  meanings  of  these 
symbols are as follows:

Warning

Something that could cause serious injury or death.

Caution

Something that could cause injury or damage to the 
equipment.

Other symbols

Required (mandatory) actions.

Prohibited actions.

 Warning

Operation using an AC adapter

  Use only a ZOOM AD-16 AC adapter with this unit.
  Do not use do anything that could exceed the ratings of outlets and other 

electrical wiring equipment. Before using the equipment in a foreign country 
or other region where the electrical voltage differs from that indicated on 
the AC adapter, always consult with a shop that carries ZOOM products 
beforehand and use the appropriate AC adapter.

Operation using batteries

  Use 4 conventional 1.5-volt AA batteries (alkaline or nickel-metal hydride).
  Read battery warning labels carefully.
  Always close the battery compartment cover when using the unit.

Alterations

  Never open the case or attempt to modify the product.

 Caution

Product handling

  Do not drop, bump or apply excessive force to the unit.
  Be careful not to allow foreign objects or liquids to enter the unit.

Operating environment

  Do not use in extremely high or low temperatures.
  Do not use near heaters, stoves and other heat sources.
  Do not use in very high humidity or near splashing water.
  Do not use in places with excessive vibrations.
  Do not use in places with excessive dust or sand.

AC adapter handling

  When disconnecting the AC adapter from an outlet, always pull the body of 

the adapter itself.

  During  lightning  storms  or  when  not  using  the  unit  for  a  long  time, 

disconnect the power plug from the AC outlet.

Battery handling

  Install the batteries with the c/- orientation.
  Use a specified battery type. Do not mix new and old batteries or different 

brands or types at the same time. When not using the unit for an extended 
period of time, remove the batteries from the unit.

  If a battery leak should occur, wipe the battery compartment and the battery 

terminals carefully to remove all battery residue.

Connecting cables with input and output jacks

  Always turn the power OFF for all equipment before connecting any cables.
  Always disconnect all connection cables and the AC adapter before moving 

the unit.

Volume

  Do not use the product at a loud volume for a long time.

Usage Precautions

Interference with other electrical equipment

In  consideration  of  safety,  the 

 has  been  designed  to 

minimize the emission of electromagnetic radiation from the device and to 
minimize  external  electromagnetic  interference.  However,  equipment  that 
is very susceptible to interference or that emits powerful electromagnetic 
waves could result in interference if placed nearby. If this occurs, place the 

 and  the  other  device  farther  apart. With  any  type  of 

electronic device that uses digital control, including the 

 , 

electromagnetic interference could cause malfunction, corrupt or destroy data 
and result in other unexpected trouble. Always use caution.

Cleaning

Use  a  soft  cloth  to  clean  the  panels  of  the  unit  if  they  become  dirty.  If 
necessary, use a damp cloth that has been wrung out well. Never use abrasive 
cleansers, wax or solvents, including alcohol, benzene and paint thinner.

Malfunction

If the unit becomes broken or malfunctions, immediately disconnect the AC 
adapter, turn the power OFF and disconnect other cables. Contact the store 
where you bought the unit or ZOOM service with the following information: 
product model, serial number and specific symptoms of failure or malfunction, 
along with your name, address and telephone number.

Copyrights

t"MM USBEFNBSLT QSPEVDU OBNFT BOE DPNQBOZ OBNFT NFOUJPOFE JO UIJT

documentation are the property of their respective owners.

Note: All trademarks and registered trademarks mentioned in this manual are 

for identification purposes only and are not intended to infringe on the 
copyrights of their respective owners.

Содержание B1on

Страница 1: ...on of this document in whole or in part without permission is prohibited Contents Usage and Safety Precautions 2 Introduction 3 Part Names 4 Turning the Power ON 6 Display Information 7 Terms Used in...

Страница 2: ...brands or types at the same time When not using the unit for an extended period of time remove the batteries from the unit If a battery leak should occur wipe the battery compartment and the battery...

Страница 3: ...stic amplifier modeling We have included realistic amplifier modeling sounds from our We have recreated the low end thickness pitch clarity and loudness which are elements that contribute to a natural...

Страница 4: ...4 Part Names OTop Panel RHYTHM LOOPER key MENU key Display HOME key Parameter knob ENTER key Foot switches Cursor keys up down left right Expression pedal only...

Страница 5: ...etc ZOOM AC adapter AD 16 Computer Bass guitar INPUT jack Pedal switch only OUTPUT jack AUX IN jack USB connector DC9V AC adapter jack NOTE Signals input through t the AUX IN jack are sent directly t...

Страница 6: ...ment Plug a guitar cable into the INPUT jack Doing so turns the unit on When using an adapter O Connect an AD 16 adapter Turn the amplifier s power on and raise its volume NOTE USB bus power operation...

Страница 7: ...ents have been changed This shows that the patch contents have been saved HINT Press t to return to the HOME screen from any other screen Effects that are OFF appear gray t Terms Used inThis Manual Pa...

Страница 8: ...nge the patch Use and HINT For details about using the preselect function to t change directly to patches that are not next in order see page 19 Press and hold t or to change patches continuously To c...

Страница 9: ...ess The patch editing screen appears Turn Open the page you want only To adjust the patch level LVL O Turn Select LEVEL Press Turn Set between 0 and 120 To change the patch name O NAME Turn Move the c...

Страница 10: ...ect ON Virtual knob Graphic for selected effect To select an effect type Use and Effect processing capacity M The allows you to combine five effects as you like However if you combine effect types tha...

Страница 11: ...wn When using multiple effects scroll to switch the effect shown Use and To adjust parameters Press The editing screen appears Turn Select the parameter to adjust Press Confirm the parameter to adjust...

Страница 12: ...lect the category Press Open the added effect placement screen Turn Select where to add the effect Press Add the effect Turn to end Select EXIT Press HINT On the effect screen you can also press and t...

Страница 13: ...t Turn to end Select EXIT Press To change the order of effects Turn on the HOME screen Select EFFECT CHAIN Press Open the EFFECT CHAIN screen Turn Select the effect to move Press Confirm the effect to...

Страница 14: ...he MENU screen Turn Select MASTER LVL Press Turn Set between 0 and 120 Press to end To adjust the master tempo BPM Press on the HOME screen Open the MENU screen Turn Select BPM Press Turn Set between...

Страница 15: ...n the confirmation screen Turn Select YES to execute Select NO to cancel Press To swap the current patch Press on the HOME screen Open the MENU screen Turn Select SWAP Press Open the patch SWAP screen...

Страница 16: ...ct the battery type Turn on the SETTINGS screen Select BATTERY Press Turn Select ALKALI alkaline or Ni MH nickel metal hydride To set the eco mode Turn on the SETTINGS screen Select eco Press Turn Sel...

Страница 17: ...st the backlight time Turn on the SETTINGS screen Select LCD LIGHT Press Turn Select OFF ON 15sec or 30sec To adjust the display contrast Turn on the SETTINGS screen Select LCD CNTRST Press Turn Set b...

Страница 18: ...s been changed This shows that the patch has been saved When AUTO SAVE is OFF O Patch changes will not be saved until they are saved manually If a patch has been changed a confirmation screen will app...

Страница 19: ...s not been saved patches cannot be t swapped See page 15 To use the preselect function Turn on the SETTINGS screen Select PRESELECT Press Turn Select ON or OFF HINT ON The preselect function is active...

Страница 20: ...ng and tune it CHROMATIC TUNER O Flat Correct pitch Sharp The name of the nearest note and the pitch accuracy are shown BASSTUNER O Flat Correct pitch Sharp Using theTuner Press or to end To change tu...

Страница 21: ...ic or BASS See the table below for more about the bass tuner Drop tuning FLAT Set to 0 1 2 or 3 NOTE Drop tuning is not possible when the TYPE is t set to CHROMA Tuner types Display Meaning String num...

Страница 22: ...lume On the RHYTHM screen turn Select the item to set Press Confirm the item to set Turn Change the setting Setting items M PATTERN Select the rhythm pattern For more about rhythm patterns See page 23...

Страница 23: ...Disco 4 4 31 Pop 4 4 32 PopRock 4 4 33 IndiePop 4 4 34 EuroPop 4 4 35 NewWave 4 4 36 OneDrop 4 4 37 Steppers 4 4 38 Rockers 4 4 39 Ska 4 4 40 2nd Line 4 4 41 Country 4 4 42 Shuffle1 4 4 43 Shuffle2 4...

Страница 24: ...setting Setting items M Recording time TIME Set to MANUAL or in a range from 1 to 64 NOTE The looper can record up to 30 seconds t If the setting number of quarter notes would t not fall in this rang...

Страница 25: ...ecording time 30 seconds is reached NOTE During rhythm playback recording will start after a t pre count To overdub a recorded loop During loop playback press Press to end To stop loop playback On the...

Страница 26: ...S Press Open the PATCH SETTINGS screen Press Open the patch editing screen Turn Open the PEDAL setting screen To set the controlled parameter O and range Turn on the PEDAL setting screen Select the it...

Страница 27: ...t effects that are assigned to the expression pedal The ON OFF setting made by the pedal switch is not saved To calibrate its sensitivity While pressing turn the unit on See page 6 Operate the pedal...

Страница 28: ...en Turn Select VERSION Press The firmware version is shown Press to end To update the firmware Confirm that the power is off While pressing both and connect the unit to a computer using a USB cable Th...

Страница 29: ...e the firmware t is being updated To restore the to its factory default settings While pressing turn the power ON See page 6 The All INITIALIZE screen appears Turn Select YES to execute Select NO to c...

Страница 30: ...only a genuine ZOOM AC adapter t P6 An effect is not working If the effect processing capacity is exceeded t PROCESSING LIMIT appears on the effect graphic In this case the effect is bypassed P10 Batt...

Страница 31: ...k AUX IN Stereo mini jack Rated input level 10dBm Input impedance Line 1k Output OUTPUT Standard stereo phone jack Maximum output level Line 2dBm with output load impedance of 10 k or more Headphones...

Страница 32: ...ce to radio or television reception which can be determined by turning the equipment off and on the user is encouraged to try to correct the interference by one or more of the following measures Dispo...

Страница 33: ...play This dub sound is crafted with reverb and has great depth Lowering the tone on the bass itself might add interest Was thinking of Victor Wooten s Show of Hands record This is a sound in the style...

Страница 34: ...2 3 4 5 6 7 8 9 0 1 2 3 4 5 6 7 8 9 0 1 2 3 4 5 6 7 8 9 0 1 2 3 4 5 6 7 8 9 This is a sound in the style of Chris Squire from Yes It re creates the rapidly sawing tremolo sound that he used in Starshi...

Отзывы: