manualshive.com logo in svg
background image

H0605500.A - 2017/03 - EC11-

More documents on:

www.zodiac-poolcare.com

RV 5500 iQ

Instructi ons for installati on and use

 - 

English

Electric pool cleaner

Translati on of the original instructi ons in french 

EN

Содержание RV 5500 iQ

Страница 1: ...H0605500 A 2017 03 EC11 More documents on www zodiac poolcare com RV 5500 iQ Instructions for installation and use English Electric pool cleaner Translation of the original instructions in french EN...

Страница 2: ...ket or outlet Before carrying out any operations check that The voltage indicated on the appliance s information plate corresponds to the mains voltage The power grid is adapted to the power requireme...

Страница 3: ...3 I Troubleshooting the connection to the iAquaLink app 23 Before you do anything with the device it is vital that you read this installation and user manual as well as the warnings and warranty bookl...

Страница 4: ...iption RV 5500 iQ A Cleaner oating cable Front rear driving wheels 4WD B Control unit C Caddy kit D 100 ne debris lter 200 large debris lter 60 very ne debris lter E Protective cover Supplied Availabl...

Страница 5: ...es Linings Transport and removal from pool handle Front drive wheels Rear drive wheels Floating cable Swivel 1 2 3 Product conformity This appliance was designed constructed and certi ed to comply wit...

Страница 6: ...5 Installation 2 1 I Set up 3 5 metres Minimum Control unit Caddy Cleaner Floating cable Plug Mains cable iAquaLink remote control...

Страница 7: ...6 2 2 l Assembling the caddy Tool less assembly Tighten the nut loosely x2 x2 x2 Finish tightening the nut EN...

Страница 8: ...ly dismantled and stored The device must operate in pool water of the following quality Water temperature Between 15 C and 35 C pH Between 6 8 and 7 6 Chlorine 3 mg per L When the pool is dirty especi...

Страница 9: ...tres away from the edge of the pool and avoid exposing it to direct sunlight Position the control unit close to the socket Unscrew the protective cap see image Connect the oating cable to the control...

Страница 10: ...ned Bottom only Bottom sides water line Water line Surface to be cleaned Bottom sides water line Wi Fi Direct Button LED on when the Wi Fi Direct mode is active LED on when the connection is con rmed...

Страница 11: ...p the device operating if it is in a cleaning cycle 3 6 1 Choice of cleaning mode By default a pre con gured cleaning mode Bottom sides water line the symbols are illuminated and the cleaning time is...

Страница 12: ...control unit away from sunlight and anywhere it might be splashed with water A protective cover is available as an option see image 3 6 3 Out of water mode This function enables the cleaner to be retu...

Страница 13: ...he My systems screen Select Robotic Cleaner Select Wi Fi Direct to start set up or Invite code if another user has sent you an invitation code Press the Wi Fi Direct button to start set up or on the c...

Страница 14: ...dentify yourself as the primary user or click on Skip The primary user has access to all the cleaner s functions in the iAquaLink app The primary user can invite other users family members service com...

Страница 15: ...Standard High Intensity Press Save to save the new parameters or X to cancel Press X return to the home screen The new cleaning mode will take e ect for the cleaning in progress and all future cycles...

Страница 16: ...le 4 3 6 Programming or cancelling cleaning cycles Cleaning cycles may be programmed to repeat You are strongly recommended to remove and clean the lter after every cleaning cycle From the app s home...

Страница 17: ...Fi Direct switches o after 10 minutes The iAquaLinkTM can only be used in Wi Fi Direct mode by one user at a time in Wi Fi Direct mode Go to the menu with three bars and select My Systems Press and Ad...

Страница 18: ...integrity of the device and guarantee optimum performance 5 1 I Cleaning the lter The cleaner s performance may be reduced if the lter is full or dirty Clean the lter with clean water after each clea...

Страница 19: ...maintenance on the propeller Loosen the screw on the grille see image Remove the grille see image Remove the ow guide carefully see image To remove the propeller wear gloves and hold the end of the p...

Страница 20: ...ndicators appear as shown in image To remove worn brushes remove the tabs from the holes in which they are xed see image To t new brushes start by tting the side without tabs under the brush holder se...

Страница 21: ...20 5 4 I Changing the tyres EN...
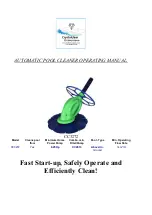
Страница 22: ...originally did The lter is full or dirty clean it The lter is clogged change it The tyres are worn replace them Even though the water seems clear microscopic algae are present in your pool they are no...

Страница 23: ...e your problem please contact your local retailer for a diagnostic review or call customer service N A N A The cleaner did not nish its cycle correctly Restart a cleaning cycle 10 Communication Turn c...

Страница 24: ...Wi Fi router then plug it back in Using a portable computer go into Con guration Panel to see the state of your network connections Check the strength of the wireless network Wi Fi signal on the porta...

Страница 25: ...nd see whether the LEDs come back on Check the internet connection Network may be down The LAN WEB LEDs are ashing A software update is in progress The LEDs may ash for 10 minutes until the update is...

Страница 26: ...49180 St Barth l my d Anjou cedex S A S U au capital de 1 267 140 SIREN 395 068 679 RCS PARIS Votre revendeur Your retailer Mod le appareil Appliance model Num ro de s rie Serial number Trouvez plus d...

Отзывы: