background image

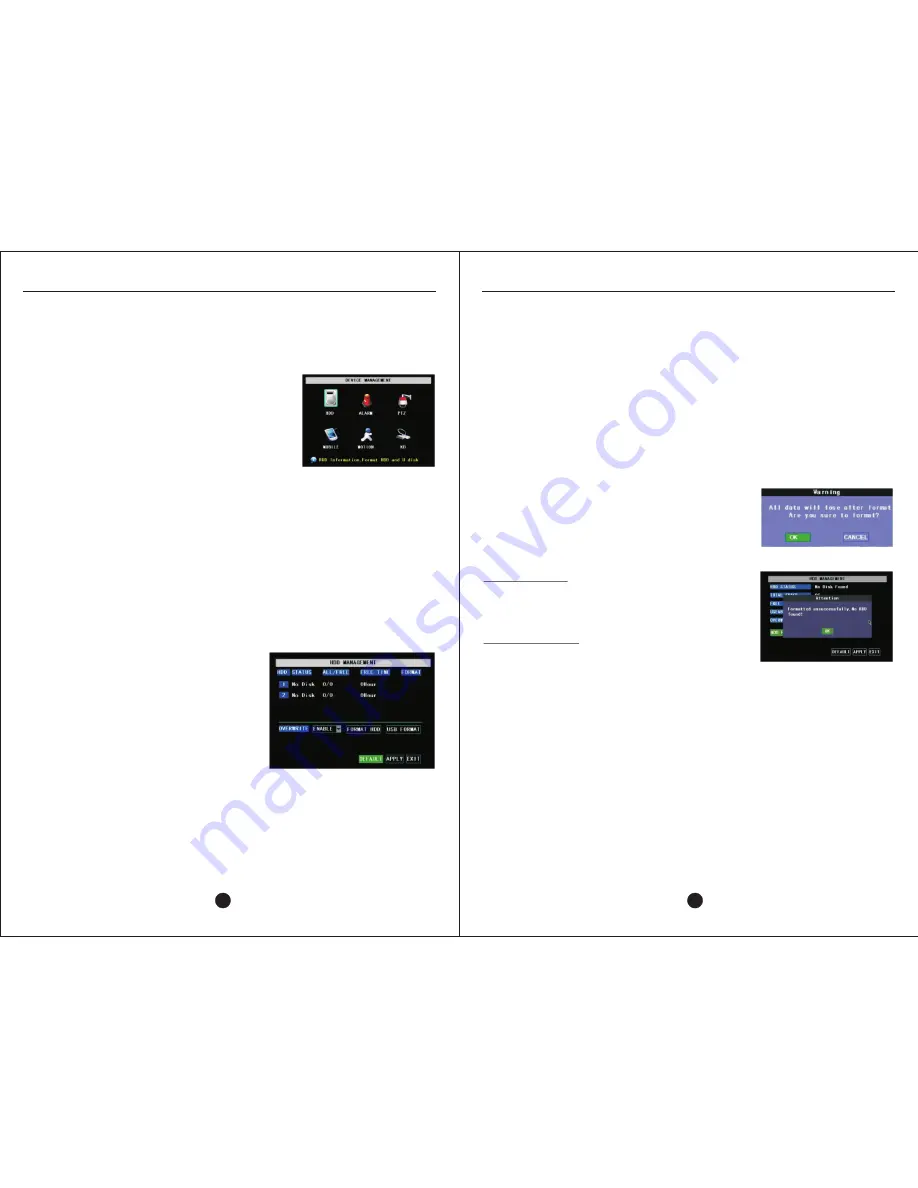
Figure 10-38:  Hard drive format confirmation 
dialog box.

10.1 – MANAGING THE HARD DRIVE

The hard drive is a semi-permanent storage device necessary for the DVR to 
record video and audio input from the cameras.

 The SATA hard drives available for the DVR are specially designed to withstand 
the rigorous demands of continuous recording.

The 

 DVR can support up to a 1 TB SATA hard drive.

See Section 3.1 for installing a hard drive.

10.1.1 – HDD STATUS

This field reports on the presence and/or condition of the hard drive.  

OK

 - A healthy hard drive connected properly 

will be detected automatically by the DVR.

No Disk Found 

– Hard drive is either not I

nstalled, not connected properly, or is 
malfunctioning.  Verify that hard drive is 
installed and connected correctly.

Unformatted

 – Hard drive is present but not 

formatted or is malfunctioning.  Drive must be 
formatted before continuing.

10.1.2 – HDD PROPERTY FIELDS

All/Free

This field presents a ratio of the remaining storage space versus the total storage space 
available after formatting, which will be slightly less than the maximum size.

An alarm can be set to notify by buzzer and e-mail when the free space is low.

Free Time

Free space on hard drive is converted into an estimate of recording time (in hours) 

H9106UVD-SV

USER MANUAL

USER MANUAL

Figure 10-39:  Unsuccessful format when hard drive
is not present, is disconnected, or is defective.

See Section 3.1 for instructions on checking the hard drive connections.

26

25

10.1.5 – USB FORMAT

Clicking this button will execute the USB drive format process.  Formatting the 
USB drive must be completed before recorded files can be backed up.

The same warning prompt for the HDD will be displayed (Figure 10.35).

If an error message appears stating no USB device is found, perform the 
following procedure:
1.

Power off DVR.

2.

Reinsert USB device into USB port other than mouse port.

3.

Power on DVR.

10.2 – ALARM SETUP


Figure 10-36:  Device Management Menu

Figure 10-33:  HDD Management Console 

The Device Management menu is divided into the following six options:

1.    HDD displays hard drive status, space and recording time.  Commands are      
       available to format the hard drive and USB backup device.
2.    Alarm console is for configuring external trigger  inputs, notification  
       conditions, alarm settings, and e-mail options. 
3.    PTZ setup menu is used to match PTZ camera 
       dip switch settings. 
4.    Mobile menu is used to enter a username, 
       password, and port for connecting to the DVR
       remotely via mobile phone.
5.    Motion Detection menu turns and off detection, 
       and sets sensitivity and detection area.
6.    KB Setup is to configure an RS485 keyboard

remaining.

Format

If a hard drive is detected, a checkbox will appear in this column next to the hard drive 
number.  Checking the box will select the drive for formatting.

10.1.3 – OVERWRITE 

With Overwrite 

enabled

, when the hard drive runs out of space to record, the DVR will 

return to the oldest file first and begin overwriting files.

Important Note!  If overwrite is enabled, it is imperative to back up files regularly.  Once a 
file has been overwritten, neither Zmodo technical support nor the manufacturer can assist 
in recovering the overwritten file.

If Overwrite is 

disabled

, the DVR will stop recording when the hard drive is full.  It will be 

necessary to enable overwrite, replace the hard drive, or format it.

10.1.4 – FORMAT HDD 

Clicking this button will execute the hard drive format 
process.  Formatting the hard drive must be completed
before recording of video files.

A confirmation dialog box will be displayed before 
formatting begins.

Successful Format
After the hard drive is formatted, the DVR must be restarted.
Press OK at the successful format dialog box.  Then press 
the Menu button twice.  Finally, press OK when prompted 
to restart.

Unsuccessful Format
If the error message below is displayed, check the hard 
drive connections.  If the hard drive is connected properly, 
the hard drive may be defective.

Содержание DVR-H9106UVD-SV

Страница 1: ...DVR H9106UVD SV...

Страница 2: ...Backup Device 3 7 Connecting a USB Mouse 3 8 Connecting Your DVR to Your Network 4 Starting up Your DVR 4 1 System Initialization 4 2 Main Video Feed Display 4 3 Setting System Date and Time 5 Main Ov...

Страница 3: ...Setup 28 11 PTZ Setup 29 11 1 Options 29 12 Mobile Phone Setup 30 12 1 Setting Up Your Phone 31 13 Motion Detection 31 13 1 Options 32 13 2 MD Area 32 14 System Setup 32 14 1 Time Setup Date Time 33...

Страница 4: ...and move your videos off site with either a USB flash drive external hard drive or DVD RW drive View what you recorded straight from the DVR or remotely from a computer Set up your DVR to be accessed...

Страница 5: ...port for viewing on a computer monitor sold separately and a DVD RW Drive for backup H9106UVD SV H9106UVD SV H9106UVD SV D A N O 2 1 1 H9106UVD SV FRONT PANEL NAVIGATION Up Down Move Up Down REW Move...

Страница 6: ...onnections Important There is only one way to correctly connect cables If the connections do not fit together properly reverse the cables 5 6 A B C D I J K L E F G H Figure 2 Front Right Panel Control...

Страница 7: ...of the DVR The purpose of external alarm sensors is to activate recording on a given channel when the sensor is activated or a condition is met such as a door opening To configure the external alarm s...

Страница 8: ...wo types of USB devices that can be connected to the DVR for backing up recording files are either a portable flash drive thumb drive or an external hard drive The DVR runs on a Linux platform so the...

Страница 9: ...Click Time field and enter current time 4 Click Time Zone drop down menu and select proper time zone 5 Click DST drop down menu and select On or Off for your location 6 Click Apply OK Exit Figure 4 1...

Страница 10: ...S TABLE Menu Option Sub Menus Function Function Display Setup Display Setup configures the live view for each channel Color Setup permits adjustment of video for each individual camera Color Setup Net...

Страница 11: ...the live view Contrast creates a greater contrast between light and dark areas Saturation makes colors more or less vivid 6 4 LIVE Shows or hides live feed for respective channel 6 5 DISPLAY TIME OPT...

Страница 12: ...TIME Choose the maximum recording time for a single video file Options are 15 30 45 and 60 minutes 7 7 RECORDING MODE Click the Recording Mode drop down menu to reveal the options which vary 8 NETWOR...

Страница 13: ...er to which the DVR is connected The default value is 192 168 1 1 8 7 DNS DNS or Domain Name Server should also be set to the local address of the router 8 8 1 TESTING DVR LOCAL CONNECTION Method 1 Ne...

Страница 14: ...domain e g mydvr dvrdns org that is associated with his her public IP address Entering the DDNS account information into the DDNS Setup menu maintains the link between the DDNS account and the public...

Страница 15: ...ances to the last page of results All selects all files for backing up Inverse inverts the files that are checked to unchecked and vice versa Backup activates the backup procedure Figure 9 27 Log Sear...

Страница 16: ...mouse port 3 Power on DVR 10 2 ALARM SETUP Figure 10 36 Device Management Menu Figure 10 33 HDD Management Console The Device Management menu is divided into the following six options 1 HDD displays...

Страница 17: ...O CHANNEL AND STATUS I O input output channels are to connect external sensor alarms to the camera on the specified channel An example of an external sensor is a laser activated motion detector Extern...

Страница 18: ...Stop bit as do Pelco D cameras Baud Rate Baud rate is the data transmission speed used for communication between the DVR and PTZ camera This setting must match the switch on the PTZ camera The baud ra...

Страница 19: ...See Section 8 Network Setup or refer to the Network Setup Guide To access the Mobile Phone Setup from the Main Menu select Devices Mobile 13 MOTION DETECTION USER NAME Enter a username for the user c...

Страница 20: ...DVR 14 2 2 PASSWORD ENABLE Switching this option to ON reveals the following settings 14 2 3 USER PASSWORD The user password grants access to the Search in Main Menu but all other sub menus are locked...

Страница 21: ...4 5 3 MAC ADDRESS A MAC Address is another unique hardware identification used for a local area network On the changes to the MAC address cannot be saved 14 6 MAINTAIN SYSTEM MAINTAIN H9106UVD SV H910...

Страница 22: ...tton will save the current set point configuration and automatically proceed to the next set point Figure 15 57 Cruise Setup control panel Figure 15 57 Start Cruise Quick Launch command Figure 15 58 S...

Страница 23: ...riting the oldest file with the overwrite function enabled or formatting the hard drive which will erase everything Q Why can t I view my DVR online A Settings may be configured incorrectly or the DVR...

Страница 24: ......

Страница 25: ......

Страница 26: ......

Страница 27: ......

Страница 28: ......

Страница 29: ......

Страница 30: ......

Страница 31: ......

Страница 32: ......

Страница 33: ......

Страница 34: ......

Страница 35: ......

Страница 36: ......

Страница 37: ......

Страница 38: ......

Отзывы: