background image

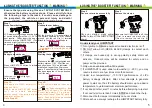
4.USING THE “BOOSTER” FUNCTION       WARNING 

USING JUMP START OPERATION STEPS

Step 1
Press Power button

LCD  displays the  voltage and  capacity 
of  device  battery,  must  be  >11.5V  for 
best  results.    Firmly  insert  the  end  of 
the cable into the JUMP START.  (First 
time use might feel some resistance to 
be pushed in all the way.)

Step 2
Hookup the car battery 

Put the black clip (-) terminal attach to 

the  battery  negative  post  or  chassis 

ground,  put  the  red  clip  (+)  terminal 

attach to the battery negative post.

*  Alarm  will  beep  if  polarity  is  wrong.

** If car battery is completely dead, 

Go 

to Step 3B

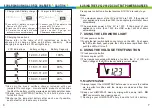
Step 3A
Ready to crank the car

Press  JUMP  START  button  to  initiate 
boost function.

Indication: the          is highlight

Go to Step 4A 

Step 4A 
Starting the car 

Make sure the         is highlighted and 
battery status > 11.5V.  Start the car 
and should see 14.1V as indicated.  If 
start failed, repeat Step 3A process 
again.  Seek other help if start process 
has been repeated > 5 times.  pushed 
in all the way.)

Step 3B

This  applies  to  DEAD  battery(<4V) 
situation ONLY. 

Hold  &  press  JUMP  START  button 
f o r  3  s e c  t o  i n i t i a t e  " p h a n t o m " 
polarity  check.    If  polarity  is  wrong, 
the alarm  will sound.

Go to Step 4B

Step 4B

Safety  check will take up 30 sec long 

the        will  flash  continuously;  then 
power  will  be  ready  for  starting. 
Correct  the  polarity  if  it  is  wrong.  If 
start  failed,  repeat  Step  3B  process 
again.  Seek help if start process has 
been repeated > 5 times.

Ensure that you are using this on a 12 VOLT SYSTEM ONLY, 
otherwise the battery could explode.  Please strictly follow 
the  following  steps,  otherwise,  it  could  cause  damage  to 
the  jumpstart,  the  vehicle  or  personal  injury  and  death!

-

-

-

-

-

1

2

2

+

-

Ground

OR

A

B

A

B

+

-

Ground

OR

A

B

+

-

Ground

OR

A

B

+

-

Ground

OR

4.USING THE “BOOSTER” FUNCTION       WARNING 

Understand your JUMPSTART

Turn ignition to 

ON

 and ensure all onboard electronics is off.

DO  NOT  allow  both  (RED  &  BLACK)  clamps  to  contact  each 

others.

If  clamps  are  hooked  up  in  wrong  polarity,  safety  alarm  will 

activate.    Onboard  relay  will  be  disabled  for  safety  and  no 

power will be provided.

Only use on vehicles with a 12V system.

If JUMPSTART is used under cold weather (< -25˚C), you may 

require to start car a few times more than normal.

Under  low  temperature(<  -10˚C/14˚F),performance  of  LiPo 

battery  is 

deeply  affected.    After  a  few  attempts  to  generate 

power to start car, the LiPo battery should warm up to a desire 

temperature to yield maximum electrical performance. 

If car doesn't start, wait 1 minutes before attempting to restart.  

If car can't start more than 5 times, 

STOP

 and seek other help.

Disconnect both clamps immediately once car starts.

After each use, always recharge the JUMPSTART battery fully.

Step 5 
Once car started successfully

Step 6 
Remove the clamps  

Once  car  started,  press  power 
button to turn off the JUMP START 
power.

Make sure the JUMPSTART is off, then

① 

First  to  remove  the  black  clip  (-) 

② 

Next  to  remove  the  red  clip  (+)

A

B

+

-

Ground

OR

1

1

2

+

-

Ground

A

B

OR

5

4

Содержание HYD Series

Страница 1: ...Multi Function Automobile Emergency JUMP START Product Instruction For HYD Series 12V Carstart Mobile power supply Emergency lighting Compact Versatile Multi Function Automobile Emergency JUMP START ...

Страница 2: ... for further assistance Do not allow metal to come in contact with the battery poles It may spark or short circuit the battery and cause an explosion Stop using the jumpstart when you hear the alarm or cannot turn on the JUMPSTART The reason may be from The jumpstart device voltage is less than 9V Charge the jumpstart to prevent battery failure The device temperature is higher than 140 F 55 C Cool...

Страница 3: ...ction provides power for most laptop computers if equipped Charge with a 12V 1A AC charger and optional 12V 1A DC A USB 5V 2 1A provides power for small electrical appliances iPhone iPad ANDROID PDA etc High intensity LED light can be used for emergency lighting and flash LCD display shows the both LiPo and car lead acid battery status with voltage test functions Sparkproof design Once the car engi...

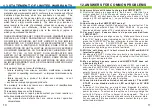
Страница 4: ...help if start process has been repeated 5 times Ensure that you are using this on a 12 VOLT SYSTEM ONLY otherwise the battery could explode Please strictly follow the following steps otherwise it could cause damage to the jumpstart the vehicle or personal injury and death 1 2 2 Ground OR A B A B Ground OR A B Ground OR A B Ground OR 4 USING THE BOOSTER FUNCTION WARNING Understand your JUMPSTART Tu...

Страница 5: ...wiping with a damp cloth DO NOT use solvents as a cleaning agent Recharge your JUMPSTART every 6 months for FULL battery 5 CHARGING USING AC OR DC CHARGER CAUTION Use only the brand certified charger included with your jumpstart to recharge Non standard products will shorten the life of the battery void the warranty and might post other risks Charge your JUMPSTART battery for 8 hours before using f...

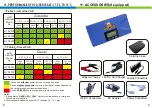
Страница 6: ...ne HYD6000 HYD5000 HYD4000 HYD SERIES Model No Dead Battery 50 Full Battery Dead Battery 50 Full Battery Dead Battery 50 Full Battery 4 CYL 2L 6 CYL 3L 8 CYL 5L Diesel Device has sufficient power to crank car engine by itself Device may have adequate power to crank the car engine depends on the car battery and environment conditions Device DOES NOT have enough power to crank the car engine Notes 1 ...

Страница 7: ...al charge is suggested to be 8 hours After that in a normal situation 3 5 hours should charge up completely The JUMP START will shut down the charging circuit once it is fully charged LCD will lighted up so you will never over charge the device Q How to charge the JUMP START device A You can either charge it with AC adapter from the wall outlet The adapter is a universal unit from 110 240V 50 60 H...

Страница 8: ...wing information for safe keeping 14 WARRANTY CERTIFICATE Product model Purchase date Dealer name Dealer address Dealer phone no Dealer email Cause of failure User name User phone no User address User email M001E B 12 ...

Отзывы: