Zip InLine ES3 Скачать руководство пользователя страница 15


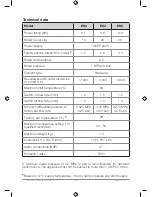
ES3, ES4 & ES6 Instructions. Issue: No. 2 

Page 13  

February / 2012

nOTE!

 When used to supply a mixer tap a flow restrictor may be required on the 

cold supply to the tap to balance the flows.
For further information see the Fault Finding table, page 14.
When the unit has been commissioned, explain the functions of the heater to the 
end user and ensure they know how to use the appliance.
Hand over these instructions for the user to keep.   

Maintenance and cleaning

nOTE! 

Maintenance work must only be carried out by a competent person familiar 

with instantaneous water heaters.
Plastic  surfaces and sanitary fittings should only be wiped with a damp cloth. 
Never use abrasive cleaning agents or solvents.
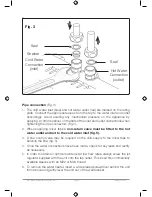
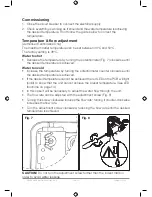
Outlet fittings (jet regulator Fig. 5) should be unscrewed from the tap nozzle and 
cleaned at regular intervals. 

• 

Rinse the regulator with water and brush off the debris. For difficult to remove 
deposits, soak in white vinegar (or a proprietary scale cleaner)


for a few minutes 

and scrub with a toothbrush. 

• 

If any parts are cracked or broken, replace them. If the washer has hardened, 
it should be replaced.

• 

With the debris cleaned out, screw the regulator back into the tap. 


Hand tightening should be adequate.

The electrical and plumbing components should be inspected regularly by 
a competent person to ensure proper functioning and operational safety. 


Water quality should be considered when determining the frequency of inspection. 
Each time the appliance is emptied (e.g. due to work on the plumbing 
system, if there is a risk of freezing or in case of maintenance), the appliance 
must be purged by opening and closing the hot water tap until all air has 
been eliminated from the water heater and no more air emerges before 


re-connecting to the electrical supply.

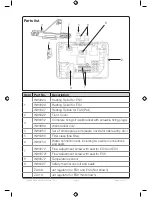
Содержание InLine ES3

Страница 1: ...tructions carefully before commencing installation of the InLine water heater Please leave these instructions with the end user after installation Zip Heaters UK Ltd 14 Bertie Ward Way Dereham Norfolk...

Страница 2: ...Inside Back Cover Inside Front Cover...

Страница 3: ...ning 13 Fault finding 14 Warranty 16 Please read these instructions carefully before commencing installation of the InLine Electronic Instantaneous Water Heater Please leave these instructions with th...

Страница 4: ...ower temperature is required If the flow rate is too low or if the hot water tap is closed the appliance switches itself off automatically For an optimum flow of water always fit the special jet regul...

Страница 5: ...nction isolate the power supply immediately In case of leaks also isolate the water supply Repairs must only be carried out by Zip Heaters UK Ltd or an authorised Zip service engineer Temperatures in...

Страница 6: ...must be vented by opening and closing the hot water tap until all air has been eliminated from the water heater and no more air emerges before re connecting to the electrical supply The appliance must...

Страница 7: ...on flow rate l min 1 2 1 5 1 5 Switch off flow rate l min 1 0 1 3 1 3 Minimum differential pressure factory set flow rate 0 025 MPa 0 25 bar 0 05 MPa 0 50 bar 0 075 MPa 0 75 bar Factory set temperatur...

Страница 8: ...ll bracket only 4 IN80353 Set of small spare parts seals nozzle for cable entry etc 5 IN80080 Filter sieve fine filter 6 IN80750 Water connection set including two water connections and seals 7 IN8037...

Страница 9: ...ectional area of the connection cable must be in accordance with the power rating of the appliance and the specific requirements of the installation site Take care to protect the wiring from damage du...

Страница 10: ...an be checked with the local water supply company Thoroughly flush the water supply pipes before installation to remove any water borne debris Installing the appliance 1 Secure the wall bracket to the...

Страница 11: ...ipe connectors Fig 3 2 When supplying mixer taps a non return valve must be fitted to the hot water outlet and not to the cold water inlet fig 5 3 A flow control valve may be required on the cold supp...

Страница 12: ...4 5 show unvented installation with closed outlet tap Fig 4a shows open vented installation Fig 4 You may also use an open vented installation 187mm 132mm Fig 5 Service Valve Flow Control Valve Mains...

Страница 13: ...rity requirements Important The appliance must be installed according to the specification on the rating plate and the technical specifications Ensure that the voltage marked on the appliance matches...

Страница 14: ...eved Water too cold Increase the temperature by turning the potentiometer counter clockwise until the desired temperature is achieved If the desired temperature cannot be achieved the red LED on the P...

Страница 15: ...cleaned at regular intervals Rinse the regulator with water and brush off the debris For difficult to remove deposits soak in white vinegar or a proprietary scale cleaner for a few minutes and scrub w...

Страница 16: ...lve shut off valve Water flows more slowly than expected The Jet Regulator is not fitted Fit the correct Jet Regulator see Fig 5 Water pressure is not sufficient Check the water flow pressure check th...

Страница 17: ...incorrect Check the electric supply Circuit breaker has tripped Safety thermal cut out has tripped Have the fault rectified by a technician and reset the circuit breaker thermal cut out Hot water tem...

Страница 18: ...ent of the appliance if it needs to be returned for repair to Zip or its Distributor This warranty does not cover damage resulting from non operation of the appliance or consequential damage to any ot...

Отзывы: