background image

6

3PCLIOBTO.5


VITROCERAMIC HOB  


User instructions

GENERAL

Carefully read the contents of this leaflet since 

it  provides  important  instructions  regarding 

safety  of  installation,  use  and  maintenance. 

Keep the leaflet for possible future consultation. 

All  the  operations  relating  to  installation 

(electrical  connections)  must  be  carried  out 

by  specialised  personnel  in  accordance  with 

current regulations.

SAFETY WARNINGS

It is recommended to use flat-bottom pans with 

a diameter equal to or slightly larger than that 

of the heated area (Fig.6). �o not use pans with

Fig.6). �o not use pans with

. �o not use pans with 

a rough base in order to prevent scratching the 

heat surface of the cooking hob. 

This appliance is not suitable for use by children 

or persons requiring supervision. 

IMPORTANT

- Avoid spilling liquid, therefore to boil or heat 

liquids, reduce the heat.

- Please ensure when the appliance is turned 

on, that there are no empty pots left on top.

- When  you  have  finished  cooking,  switch 

off  the  relevant  heating  element  with  the 

command indicated hereinafter.

h  

WARNING


h

If  the  surface  of  the  hob  is  cracked,  turn 

off  the  appliance  and  disconnect  from  the 

electrical main in order to avoid any possible 

electric shocks..

INSTALLATION INSTRUCTIONS

These instructions are for a specialized installer 

and  are  a  guide  for  the  installation  process, 

regulations  and  maintenance  in  accordance 

with the law and current standards. If the built-

in  oven  or  any  other  appliances  that  produce 

heat,  need  to  be  installed  directly  underneath 

the  cooking  hobs  in  ceramic  glass,

  IT  IS 

NECESSARY THAT THE APPLIANCE (oven) 

AND  THE  COOKING  HOBS  IN  CERAMIC 

GLASS  ARE  ADEQUATELY  ISOLATED

Failure to follow this precaution, could cause a 

malfunction in the TOUCH CONTROL system.

POSITIONING

The  domestic  appliance  was  built  in  order  to 

be  encased  on  a  work  surface,  the  way  it  is 

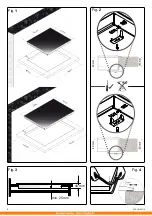
illustrated  in  the  graph  (Fig.1).  Predispose 

sealing material along the whole perimeter Fig. 

4 (the dimensions of the cut Fig.). 

This operation is necessary to avoid any liquids 

penetrating  the  worktop,  as  it  is  not  possible 

to  guarantee  that  the  top,  the  glass  and  their 

connection are completely flat.  

Lock the domestic appliance into place with 4 

supporters,  keeping  in  mind  the  width  of  the 

surface (Fig.). 

If the lower part of the appliance after installation, 

is accessable via the lower part of the furniture, 

it  is  necessary  to  mount  a  separating  panel 

keeping in mind the distances indicated (Fig.) 

if the appliance is being installed underneath an 

oven, this is not necessary.

ELECTRICAL CONNECTIONS 

 (Fig.5)

(Fig.5) 

Before making the electrical connections, check 

that:

- the ground wire is  cm longer than the other 

cables;

- the system ratings meet the ratings indicated 

on  the  identification  plate  fixed  on  the  lower 

part of the worktop;

- the system is fitted with efficient ground wires 

in  accordance  with  the  laws  and  current 

standards.

  Grounding is mandatory by law.

If  the  domestic  appliance  is  not  supplied  with 

a  cable  and/or  suitable  plug,  use  material 

suitable  for  the  absorption  value  indicated 

on  the  identification  plate  and  the  operating 

temperature.  If  wishing  to  make  a  direct 

connection  to  the  mains,  an  omnipolar  switch 

must be installed with a minimum  mm opening 

between  the  contacts  and  appropriate  for  the 

load indicated on the plate and in accordance 

with  current  standards  (the  yellow/green 

ground  conductor  must  not  be  disconnected 

by  a  switch).  When  the  appliance  has  been 

installed, the omnipolar switch must be easily 

reachable.

USE AND MAINTENANCE
MAINTENANCE

Remove  any  residues  of  food  and  drops  of 

grease from the cooking surface by using the 

special  scraper  supplied  on  request  (Fig.7) 

Clean the heated area as thoroughly as possible 

using suitable products, and a cloth/paper, then 

rinse with water and dry with a clean cloth. 

Using the special scraper (optional) immediately 

remove any fragments of aluminium and plastic 

material that have unintentionally melted on the 

heated  cooking  area,  or  residues  of  sugar  or 

food with a high sugar content (Fig.7). In this 

way,  any  damage  to  the  cooktop  surface  can 

be prevented. Under no circumstances should 

abrasive  sponges,  or  corrosive  chemical 

detergents,  such  as  oven  sprays  or  stain 

removers, be used.

USE

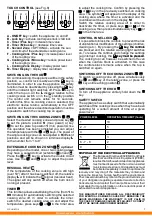
Use  the  touch  control  system  in  the 

corresponding  position  according  to  individual 

cooking needs. Keep in mind that the higher the 

number, the more heat is produced.

EN

Содержание BTO640T

Страница 1: ...ssorbimento Absorption Anschlusswert 6 4 kW BTO641T 145 w 1200 145 w 1200 180 w 1800 180 w 1800 Assorbimento Absorption Anschlusswert 6 0 kW BTO640T 210 140 w 2200 1000 265 170 w 2400 1400 180 w 1800...

Страница 2: ...3PCLIOBTO 5 50 mm 50 mm 50 mm 510 mm 580 mm 490 mm 560 mm 770 mm 750 mm 490 mm 510 mm Fig 1 Fig 4 min 25 mm 40 mm Fig 3 2 mm min 25 mm Fig 2 40 mm 40 mm 30 mm 40 mm...

Страница 3: ...0 415V3N L3 N L2 L1 L2 L1 N L2 L1 220 240V N L 380 415V3 L3 L2 L1 3 4 2 1 3 4 2 1 3 4 2 1 3 4 2 1 3 4 2 1 Fig 7 Fig 6 Fig 5 H05V2V2 F 3G 2 5 mm 2 E A D M C B E G L F G L F TIMER COOKING AREA WITH SECO...

Страница 4: ...e l elettrodomestico sul piano di lavoro mediante i 4 sostegni tenendo presente lo spessore del piano di lavoro Fig 2 Se la parte inferiore dell apparecchio dopo l installazione accessibile dalla part...

Страница 5: ...cendere e regolare la temperatura della zona di cottura desiderata premere i tasti o della zona timer per regolare il tempo di cottura Confermare premendo il tasto o della zona di cottura precedenteme...

Страница 6: ...r connection are completely flat Lock the domestic appliance into place with 4 supporters keeping in mind the width of the surface Fig 2 If the lower part of the appliance after installation is access...

Страница 7: ...ne off In order to activate the timer switch the desired cooking area on and adjust the temperature press keys or in the timer area to adjust the cooking time Confirm by pressing the or key in the pre...

Страница 8: ...gsweite von mindestens 3 mm vorzusehen Die Erdleitung darf nicht durch den Schalter unterbrochen werden Dieser Hauptschalter muss jederzeit gut zug nglich sein Die Kabelf hrung ist so zu w hlen dass s...

Страница 9: ...zuschalten gleichzeitig die Tasten und der entsprechenden Kochzone dr cken bis zur Position ABSCHALTEN DES KOCHFELDES Um die Kochfl che komplett auszuschalten die Taste dr cken SICHERHEITSABSCHALTUNG...

Страница 10: ...F G L F E A D M C B E G L F G L F TIMER COOKING AREA WITH SECOND ZONE STANDARD COOKING AREA PLANO EN VIDRIOCERAMICA Manual de utilizaci n GENERALIDADES Lea atentamente el contenido de este libro que...

Страница 11: ...emporizador encender una zona de cocci n y seleccionar la temperatura presionar los botones o de la zona del temporizador y seleccionar un determinado tiempo de cocci n Confirmar la selecci n pulsando...

Страница 12: ...l appareil lectrom nager sur le plan de travail au moyen des 4 appuis compte tenu de l paisseur du plan de travail Fig 2 Si la partie inf rieure de l appareil apr s l installation est accessible du c...

Страница 13: ...re fonctionner le timer allumer et r gler la temp rature de la zone de cuisson souhait e enfoncer les touches ou de la zone timer pour r gler le temps de cuisson Confirmer en appuyant la touche ou de...

Страница 14: ...KING AREA WITH SECOND ZONE STANDARD COOKING AREA GLASKERAMIEK PLAAT Gebruiksaanwijzingen ALGEMENE INFORMATIE Lees de inhoud van dit boekje aandachtig door want het verstrekt belangrijke aanwijzingen o...

Страница 15: ...eerder ingeschakelde kookzone te drukken Het symbool zal op het display van de kookzone verschijnen waarvoor de timer geactiveerd is en de terugtelling van de tijd zal op display M weergegeven worden...

Страница 16: ...n vha 4holdere vedattagehensyntilarbejdspladens tykkelse Fig 2 Hvis apparatets nederste del er tilg ngelig efter installation fra m blets nederste del er det n dvendigt at montere et adskillelses pane...

Страница 17: ...g regulere temperaturen p det nskede kogeomr de tryk tasterne eller i timer omr det foratregulerekogetiden Bekr ftvedattrykketasten eller kogeomr dets der forinden var t ndt Symbolet vil vises p displ...

Страница 18: ...18 3PCLIOBTO 5 6 h h TOUCH CONTROL 1 4 1 4 2 3 5 2 3 7 7 8 G L F G L F E A D M C B E G L F G L F TIMER COOKING AREA WITH SECOND ZONE STANDARD COOKING AREA RU...

Страница 19: ...19 3PCLIOBTO 5 A ON OFF B C D E F G L M 0 1 9 9 1 9 50 L 1 99 1 10 2 3 5 4 4 5 3 6 7 8 2 9 1 2002 96 RAEE...

Страница 20: ...20 3PCLIOBTO 5...

Отзывы: