manualshive.com logo in svg
background image

PREMIER AD INSTALLATION MANUAL.  


Software:PANEL:R1107 & LOOP:R1062 


Approved Document No: GLT.MAN-105A


PAGE 23


Issue : 2.02         Authorised: GH      Date: 16/07/2007 

13. DISABLEMENT 
 

On the Premier AD, there are 2 disablement options. A whole zone of detectors can 
be disabled, or an individual point can be disabled. Both types of disablement can 
be used at the same time if required. 


13.1 ZONE DISABLEMENT 


To aid commissioning and assist routine maintenance checks, any of the zones or the sounder 
circuits can be disabled. 


When a zone (or sounder cct) is disabled, the panel will not respond to any fault or fire signals it 
receives from DETECTORS from that zone. Call points will remain operational.  
 
This might be used if the system requires routine maintenance, and the customer needs the system 
to continue running, but doesn’t want spurious false alarms.  


The panel will respond in the usual manner to any events in any non-disabled zones. 


The premier AD allows the 4 conventional sounder circuits to be disabled individually, and 
also allows the loop powered sounders to be disabled 
 

13.2 TO PROGRAMME ZONE (OR SOUNDERS) AS DISABLED 

 
Any number of zones (or the sounders) can be disabled, but it is good practice to only disable one 
zone at a time. 


1. 

Insert and turn control key to enabled position; 


2. 

Press DISABLE button and the screen will show: 
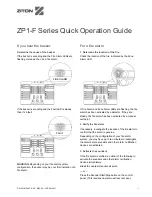
ZONE DISABLEMENT ZONE 1. The panel is now in  
SELECT DISABLEMENT MODE. 
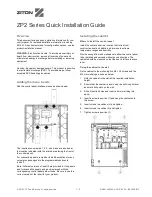
 

3. 

Press DISABLEMENT SELECT until the required zone or  
sounder circuit is DISPLAYED. Press DISABLEMENT  
CONFIRM button. The screen will now show that the zone is 
disabled, and the Zone or Sounder LED will  
come on steady, along with the GENERAL DISABLEMENT LED. 
This section is now disabled. 

(NOTE: Call points in this zone  

will still be active. To disable the call points as well, disable them individually as points 
– see 13.3) 


4. 

If more than one zone (or sounder) needs to be disabled, then press DISABLEMENT SELECT 
again until the required zone (or sounder) is selected. 


5. 

If the panel needs to be taken out of SELECT DISABLEMENT MODE (eg to silence a fault on 
another part of the system), Either press DISABLEMENT button, or turn the keyswitch off, then 
back on again. 


6. 

Once all the maintenance work has been done the zones need to be enabled again. If the 
panel is still in SELECT DISABLEMENT MODE, jump to paragraph 7, otherwise, turn the 
keyswitch to controls enabled, press DISABLE button. The panel is now in SELECT 
DISABLEMENT MODE 


7. 

Press the DISABLEMENT SELECT button until the disabled zone is displayed on the screen. 
Press DISABLEMENT CONFIRM button to de-select disablement. Scroll to any other disabled 
zone and enable in the same way. When all zones are enabled again, the GENERAL 
DISABLEMENT LED will turn off. Turn the keyswitch to off position to return the system to 
normal. (NOTE: This will also enable any points individually disabled in that zone) 


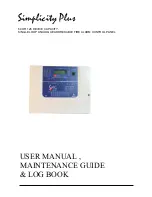
13.3 POINT DISABLEMENT 


The Premier AL panel can also disable individual devices (detector,  
call point, sounder or interface). To do this, enter CONFIGURATION  
MENU 2 and select EDIT DEVICE. Select the required device, them  
press DISABLE button. The Device label now flashed between the  
programmed label and Device Disabled. The general disablement LED  
will also be lit. This device is now disabled. To re-enable the device,  

  Zone Disablement 
      Zone  1


Enabled 

Single Devices:  0 

  Zone Disablement 

      Zone  3


Disabled 

Single Devices:  0 

Optical    


Analog:  25  Normal   
  Device Disabled 

Zone:01  Lp:1 Ad:016

Содержание NPAD 2

Страница 1: ...INSTALLATION MANUAL...

Страница 2: ...OCIATED SOUNDER BASES 15 8 4 SUPPORTED SOUNDER TYPES THEIR APPLICATIONS 15 9 AUXILIARY INPUTS OUTPUTS 16 9 1 AUXILIARY INPUT WIRING EXAMPLES 16 9 2 AUXILIARY OUTPUT WIRING VOLTAGE FREE CHANGEOVER CONT...

Страница 3: ...ith our instructions and the relevant National Standards Contact the Fire Officer concerned with the property at an early stage in case he has any special requirements If in doubt read BS 5839 Pt 1 20...

Страница 4: ...The screen is simply there to identify loop device fault locations and to help in setting up the panel 2 2 ADVANTAGES OF AN ADDRESSABLE FIRE ALARM SYSTEM The table below lists the main advantages of a...

Страница 5: ...elow Old CPU 3 large ICs New CPU 2 small surface mount ICs If the control panel has the OLD CPU card then some of the options in this manual will not be applicable Contact your supplier to obtain Vers...

Страница 6: ...op sounders address 113 to 126 which allows 14 devices Each option has advantages disadvantages Check the Sounder option chart on page 15 for information 3 If zonal sounder operation is required loop...

Страница 7: ...ire Detection and Alarm Systems for Buildings Code of Practice for System Design Installation and Servicing are Standard fire resisting cable to PH30 classification of EN 50200 Enhanced fire resisting...

Страница 8: ...oved by a push from inside the control panel box If a grommet is removed fill the hole with a brass cable gland If any knockout is removed but subsequently not used it should be covered up The 230Va c...

Страница 9: ...s connected the protective cover should be replaced BEFORE turning on the mains power This will minimise the chance of electric shock from the PCB MAKE SURE ANY SPARE ENTRY HOLES ARE COVERED WITH THE...

Страница 10: ...nder A maximum of 32 loop powered addressable sounders or sounder bases are permitted on the loop On the Premier AD Panel all Sounder Bases are always configured as common sounders Short circuit isola...

Страница 11: ...L2 L 1 I O U T L1IN R C RELAY OUTPUT Note that on the Fyreye Loop Isolator Base the loop wiring connects to the terminal block on the PCB and NOT to the Base Spring Screws The terminals are marked in...

Страница 12: ...Base 80 090 FE IB Fyreye Addressable Loop Isolator Base 80 100 FEA SB Fyreye Addressable Sounder Base 80 101 FEA ISB Fyreye Addressable Isolator Sounder Base 43 305 ZT CP2 AD Zeta Addressable EN54 Cal...

Страница 13: ...at during an alarm condition maximum current draw the voltage at all detectors must be at least 17 Volts with at least 5V of superimposed data signal The exact calculation equations are beyond the sco...

Страница 14: ...N 3 OFF 2 ON 1 OFF As an alternative to using this chart use the table on the following page SW 4 3 2 1 OOOO OOO1 OO1O OO11 O1OO O1O1 O11O O111 1OOO 1OO1 1O1O 1O11 11OO 11O1 111O 1111 LOOP 1 LOOP 2 SW...

Страница 15: ...off off on on on 46 on off off off on off on 78 on off off off on on off 110 on off off off on off off 15 off off off off on on on 47 off off off off on off on 79 off off off off on on off 111 off of...

Страница 16: ...on any alarm Note that the Premier AD has a preset time out of 3 minutes after which ALL loop sounders will start even one from a different zone 8 3 ASSOCIATED SOUNDER BASES Associated sounder bases...

Страница 17: ...wiring options CLASS CHANGE 2nd Fire Alarm AUX FIRE RELAY CM NO CLASS CHANGE The termination for the above inputs must be as indicated on the main PCB See page 15 The Earthing of the cable screens sho...

Страница 18: ...wer supplies The panel supports up to 4 repeaters Connections Premier AD Termination PCB AD Repeater SERIAL REPEATER COM SERIAL REPEATER COM AUX SUP 28V AUX SUP 0V 11 2 SERIAL PRINTER CONNECTION The P...

Страница 19: ...o configure the loops The panel displays configuration in progress Please wait It will return to Configuration Menu 2 when completed 7 Press PREVIOUS button followed by button 1 to view the loop conte...

Страница 20: ...s shown below Note if every detector has a sounder base or if most of the detectors have a sounder base this speed up operation will have little or no effect 1 Press enter NEXT followed by 369 to ente...

Страница 21: ...rm Fault Description If the device is in a fault condition a description of the fault will appear here It will show one of the following messages FAULT MEANING Changed The device had been changed with...

Страница 22: ...vent number the date the time the type of event in this case a DEVICE ALARM and the Zone loop and address if appropriate Next Previous buttons will cycle through the list Faults Selecting this option...

Страница 23: ...ximum value of 524287 and will return to 0 after this 12 8 CHECKING SOFTWARE VERSION The Premier AD now has the ability to view the software version from the screen From Configuration menu 2 select co...

Страница 24: ...y along with the GENERAL DISABLEMENT LED This section is now disabled NOTE Call points in this zone will still be active To disable the call points as well disable them individually as points see 13 3...

Страница 25: ...re one or more disabled points in this zone the screen will show TIP a quick way to enable several disabled points is to disable the zone then re enable it To view from the Device Status screen press...

Страница 26: ...til all smoke spray has cleared from the detector 8 Once testing of that zone is completed press TEST FUNCTION SELECT button to move to another Zone or turn the control key switch to off position to e...

Страница 27: ...ssing device and check if it has its LED on Detector or check the dip switch setting 4 If this does not cure all double addresses go to the known location and temporarily remove the device The panel w...

Страница 28: ...hing is shorting to earth usually through the cable screen Disconnect the earth screens one at a time to determine the problem line Note connecting other equipment eg an oscilloscope to the panel can...

Страница 29: ...10 LOOP WIRING FAULTS A loop fault can be caused by a break or short circuit in the Loop wiring Open the panel and look for the 4 green LEDs on the termination PCB Under normal conditions these should...

Страница 30: ...Input Output Unit ZIOU 2 2 10 16 32 Zeta Sounder Control Module ZSCC 2 2 10 16 32 Zone Monitor Unit ZT ZM 6 8 30 22 10 20 Fyreye Addressable Beam Detector 5 50m ZTA FR50 t b c t b c t b c t b c t b c...

Страница 31: ...al Example A system comprises of 160 Addressable Optical detectors 64 Sounder bases and the required standby is 24 hours It will need to operate in alarm for hour Calculate the battery size required T...

Страница 32: ...t to loop 2 side B 8 SND 4 Connect to sounder circuit 4 sirens bells 9 FIRE RELAY NO CM NC Activates on fire including test mode 10 FAULT RELAY NO CM NC Normally powered ie NO is closed with no fault...

Страница 33: ...AL 18 32 V SYSTEM VOLTAGE RIPPLE 2V PK PK MAX CHARGER SIZE UP TO 7AH in 24 Hours ZONE VOLTAGE 24V DC NOMINAL 9 volt data SOUNDER ALARM OUTPUTS 4 x 250mA 24V DC Nominal AUXILIARY FAULT OUTPUT 1 x RELAY...

Отзывы: