Faraday LW401, Operation, Installation, And Maintenance Manual
The Christie LW401 Setup Manual is the go-to resource for users to effortlessly install and configure their LW401 projector. With step-by-step instructions, this comprehensive manual ensures a smooth and hassle-free setup process. Download this invaluable resource for free from our website and get started right away.
Share
Download


Reviews:
No comments
Related manuals for LW401

EBL512 G3 5000
Brand: Panasonic Pages: 134

BSR-1000
Brand: olympia electronics Pages: 71
WES3
Brand: Ramtech Pages: 64

Premier M plus
Brand: Zeta Pages: 16
Premier M plus
Brand: Zeta Pages: 22
INFINITY ID2
Brand: Zeta Alarm Systems Pages: 45
zp1-f Series
Brand: Ziton Pages: 2
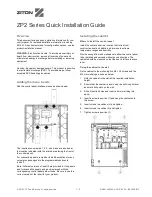
ZP2 Series
Brand: Ziton Pages: 2
NPAD 2
Brand: Zeta Pages: 33
SP-64
Brand: Zeta Pages: 23

JUNIOR V3
Brand: Global Fire Equipment Pages: 21

UniNet 2000 AFP-300 NION
Brand: Notifier Pages: 32
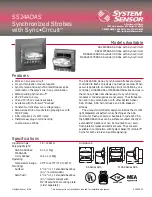
SS24ADAS Series
Brand: System Sensor Pages: 4

FD 7120
Brand: UniPOS Pages: 2

LCD-80FC
Brand: Fire-Lite Pages: 32

MS-700ID SERIES
Brand: Mircom Pages: 2
80-210
Brand: Zeta Alarm Systems Pages: 3
EN54
Brand: Zircon Pages: 41


