Zero 88 FLX Скачать руководство пользователя страница 5


Zero 88 Series


Usk House, Lakeside, Llantarnam Park,  
Cwmbran, NP44 3HD. UK 
Tel: +44 (0)1633 838088   Fax: +44 (0)1633 867880 
Email: [email protected]   Web: www.zero88.com


Lighting Controls 

– 

FLX lighting console


Zero 88 FLX Quick Start Guide v1.2 

– Stock Code: 9850-000492-00 – Page 5 of 20 


Fixtures 

Every device controlled by a FLX lighting console is known 
as a “Fixture”, and is assigned a “Channel Number”. 
Fixtures can be a simple generic dimmer channel, or a 
more complex DMX device such as a colour scroller, LED 
fixture, moving head, strobe light, smoke machine or media 
server. Any item controllable via a DMX signal can be 
assigned as a fixture on the console. Fixtures can be 
“patched” to any channel (1- 512) on any universes (1- 4).  

 
DMX patch 

The DMX Patch (or “patching”) is a required process where 
the FLX lighting console is told which fixtures are being 
used, which DMX channels each fixture uses (referred to 
as the 

“DMX address”) and what Channel Number each 

fixture should be assigned. 

 
Groups 

Fixtures that are used together regularly (such as a colour 
wash, or all the moving lights on a specific truss) can be 
stored together into a “group”. The desk provides 240 
groups. FLX can automatically create groups if required.  

 
Parameters 

Dimmer channels are simple fixtures with 

one

 parameter - 

the “intensity”. More complex DMX devices (such as 
moving lights, LEDs etc) are fixtures with 

multiple


parameters (for example “pan”, “tilt”, “red”, “green”, “blue”, 
“strobe” or “focus”).  

 
Attributes 

Parameters are grouped together into four attributes for 
easy access and control. These attributes are called  
“Colour”, “Beam”, “Shape” and “Position”. A fifth attribute, 
called “Effect”, manipulates parameters to create effects 
such as “Circle”, “Ballyhoo” and “Rainbow”. These five 
attribute buttons can be found along the right hand side of 
the internal touchscreen. 


Macros 

Macros are used for fixture 

settings such as “Lamp On” or 

“Reset”. Which Macros are available depend on the 
fixtures patched.


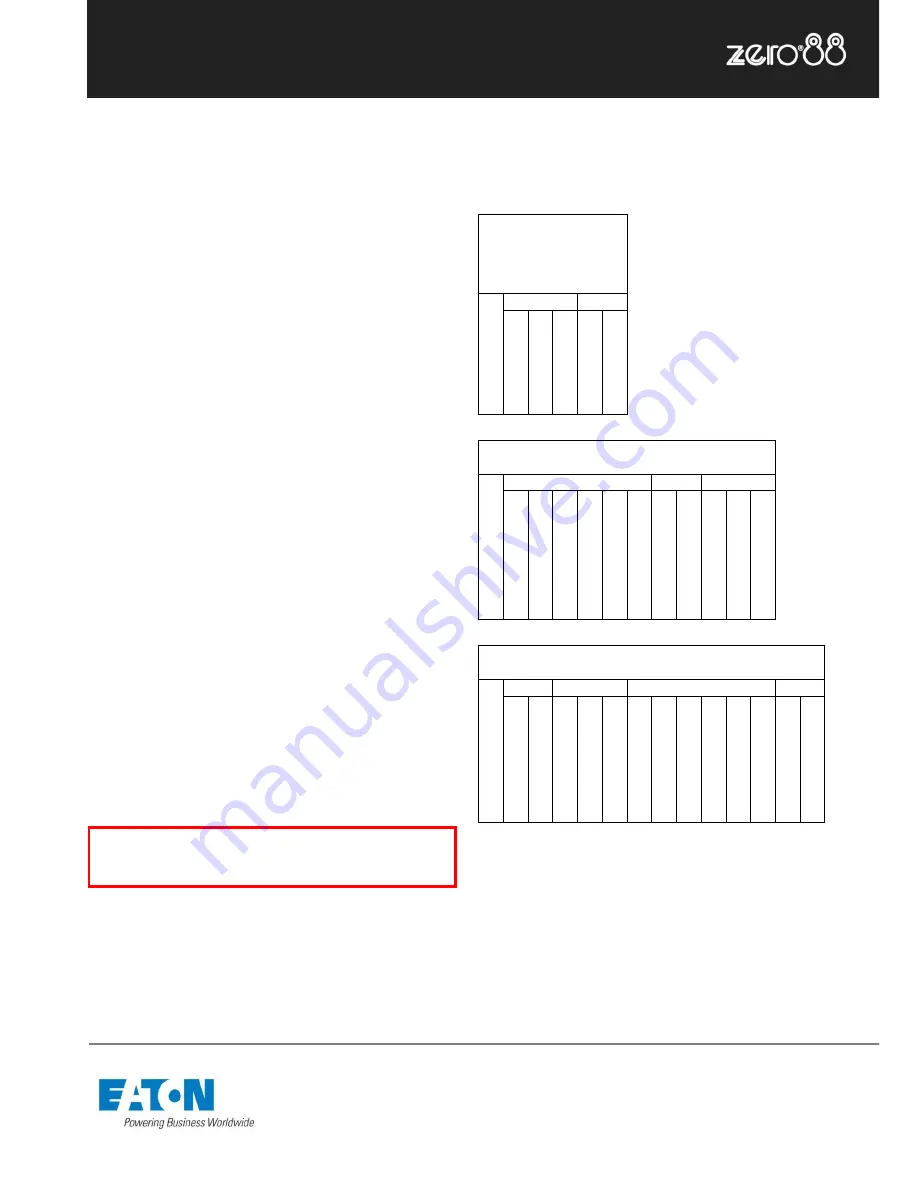
The below examples show how a fixture’s parameters 
would be split up into the four attributes. 
 

ETC Source 4 

LED Lustr+ 


DMX Address 100, 

Channel Number 50


Fixture 


Patch Info


Di

m

me

Colour 

Beam 


Attributes 

Red


G

ree

n


B

lu

e


S

tr

ob

e


F

an


Parameters 


Robe Robin 100 LEDBeam 

DMX Address 106, Channel Number 51


Fixture 


Patch Info


Di

m

me

Colour 

Beam 

Position 


Attributes 

Red


G

ree

n


B

lu

e


W

h

ite


CT

C


Col

o

ur 1


F

un

c

ti

o

n


S

hu

tter


P

an


T

ilt


P

an

 / Ti

lt 

S

pe

ed


Parameters 


Clay Paky Alpha Spot 300 

DMX Address 118, Channel Number 52


Di

m

me

Colour 

Shape 

Beam 

Position 

Col

o

ur W

he

e

l 1


Col

o

ur W

he

e

l 2


G

ob

W

he

el

 1


G

ob

W

he

el

 2


G

ob

o R

ota

ti

on


P

ri

s

m


P

ri

s

m R

ota

ti

o

n


F

oc

us


S

hu

tter


Lamp


Res

et


P

an


T

ilt


Palettes 

Palettes can quickly recall parameter settings that are used 
regularly, such as a range of colours for LED fixtures, or a 
range of positions for moving lights.  240 palettes are 
available for each of the five attributes (Colour, Beam, 
Shape, Position and Effects). FLX can automatically create 
palettes if required.


The “Shape” attribute is coming soon in a free software 

update. Until then, “Shape” and “Beam” will be 

combined together under “Beam”.


Содержание FLX

Страница 1: ...867880 Email enquiries zero88 com Web www zero88 com Lighting Controls FLX lighting console Zero 88 FLX Quick Start Guide v1 2 Stock Code 9850 000492 00 Page 1 of 20 FLX Quick Start Guide Version 1 2...

Страница 2: ...2 Stock Code 9850 000492 00 Page 2 of 20 Your new FLX console runs ZerOS software ZerOS is regularly updated to bring new features and to keep your console stable and secure Software updates are free...

Страница 3: ...wing areas each of which are described on the next pages along with some key terminology Quick start guide This Quick Start Guide is designed to get you up and running with the console but is not a su...

Страница 4: ...nd Effects or accessing advanced functionality such as RemDim or Highlight Function keys The five function keys to the left of the touchscreen either perform functions themselves like Home and View or...

Страница 5: ...strobe or focus Attributes Parameters are grouped together into four attributes for easy access and control These attributes are called Colour Beam Shape and Position A fifth attribute called Effect...

Страница 6: ...View together The Programming desktop fig 1 shows the Output Window in the top half of the screen and either the Playback window or the Playbacks Summary window in the bottom half Which one is being...

Страница 7: ...n will allow you to select the fixture s mode It is important that the mode set here matches the mode set on the fixture if in doubt consult the fixture s operating manual for details Once the mode ha...

Страница 8: ...an orange box will be drawn around the channel number in the Output Window You can select multiple channels on the faders at the same time by pressing and holding the first button and then tapping th...

Страница 9: ...ter selecting a fixture s press the Home key This will send the fixture s to its home values Figure 6 The colour window and parameters Choosing an attribute Each fixture has its own set of parameters...

Страница 10: ...columns show the playback s name and then information about the currently active cue within each playback Figure 8 Playback Summary window Recording a cue To record a cue there are four possible meth...

Страница 11: ...you lower a fader the playback is automatically released but you can also manually do this by holding Clear and pressing the Go button of the playback Figure 9 Playback window Updating cues In order...

Страница 12: ...olour Palettes are displayed on the internal monitor just tap a palette after pressing the Name button to name that palette Using palettes When using palettes only the selected fixtures will move to t...

Страница 13: ...oups can be named in the same way as palettes using commands or by pressing Name and touching the group Using groups to control intensities All the commands explained within the controlling intensitie...

Страница 14: ...gle file on your storage device This file can then be reloaded at a later date to return the console to the same state as it was in when you saved it Saved files can be loaded onto any lighting consol...

Страница 15: ...nam Park Cwmbran NP44 3HD UK Tel 44 0 1633 838088 Fax 44 0 1633 867880 Email enquiries zero88 com Web www zero88 com Lighting Controls FLX lighting console Zero 88 FLX Quick Start Guide v1 2 Stock Cod...

Страница 16: ...nam Park Cwmbran NP44 3HD UK Tel 44 0 1633 838088 Fax 44 0 1633 867880 Email enquiries zero88 com Web www zero88 com Lighting Controls FLX lighting console Zero 88 FLX Quick Start Guide v1 2 Stock Cod...

Страница 17: ...If you forget the passcode you ve set please send the serial number of your console to support zero88 com Front panel not responding Is the console fully booted check internal monitor for any errors w...

Страница 18: ...heir consoles the cardboard box which FLX is supplied in is intended only for one or two journeys and should not be relied upon to keep the console safe for prolonged use Operating environments Always...

Страница 19: ...Console is fitted with a Neutrik etherCON RJ45 Ethernet port and is capable of supporting various Ethernet protocols Kensington Lock A Kensington style lock slot is provided on FLX for securing the c...

Страница 20: ...0mm D Weight 7 5 kg Operating temperature range 5 to 40 C Humidity 5 to 95 non condensing Notes Cooper Controls Ltd reserves the right to make changes to the equipment described in this manual without...

Отзывы: