background image

Содержание NOISETTE

Страница 1: ......

Страница 2: ...AUTHOR ZEPPELIN DESIGN LABS TAKES NO RESPONSIBILITY FOR ANY DAMAGE OR HARM THAT MAY COME TO ANYONE OR ANYTHING THROUGH USING OR BUILDING THEIR PRODUCTS 102023 INTRODUCTION 3 HOW IT WORKS 4 WHAT YOU WI...

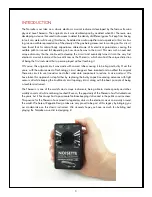
Страница 3: ...ouching it Of course this original circuit was made with vacuum tubes causing it to be big and bulky Over the years with the advancement of technology circuit designers have tweaked and modified the o...

Страница 4: ...es light detection sensors known as LDRs light dependent resistors to determine the pitch and volume of the audio LDRs have a very large resistance across their pins in the dark but the resistance dro...

Страница 5: ...nal cutters 7 Clamp or vise to hold the printed circuit board while soldering optional but handy 8 Solder sucker and or solder braid optional but very handy if you have to remove or repair any compone...

Страница 6: ...es verifying that nothing is missing this will acquaint you with the parts and their names If ANYTHING is missing first double check we double checked before sealing the bag at our lab If it s still m...

Страница 7: ...or 16V 220uF C1 C2 C3 3 HE 20 01 Single Row Header 3 PIN 1 PT 30 30 Trim Potentiometer 100K 4 PT 10 10 9mm Potentiometer 100K 2 SN 30 10 LDR Sensor 3 CB 90 09 Heat Shrink Tubing 2mm x 42mm 1 CB 90 15...

Страница 8: ...part labels on it The other side of the board is called the solder side which as the name implies is the side on which the legs of the components are soldered Proper technique for installing and solde...

Страница 9: ...he board Some of the surface mounted components are sensitive to static electricity meaning they can easily get damaged if they are exposed to moderately high voltages Unfortunately or fortunately hum...

Страница 10: ...on the case indicates the negative lead of the cap Notice that one of the leads is longer than the other The long lead on the capacitor is the positive lead 1 STRIPE NEGATIVE SHORT LEAD ROUND PAD NO S...

Страница 11: ...board as this is done Once one lead is held in place with the solder we can put the circuit board in our clamp and solder the rest of the leads 8 Then we always re solder the tacked in lead to ensure...

Страница 12: ...doff is flush with the board and is standing straight up Bend the leads out on the bottom as you did with the caps 13 flip the board over and solder and clip the leads 14 15 10 11 12 13 14 15 4 Power...

Страница 13: ...er it Tack one pin of the jack into place on the board while you hold it in 19 Once it s tacked in place finish soldering it to the board 20 19 20 6 Audio Jack Install the audio jack at J1 Once again...

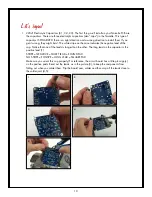
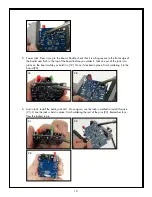
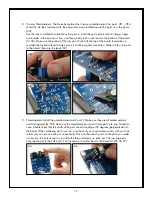
Страница 14: ...circuit board which allows it to reside inside the LDR shield We will use a piece of 21mm tall heat shrink tubing to space the LDR the proper distance above the PCB Cut two pieces of 2mm heat shrink...

Страница 15: ...nection Solder all four trim pots to the board then snip the leads 33 30 31 32 33 9 Potentiometers Install the potentiometers aka pots Make sure they are all seated securely and flush against the PCB...

Страница 16: ...ll now use this dotted LDR in building the optocoupler We will first construct the optocoupler and then install it on the board a Insert the green 5mm LED into the end of a piece of heat shrink tubing...

Страница 17: ...LED leads 39 40 Once it has stopped shrinking but while it is still very hot use your pliers to pinch the shrunken tubing closed around the leads to help seal the opening 41 42 40 41 42 c Slide the L...

Страница 18: ...on remember LEDs are polarized If you put the opto in backwards the volume sensor will not have any effect Note the PCB graphics indicate where the LDR and LED are intended to go On your optocoupler t...

Страница 19: ...ur leads and snip them 52 51 52 11 Speaker Place the speaker into its holes 53 The pin marked with a on the bottom of the speaker goes into the hole marked Make sure it s sitting flush to the top of t...

Страница 20: ...ds 57 56 57 Gently twist the tiny strands of copper wire together Tin the ends of the wires with your soldering iron 58 which means to add a tiny bit of solder to the wire to help hold the strands of...

Страница 21: ...standoffs to the base of the case 67 Do not put any glue under the standoffs just apply glue to the junction of where each standoff is touching the base Don t use too much glue and make sure you DO NO...

Страница 22: ...volt battery or a 9 volt wall adapter available from Zeppelin Design Labs 68 Make sure you tuck the battery snap wires down between the edge of the case and the trim pots to keep them out of the way...

Страница 23: ...r the light Keep the LDR shield and the probes in the same place but don t cover the LDR with anything Adjust the light trim pot until the voltage on CV1 reads just under 5 volts or so Counter clockwi...

Страница 24: ...lts So the lowest voltage CV2 needs to be set to in the darkest condition is just below 1 8 volts The LED will continue getting brighter as the voltage is increased so the maximum voltage CV2 should b...

Страница 25: ...le on and stain the circuit board and case leaving a very hard to remove white residue on the parts In fact it is a good idea to leave the open Noisette case in an area with lots of air circulation li...

Страница 26: ...Y LOW BEFORE USING THIS JACK LOUD AUDIO SIGNALS MAY CAUSE HEARING DAMAGE Please make sure the HEADPHONE SPEAKER HEADER is in the headphone position otherwise hearing or headphone damage may occur If a...

Страница 27: ...the end of the cover snaps up Then place the screwdriver on the edge of the case between the lid and the base and gently twist until one side of the top lifts You ll need to remove the lid to access t...

Страница 28: ...ter these parameters The more light the sensors detect will cause the theremin to produce a higher frequency and louder volume output The less light the sensors detect will cause the theremin to produ...

Страница 29: ...29 SCHEMATIC...

Страница 30: ......

Отзывы: