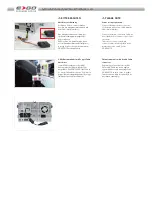
Montieren Sie jetzt die GPS
Antenne an geeigneter Stelle
(freie Sicht nach oben) und
ziehen Sie das Antennenkabel in
den Schacht. Montieren sie das
externe Bluetooth Mikrofon, falls
erwünscht. Die beste Position ist
hinter dem Rückspiegel, bzw. hinter
dem Steuerrad.
Install the GPS antenna in a
suitable location underneath the
front window (unobstructed view
up to the sky). Proceed with routing
the antenna cable to the mounting
slot. Mount the external Bluetooth
microphone, if so desired. Ideal
places are behind the rear mirror or
behind the steering wheel.
6
7
7
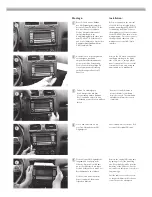
Stecken Sie den Quadlockstecker
vom vorbereiteten ZE-NC2011D Gerät
an das Gegenstück im Fahrzeug an
und schliessen Sie die Verriegelung.
Verbinden Sie die den Fakrastecker
vom GPS Antennenkabel mit dem
Gerät und auch das Kabel vom
externen Mikro, wenn dieses
montiert wurde.
Bevor das ZE-NC2011D in den
Schacht geschoben wird, stecken sie
den Doppelfakra Antennenstecker
vom Fahrzeug am Gerät an.
Insert the Quadlock plug of the
ZE-NC2011D into the receptor of
the vehicle and lock it. Connect
the Fakra plug of the GPS antenna
cable on the backside of the
device - and do the same with the
plug of the external microphone, if
the external mic has been fitted.
Before you can insert the
ZE-NC2011D into the slot, you must
connect the FM antenna dual Fakra
plug to the respective connector of
the device.
9
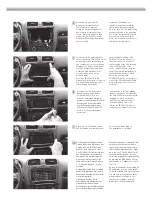
Drücken Sie die Zierblende wieder
auf. Der Einbau ist hiermit beendet.
Press the trim frame back on.
The installation is completed.
6
8
Verstauen Sie die Kabel in den
Randbereichen und schieben
Sie das ZE-NC2011D in den
Schacht.
Vermeiden Sie zuviel
mechanischen Druck auf die Front.
Es könnten Stecker abbrechen
oder Kabel gequetscht werden.
Schrauben Sie das ZE-NC2011D
mit den vier Originalschrauben
wieder fest.
Lay the wires to the side, making
room for the device. Carefully slide
the ZE-NC2011D into the bay. Avoid
applying too much mechanical
pressure to prevent shearing of
wires and broken connectors.
Fix the the ZE-NC2011D in place,
using the four original Torx screws.
8
9
bl
bl
Nach beendetem Einbau starten
Sie den Motor und fahren aus der
Garage ins Freie (GPS Antenne
braucht „freie Sicht nach oben“).
Das ZE-NC2011D schaltet sich mit
der Zündung ein – wechseln Sie
nun manuell in den Navigations-
modus durch drücken der NAV
taste und lassen Sie das Gerät ca.
3 - 5 Minuten lang den „Sat Fix“
erstellen.
Solange das Gerät noch Satelliten
sucht, wird dies über ein Icon mit
kreisenden Punkten auf dem Bild-
schirm dargestellt.
Sie können nun das Gerät
ausschalten, ein Navigationsziel
eingeben oder aber weitere
Einstellungen im Setup Menü nach
persönlichem Wunsch vornehmen.
With the installation completed, start
the engine and drive your vehicle
out of the garage into open terrain
(GPS antenna must have free “sight
up to the sky”). The ZE-NC2011 will
turn on with the ignition – please
select the navigation mode manually
by pressing the NAV button. Device
now needs 3 to 5 minutes to create
“Sat Fix”.
As long as the device is searching for
GPS satellites, you can see a small
icon with rotating dots on the screen.
You can turn your device off, enter
a destination or continue to set
functions according to personal
preferences in the setup menu.
Содержание ZE-NC2011D
Страница 1: ...MOUNTING INSTRUCTIONS VW ZE NC2011D...


