


you can heat the tub and that will help swell the wood
tighter.
Remember the swelling process continues
for about two
weeks
. Give it time.
This is a good time to check all your plumbing and
heating connections for leaks. Tighten or repair as
needed. Double check that the drain plug is in place and
not leaking.
After two weeks or more, if
you still have slow dripping
leaks
(which are unlikely), included with your tub is a
bag of fine cedar sawdust (aka “cedar flour” for its
flour-like consistency). It can be used to seal the tub:
Important: remove the filter from the filter cartridge
during this procedure, otherwise it will clog.
Add a cup (smaller tubs) or two (bigger tubs) of fine
sawdust to the water or to the floor of an empty tub before
filling. Then wait two days with the tub heated before
putting the filter back in. The wood flour will be naturally
drawn to places where the water is seeping out and will
help to stop or slow stubborn leaks. The sawdust is
harmless and the excess will be flushed out the first time
you drain and rinse the tub (don’t do this for at least a
week after adding). Note: It may take more than one
treatment to slow or fix the leak, but this method works in
almost every case.
If you still have any leaks after these processes and time
periods, something is wrong. Contact us for help. In order
to best serve you, please email us a video showing us the
full set up of your tub and system and showing us your
leak location(s) and pace(s). Another great option is to
schedule a video call appointment with us to show us in
real-time.
Tea-colored water:
The natural oils and tannins in woods
(especially red cedar) will cause the water to turn
tea-colored when the tub is new. This is normal and
harmless, even health beneficial, in fact. Also, the aroma
of cedar is due to these oils. Change the water frequently
(weekly or biweekly) at first to help clarify the water. This
effect will diminish slowly with time. Once this is
complete it will be crystal clear. It will likely take a few
months. Another option to assist in this is to use a clarifier
product such as Leisure Time Bright and Clear®.
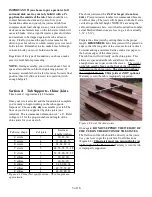
Section 12:
Water Sanitation Instructions
It is important to keep the water clean. Failure to do so
can cause growth of bacteria and possible skin irritation.
Some people prefer not to use chemicals and simply
change the water frequently - cleaning the tub between
heavy uses.
As you care for your hot tub, keep in mind that a hot tub
is not merely a small pool. Due to high water temperature
and small amount of water,
4 people in a tub is
equivalent to 300 people in a backyard pool.
For this
reason, it is important to properly sanitize your tub.
Keeping the water clean and safe involves three things –
your filter, the ozone system, and the included chemicals.
1. Fill the tub with fresh water.
2.
Important!
Test water to get pH in the 7.2 to 7.6
range (7.4 - 7.5 is ideal.)
3. Ozone system: If your tub has an ozone system, adjust
it according to the specific instructions included with your
heating system. Ozone is added to the water only when
the water pump is running.
4. Shock the tub water twice per week with two
tablespoons of fast dissolving granulated chlorine
(typically called “Spa 56”) supplied with your tub. Do
NOT USE a different type of chlorine, such as a
non-dissolving continuous use type – the supplied product
is formulated for wooden tubs. Other types of chlorine
can do damage.
Other Important Water Sanitation and Safety
Information:
●
Never heat your tub water above 104 degrees -
higher temperatures can cause health problems.
●
Always shower before using the tub.
●
Always read the label instructions prior to using a
product and use only as directed.
●
Never add chemicals when people are in the tub.
The best time is right after using the tub prior to a
long duration of un-use.
●
Store chemicals in a cool dry location out of
direct sunlight.
13 of 16


