background image

4

HDS4.1 Component Video Switch 

HDS4.1 Component Video Switch

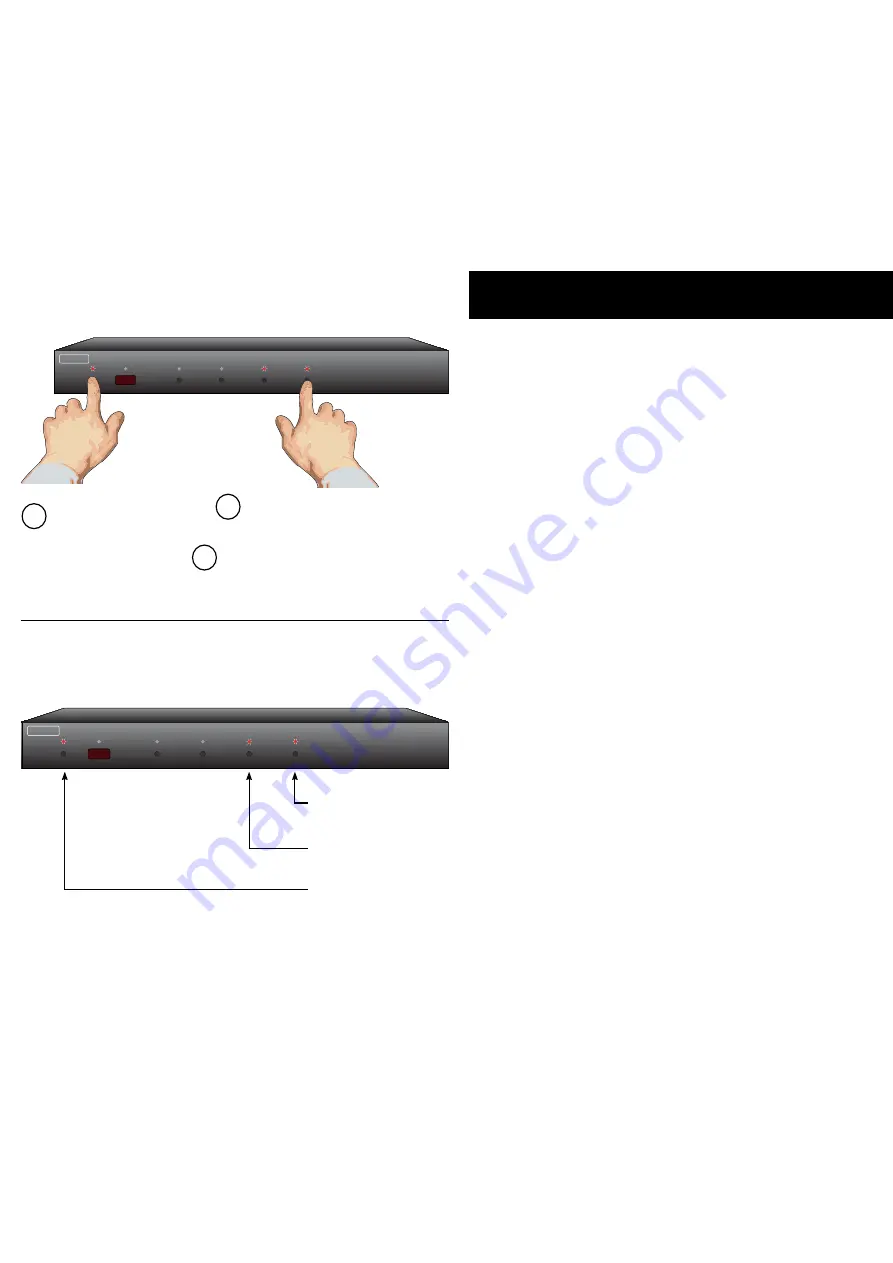
Step 1: Enter the Enable / Disable Control State

1                        2                        3                        4

ZEKTOR

Start by pressing and 
holding the Power 
button...

1

2

...while continuing to hold the Power 
button, press and hold the ‘4’ button.

After about 4 seconds, the standby LED 
will flash quickly, and the display will indi-
cate the current enable / disable statuses.

3

Disabling Front Panel or Remote

If you are not planning on using a remote control with your HDS4., 
you might want to disable its remote control function.

Or if you have a household with young curious fingers that likes 
playing with buttons, you also have the capability of disabling the 
front panel switches and only operating the HDS4. with a remote.

To enable/disable the front panel switches or remote capabilities...

Step 1: Enter the Enable / Disable control state

First press and hold the Power button
While continuing to hold the Power Button, press and hold 

the ‘4’ button.
After holding both buttons for about ‘4’ seconds, the stand-

by LED will star t flashing quickly indicating you are now 

able to enable / disable front panel buttons and IR control 

functions.
The front panel selection LEDs now indicate the state of the 

front panel and IR control settings:
If ‘’ is lit, then the Front Panel buttons are ENABLED.
If ‘4’ is lit, then the IR remote functions are ENABLED.

Step 2: Enable or Disable Front Panel and / or IR control

Use the ‘’ button to ENABLE / DISABLE the front panel 

buttons.
Use the ‘4’ button to ENABLE / DISABLE the IR remote con-

trol functions.
When finished, press the ‘Power ’ button to save new set-

tings and return to normal operations.

Note 1:  The HDS4.1 will not allow you to disable both the front 

panel and IR controls at the same time.

Note 2:  Disabling the front panel buttons does not disable the 

ability to enter the Setup Modes. Even with the front 
panel disabled you can per form the above steps, allow-
ing you to once again enable the front panel buttons.

1.
2.

3.


Step 2: Enable or Disable Front Panel and / or IR Control Functions

1                        2                        3                        4

ZEKTOR

Enable / Disable
IR Control Functions

Enable / Disable
Front Panel Buttons

Exit Setup Mode

All manuals and user guides at all-guides.com

Содержание HDS4.1

Страница 1: ...e Theater Switches Digital Video Component Video Multichannel Audio Rev 2 02 22 2006 High Definition Component Video Switch 1 2 3 4 ZEKTOR HDS4 1 All manuals and user guides at all guides com a l l g...

Страница 2: ...the contents of the HDS4 1 box The following should be included HDS4 1 Power Supply Module This User s Manual If anything is missing please get in touch with us as soon as possible so that we can corr...

Страница 3: ...cal connection Only one of the two types of inputs can be active at any time The HDS4 1 will auto select between the two types of signals If a signal is supplied to both the Coax and Optical inputs th...

Страница 4: ...your HDS4 1 Using any remote to operate the HDS4 1 is a simple mat ter of pairing up the HDS4 1 with the remote The remote doesn t have to be a universal remote although it can be any remote from an...

Страница 5: ...now waiting for new IR codes to be sent from your remote control Step 3 Teach the HDS4 1 your new remote control codes On your remote control press the following buttons in the following order Power...

Страница 6: ...lit then front panel lights are always off If 2 is lit then front panel lights are always dim If 3 is lit then front panel lights are always bright If 4 is lit then front panel lights auto fade from b...

Страница 7: ...e HDS4 1 is placed into the setup mode by pressing and holding the Power button for about 4 seconds Step 2 Select the Front Panel Intensity option Press the 4 button to select Front Panel Intensity op...

Страница 8: ...HDS4 1 To change the power on defaults Step 1 Setup the HDS4 1 to your preferred power on state Use the front panel buttons to setup the HDS4 1 to the op erating settings you d like at initial power...

Страница 9: ...or about 4 seconds the stand by LED will start flashing quickly indicating you are now able to enable disable front panel buttons and IR control functions The front panel selection LEDs now indicate t...

Страница 10: ...estored to their factory programmed values 3 Resetting to Factory Defaults If for whatever reason you d like to reset your HDS4 1 back to its factory condition this is easily done Step 1 Reset All Par...

Страница 11: ...ements Optional International Power Supply Dimensions Warranty 0Hz 70MHz All channels Greater than 200MHz All channels 480i 1080p All HDTV modes D C D C 4 Coax 4 Optical Auto conversion between format...

Страница 12: ...d service for two years from the origi nal date of purchase ZEKTOR at its option shall repair or replace the defective unit covered by this warranty In order to keep this warranty in effect the produc...

Страница 13: ...Z E K T O R Z E K T O R 12675 Danielson Ct Suite 401 Poway CA 92064 858 748 8250 www zektor com All manuals and user guides at all guides com...

Отзывы: