


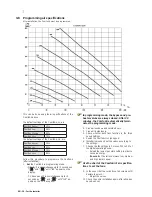


3
For the installer - 21 - EN
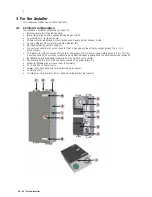
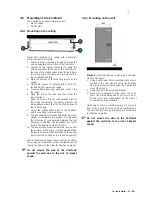
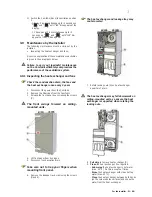
3.6 Mounting of the ComfoAir
The ComfoAir can be mounted two ways:
• On the ceiling;
• On the wall.
3.6.1 Mounting on the ceiling
Mount the ComfoAir to a ceiling with a minimum
mass of at least 200 kg/m2.
1. Fasten the four mounting brackets (A) (using the
screws supplied) to the sides of the ComfoAir.
2. Fasten the two spacer brackets (C) (using the
screws supplied) to the top of the ComfoAir on
the side of the condensation drain (B). As long as
the ceiling is level, this ensures a run-off of 2% to
the condensation drain.
3. Mark the position of the mounting points on the
ceiling.
4. Mount four pieces of studding (M8 or M10) ex-
tending 290 cm below the ceiling.
5. Screw suitable (securing) rings and nuts on the
four rods.
6. Hang the unit on the rods and then screw the
locknuts tight.
Allow a 2% run-off to the condensation drain. If
the ceiling is horizontal, the spacer brackets will
automatically ensure that the ComfoAir hangs at
the correct angle.
7. Mount the condensation drain to the ComfoAir
with a coupling or removable pipe.
9. The air exhaust duct must be fi tted with a double-
walled or insulated roof passage. This prevents
the formation of condensation between the roof
boarding. In addition, the air exhaust duct must
drain in the direction of the ComfoAir.
10. To prevent unnecessary temperature loss in either
the summer or the winter, we recommend fi tting
thermal and damp-proof insulation to the supply
ducts from the ComfoAir up to the supply valves.
Ensure that there is enough room under the ComfoAir
for carrying out maintenance. The ComfoAir does not
require any space at the sides for effective operation.
Do not mount the side of the ComfoAir
against the wall due to the risk of impact
sound.
3.6.2 Mounting on the wall
Mount the ComfoAir against a wall with a minimum
mass of 200 kg/m
2
.
1. Using a spirit level, fi x the mounting bracket hori-
zontally to the wall. Use M8 anchor bolts. Make
sure there is enough space under the ComfoAir to
mount the siphon.
2. Hang the unit in the mounting bracket.
3. Mount the condensation drain under the Com-
foAir. The stated dimension of 235 mm is an in-
dication only, and is dependent on the type of
condensation drain selected.
Make sure to leave a minimum space of 1 metre in
front of the ComfoAir for carrying out maintenance.
The ComfoAir does not require any space at the sides
for effective operation.
Do not mount the side of the ComfoAir
against the wall due to the risk of impact
sound.
B
A
C
Содержание ComfoAir 200
Страница 1: ...ComfoAir 200 Manual...
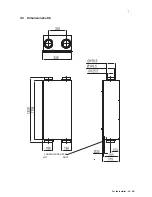
Страница 23: ...3 For the installer 19 EN 3 3 Dimension sketch LEFT RIGHT CONDENSATION DRAIN...
Страница 51: ......