background image

7

Wiring

- Be sure the operation mode is OFF 
     and Fan selection is Fan Auto
- Wire the proper cables at the terminal 
     block according to the circuit diagram
- Afterward, push all cables back into 
     the wall
- Do not use metal conduit or of cable 
     provided with a metal sheath
- Recommends adding fuse or 
     protective device in the line circuit 

Important!

If you will be powering the ZTS-110 with 24Vac:
Connect the "24Vac Common" (typically the black wire/terminal) and "24Vac 
Power" (typically the Red wire/terminal) from the HVAC system to the ZTS-110 
HVAC System terminal block "C" and "RH" or "RC" terminals (see the following 
explanation, these may be jumpered together).

Common or Split Transformer Systems:
Most HVAC systems have a common heating and cooling transformer. You must 
insert a jumper wire to tie the RH and RC inputs together for this configuration. If 
you have a system with separate heating and cooling transformers, do not insert a 
jumper wire between RC and RH.

When wiring split systems, wire the heating systems "24Vac Power" (red wire) to 
the ZTS-110 "RH" terminal, and wire the cooling systems "24Vac Power" to the 
ZTS-110 "RC" terminal. Also wire the cooling systems "24Vac Common" to the 
ZTS-110 "C" terminals.

Note: Do not split RC/RH for Heat Pump systems!

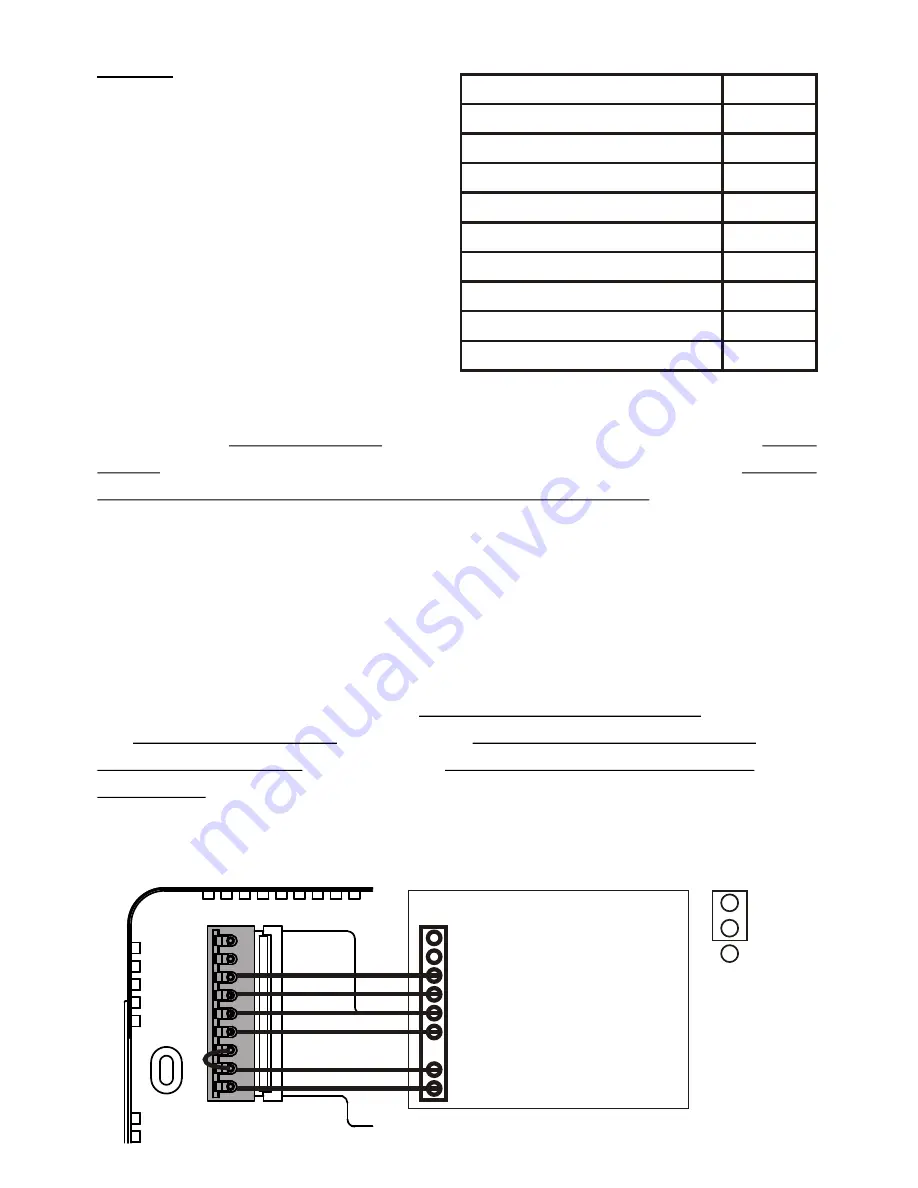
Figure 4. Non-heat pump (Standard Gas or Electric) HVAC system wiring

Terminals

Cool changeover (heat pump)

Heat changeover (heat pump)

2nd Stage heater

1st Stage heater

Fan

Compressor


24Vac Common

24Vac Power for Cooling

24Vac Power for Heating

Symbol

O

B

W2

W1

G

Y

RC

RH

C

Standard HVAC System

nd

W2 - 2  stage heater

st

W1 - 1  stage heater

G - Fan

Y - Compressor

R - 24Vac Power

C - 24Vac Common

O
B

W2
W1

G

Y

RC
RH

C

Brown
White
Green
Yellow

Red
Black

ELECTH

HPUMP

J2

Содержание ZTS-110 Z-Thermostat

Страница 1: ...ZTS 110 Z Thermostat USER MANUAL Firmware Version 2 06 ...

Страница 2: ...e Temperature Scale selection in Easy Mode Setting Mode Change Mode Change Fan Mode Select Program Mode Override Permanent Override 19 Setting Schedule Battery Low Indication Defrost Indication Out of Temperature Range Indication 23 Advanced Recovery Indication 24 Filter Counter 25 Short Cycle Start Up Protection Energy Saving Mode Z Wave Setup and Operations Z Wave Add Include Delete Exclude Mode...

Страница 3: ...KE AWAY HOME and SLEEP event which can maximize energy conservation and comfort while minimizing the effort required to maintaining the appropriate temperature in your home whether you are at home or away Also you can use the ZTS 110 to control check your room temperature by smart phone or PC while you are at home or outside through Z Wave gateway Figure 1 ZTS 110 2 WAKE AM PROG ON MO HEAT FAN ON ...

Страница 4: ...table Temperature Control Swing Differential o o o o o o o o a Swing 1 F 2 F 3 F or 4 F 0 5 C 1 0 C 1 5 C or 2 C o o o o o o o o b Differential 1 F 2 F 3 F or 4 F 0 5 C 1 0 C 1 5 C or 2 C Advanced Recovery Mode ARM Defrost Function Short cycle start up protection Clock Time display format 12 24 hour clock selection with day displayed Filter Counter Filter change reminder displayed after 500 hours ...

Страница 5: ...rollers not in the network cannot control the system Primary Controller The first controller is used to set up your devices and network Only the Primary Controller can be used to include or delete devices from a network It is recommended that you mark the primary controller for each network for ease in modifying your network FLiRS Mode FLiRS is abbreviation for Frequently Listening Routing Slave F...

Страница 6: ...because reset to default process will automatically exclude ZTS 110 from the Z Wave network You should disconnect the power source and re apply the power so ZTS 110 can detect the power source type and self configure to corresponding mode You may check Glossary for the definition of FLiRS mode and Always Listening Mode CAUTION We highly recommend that this installation procedure is performed by a ...

Страница 7: ...rt Figure 2 Use the fingertips of one hand to grip the tab on the front housing 2 Apply power to the thermostat a For battery power install four AA batteries alkaline recommended Match the polarity of the batteries with the marks inside the battery compartment b For 24Vac power connect the wires as described in Wiring 3 Insert the two included wall anchors into the wall aligned with two of the mou...

Страница 8: ...er You must insert a jumper wire to tie the RH and RC inputs together for this configuration If you have a system with separate heating and cooling transformers do not insert a jumper wire between RC and RH When wiring split systems wire the heating systems 24Vac Power red wire to the ZTS 110 RH terminal and wire the cooling systems 24Vac Power to the ZTS 110 RC terminal Also wire the cooling syst...

Страница 9: ...For heat pump output there is a 3 minutes off time for heat pump protection 8 Heat Pump HVAC System O Cool changeover heat pump B Heat changeover heat pump nd W2 2 stage heater G Fan Y Compressor R 24VacPower C 24VacCommon O B W2 W1 G Y RC RH C Brown Green Yellow Red Black Blue Orange ELECTH HPUMP J2 ELECTH HPUMP J2 Y Compressor R 24VacPower O B W2 W1 G Y RC RH C Yellow Red HG HE J1 HG HE J1 ELECT...

Страница 10: ...cal heat fan controlled unit Fan will be turned on when there is heating output HG HE HG HE Note The HE and HG jumper controls the Fan when set to Auto in heating mode If user selects Fan ON at thermostat the Fan will be turned on without considering the HE HG jumper selection Jumper Function Description Set to ELECTH for non heat pump system Default When there is a heating request thermostat will...

Страница 11: ...rrent temperature WAKE AM PROG ON MO HEAT FAN ON 1 Key Description Symbol Increase value Toggle selection Decrease value Toggle selection Select fan mode also the Backward function key in some menus Change operation mode also the Forward function key in some menus Select program mode PROG ON OVERRIDE and PERMANENT OVERRIDE also the Confirm function key in some menus Back to Home ...

Страница 12: ...on Parameter number 8 Please refer to Z Wave Configuration parameters table Below is the example by local setting Temperature Scale selection in Easy Mode LCD indication Procedure Description Press and hold Mode key for 2 seconds to entry the setting mode It will display EASY YES if it stays in Easy mode Otherwise it will display EASY no if Easy mode is deactivated Press Up Down key to toggle the ...

Страница 13: ...scale selection Setting Mode Set Day Clock 12 24 hour F C Swing and Differential Setting Mode Key Description Symbol Increase value Toggle selection Decrease value Toggle selection Backward to previous setting Forward to next setting Confirm and go to next setting Confirm and go back to Home ...

Страница 14: ...ttings it will go back to Home page if selected YES it will go to Day setting if selected no EASY mode default Local control active functions Change Mode Change Fan mode Temperature Scale selection Local control inactive functions Scheduling Program Mode Clock Display Setting Time Setting Swing Setting Differential Set Point Advanced Recovery Mode EASY mode is deactivated Support full functions at...

Страница 15: ...nfirm the setting and it will go to temperature F Fahrenheit C Celsius selection Press Up Down key to toggle the temperature F Fahrenheit C Celsius selection 6 Press Prog key once to confirm the setting and it will go to swing setting Press Up Down key to set the swing setting o o o o Range is from 0 5 C to 2 C or 1 F to 4 F 7 AM MO AM PM HR SWING Press Prog key once to confirm the setting and it ...

Страница 16: ...turns on when room temp is 67 F and off at 70 F LCD indication Step Procedure Description Press Prog key once to confirm the setting and it will go to Advanced Recovery setting Press Up Down key to enable disable Advanced Recovery Mode 9 Press Prog key once to confirm the setting and it will go to the Home page 10 RECOVERY RECOVERY WAKE AM MO FAN AUTO PROG ON OFF Diff Swing SD switch differential ...

Страница 17: ...ol set point o Example 1 If user select heat set point is 70 F the minimum cool set point will be o o limited at heat set point 4 F 74 F o o Pervious heat set point is 70 F and cool set point is 74 F o Example 2 If user changes heat set point to 72 F cool set point will be updated to o 76 F automatically to maintain the dead band Swing Temperature Output Off Cool Turn off Set point Turn on Tempera...

Страница 18: ...HEAT PUMP if HPUMP is selected during jumper setting Below example is based on HEAT PUMP LCD indication Procedure Description Press Mode key once to change the operation mode OFF HEAT PUMP COOL AUTO OFF OFF HEAT COOL AUTO WAKE AM MO FAN AUTO WAKE AM MO FAN AUTO WAKE AM MO FAN AUTO WAKE AM MO FAN AUTO 17 ...

Страница 19: ... Fan runs only when Cooling is running 1 WAKE AM MO FAN AUTO COOL Press Fan key once to change the Fan mode FAN AUTO FAN ON FAN ON Fan stays on all the time 2 WAKE AM MO FAN ON COOL WAKE AM MO FAN AUTO COOL PROG ON Press Prog key once to select PROG mode OVERRIDE Temporary override the current schedule and will go back to PROG ON when next time schedule reach 2 WAKE AM MO FAN AUTO HEAT OVERRIDE Pr...

Страница 20: ...tting 2 In AUTO mode user needs to set heat and cool set points temperature Press Up Down key to adjust auto heat set points temperature in AUTO HEAT mode Press Prog key once to confirm the setting 3 AM MO FAN AUTO TARGET HEAT OVERRIDE AM MO FAN AUTO TARGET HEAT OVERRIDE AM MO FAN AUTO TARGET OVERRIDE COOL or AM MO FAN AUTO TARGET HEAT OVERRIDE AUTO Press Up Down key to adjust auto cool set point ...

Страница 21: ...troller does NOT have an independent thermostat schedules Disable Easy mode Refer to Activate Deactivate Easy Mode section Schedule function will be enabled Refer to Pre defined Schedule for the default settings User can adjust it according to personal preference Schedule function will be controlled by ZTS 110 Time Event MO I FR Heat Cool WAKE AWAY HOME SLEEP 6 00AM 8 00AM 6 00PM 10 00PM o o 70 F ...

Страница 22: ...mode Press Up Down key to select the event WAKE AWAY HOME SLEEP 2 Press Prog key once to confirm the setting and it will go to hour setting Hour will keep flashing press Up Down key to set hour 3 WAKE MO TU WE TH FR AWAY HOME SLEEP MO MO MO TU TU TU WE WE WE TH TH TH FR FR FR WAKE AM MO TU WE TH FR Press Prog key once to confirm the setting and it will go to minutes setting Minutes will keep flash...

Страница 23: ...event is enabled it will go to target setting Target will keep flashing press Up Down key to adjust Heat set point for heating If the event is disabled it will go to next event setting 6 WAKE TARGET AM MO TU WE TH FR HEAT Press Prog key once to confirm the setting and it will go to target setting Target will keep flashing press Up Down key to adjust Cool set point for cooling 7 WAKE TARGET AM MO T...

Страница 24: ...con will be displayed at Home o o page if temperature below 41 F 5 C All heaters will be forced On except in cool mode WAKE DEFROST AM TU HEAT FAN AUTO 1 2 PUMP LCD indication Step Procedure Description HI icon will be displayed on LCD if temperature excess the measurement o o ranges 99 F 40 C All heaters will be forced Off Cooler will turn on if running cool mode 1 WAKE AM TU FAN AUTO 1 COOL WAKE...

Страница 25: ...erature to the next program setting When the thermostat is in Advanced Recovery mode the display will show RECOVERY Advanced Recovery is an option that allows the HVAC system to attempt to recover from a setback period and reach a desired comfort temperature set point by the beginning of your programmed comfort period This option allows the choice whether to use Advanced Recovery under Setting Mod...

Страница 26: ...ess Prog key to confirm the setting and go back to filter counter page Press Home key once to go back to the Home page 3 TARGET FILTER HR FILTER icon will be shown on the screen at Home page when the usage hours were reached to set time 4 WAKE FILTER AM PROG ON MO COOL FAN AUTO System Output Non Heat pump system Heat pump system Compressor 1st stage heat and compressor LCD indication Step Procedur...

Страница 27: ...or battery operated applications and will enter sleep mode frequently in order to save battery life ZTS 110 can t act as a repeater in this mode The response to Z Wave command is not as quick as Always Listening Device Normally there is 1 2 seconds latency on response you should avoid sending commands to ZTS 110 too frequently Setting to Z Wave Always Listening mode with 24Vac as power source ZTS ...

Страница 28: ... You must perform exclusion process first if need to change Z Wave operation mode d After Z Wave inclusion process if you reset ZTS 110 to default while both 24Vac and batteries are applied ZTS 110 will take 24Vac as primary power source and self configure to Always Listening Mode because reset to default process will automatically exclude ZTS 110 from the Z Wave network You should disconnect the ...

Страница 29: ...ays LCD indication Procedure Description During normal operation press and keep holding the keys on Fan Mode Prog for 3 seconds The unit will resume to normal operation after released all keys If the LCD displays bt the unit is detected to be FLiRS mode if it will be included into Z Wave network If the LCD displays AC the unit is detected to be Always Listening mode if it will be included into Z W...

Страница 30: ...can enable or disable Easy mode by local Setting Mode or Z Wave parameter number 8 please refer to parameter table at Z Wave Configuration Parameters 29 LCD indication Step Procedure Description Gateway Controller device should be set to inclusion mode Press and hold Home key for 2 seconds to set ZTS 110 to Add Inclusion Delete Exclusion Mode 1 Press Prog key once it will search the network 2 If t...

Страница 31: ...sion Mode 1 Press Prog key once it will search the network 2 If the ZTS 110 is removed from the network it shows no connection Exclusion is completed 3 Press Home key once to go back to the home page will appear on the main display 4 WAKE AM PROG ON MO FAN AUTO OFF Association group Association group_1 Heat pump Association group_2 Compressor Mode Heating mode ON basic set command 0xFF OFF basic s...

Страница 32: ...is setting by set the configuration parameter Note Total 5 devices nodes can be assigned in total 3 association groups Below table lists out the devices nodes allocations in the 3 association groups Important Please do not associate heat pump and compressor devices in same association group because heat pump and compressor device cannot be turned on simultaneously Association Groups setting exampl...

Страница 33: ...0 C default o o 3 0x03 3 F 1 5 C o o 4 0x04 4 F 2 0 C 2 0x02 Functions Swing Differential 0 0x0000 to 9999 0x270F hours 4 0x04 Dead band value 3 0x03 3 1 5 4 0x04 4 2 0 5 0x05 5 2 5 6 0x06 6 3 0 o o F C o o F C default o o F C o o F C 14 0x0E o 0 0x00 C o 1 0x01 F default 5 0x05 Report filter counter read only D e a d b a n d On thermostats that automatically control both heating and cooling syste...

Страница 34: ...AUTO report if room temperature is different from last report It will report room temperature only User can use this function to enhance batteries service life 33 Unit in Range from 5 to 37 dead band Range from 50 0x0032 to 355 0x0163 Example 28 input 280 0x0118 Unit in Range from 41 to 99 dead band Range from 410 0x019A to 960 0x03C0 Example 82 input 820 0x0334 Default 99 dead band o Celsius C o ...

Страница 35: ...set value Formula Display temperature sensor reading value offset value unit degree F o 0 0x00 0 F default o o 1 0x01 1 F 0 5 C o o 2 0x02 2 F 1 0 C o o 3 0x03 3 F 1 5 C o o 4 0x04 4 F 2 0 C o o 5 0x05 5 F 2 5 C o o 6 0x06 6 F 3 0 C o o 7 0x07 7 F 3 5 C o o 8 0x08 8 F 4 0 C o o 9 0x09 9 F 4 5 C o o 10 0x0A 10 F 5 0 C o o 1 0xFF 1 F 0 5 C o o 2 0xFE 2 F 1 0 C o o 3 0xFD 3 F 1 5 C o o 4 0xFC 4 F 2 0...

Страница 36: ...own key to toggle Yes No selection 1 Press Prog key once to confirm the action It will perform the reset if select Yes or It will back to home page if select No LCD display done after reset to factory default settings The following data will be reset to default 1 Clock 12 00am 2 Day Mon 3 Temperature scale F 4 Swing 2F 5 Diff 2F 6 Pre defined schedule 7 Operation mode OFF 8 Default Heat override s...

Страница 37: ...its if yes A Yes and it is very depends on the capability of gateway controller For example gateway can supports up to 8 16 or 32 ZTS 110 in a network ZTS 110 should work with any Z Wave controller or gateway that has control capability for Thermostat devices All Z Wave products also come with the Z Wave logo Q What is the recommended battery type for ZTS 110 and what is estimated batteries servic...

Страница 38: ...ps max 5 nodes ID can be assigned to these association groups LCD TN type with white backlight VA 66 5mmx28 5mm Powered by Dry battery AA x 4pcs or 24 VAC 20 50 60Hz Relay contact Voltage 24 VAC 50 60 Hz Current 1A Max inductive Temperature measurable range o o 32 99 F 0 40 C Temperature display resolution o o 0 5 F 0 1 C Temperature Setting range o o 41 99 F 5 37 C Temperature o o Operating 32 12...

Страница 39: ...general v2 Z Wave Command Class Controlled Supported COMMAND_CLASS_THERMOSTAT_FAN_MODE NO YES COMMAND_CLASS_THERMOSTAT_FAN_STATE NO YES COMMAND_CLASS_THERMOSTAT_MODE NO YES COMMAND_CLASS_THERMOSTAT_SETPOINT NO YES COMMAND_CLASS_THERMOSTAT_OPERATING_STATE NO YES COMMAND_CLASS_THERMOSTAT_SETBACK NO YES COMMAND_CLASS_SENSOR_MULTILEVEL NO YES COMMAND_CLASS_CLOCK NO YES COMMAND_CLASS_BATTERY NO YES COM...

Страница 40: ...erence to radio or television reception which can be determined by turning the equipment off and on the user is encouraged to try to correct the interference by one or more of the following measures Reorient or relocate the receiving antenna Increase the separation between the equipment and receiver Connect the equipment into an outlet on a circuit different from that to which the receiver is conn...

Отзывы: