background image

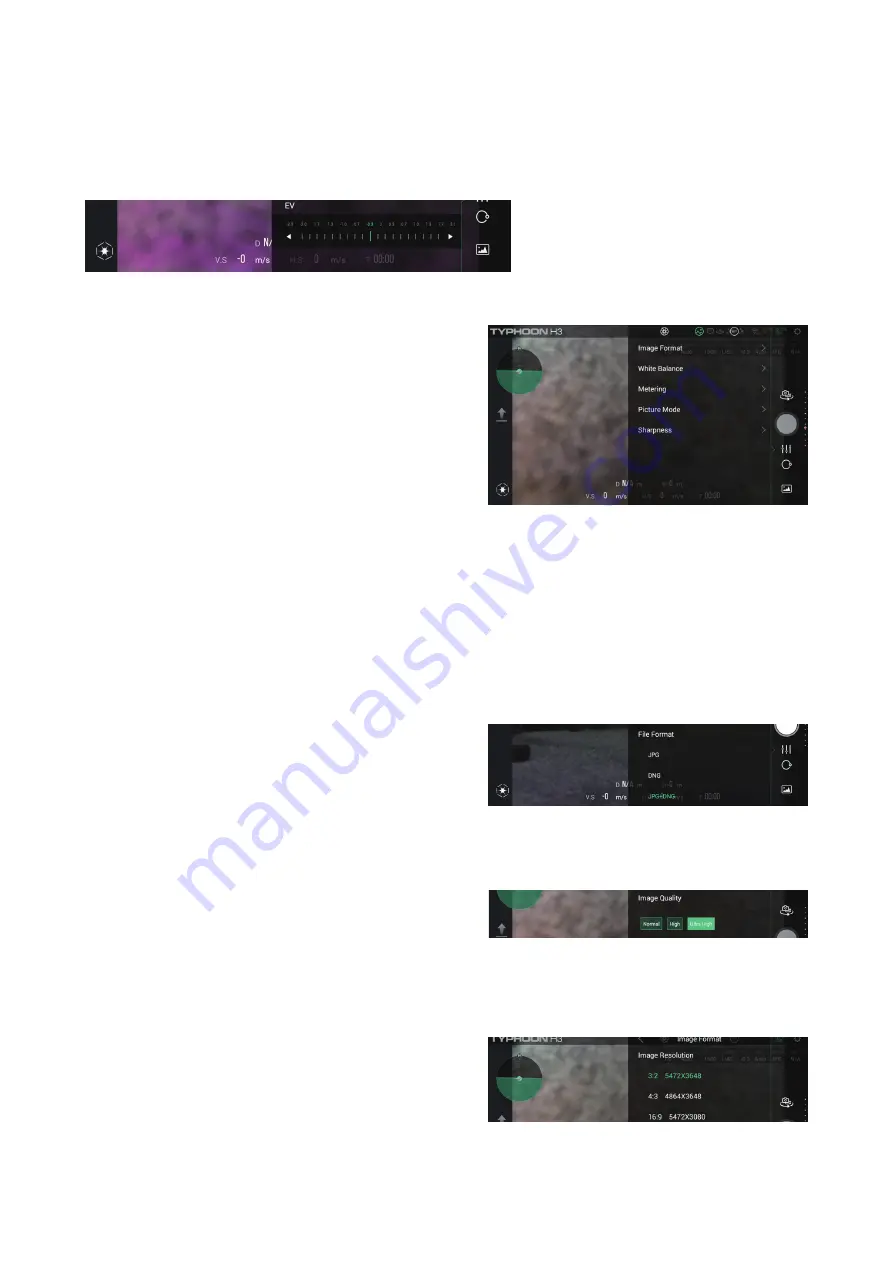
Exposure compensation

In auto exposure mode, the user can adjust the light and shade of the picture by sliding the exposure 
compensation value slider.

Photo / video parameter setting
Click the camera setting menu, pop up a dialog 
box, and select "landscape icon" or "play key icon" 
to enter the photo / video parameter setting page.

Photo / Video Format

1

Enter the photo parameter setting menu in photo mode

 1.1. Photo resolution, ION L1 PRO gimbal camera 
provides the following three different photo reso-
lutions for users to choose, directly click the 
required resolution to select.

 1.2 Image quality: users can choose among 
normal, high-definition and ultra high-definition 
picture quality, and directly click the required pic-
ture quality to choose.

 1.3 File Format: users can select the file format of 
file record in JPG, DNG and JPG + DNG photo for-
mats, and directly click the required file to select.

33                                     

Содержание TYPHOON H3

Страница 1: ...USER MANUAL V1 0 ...

Страница 2: ... Powering ON OFF 10 Binding 11 Binding the Aircraft and ST16S 11 Binding the Aircraft and ION L1 PRO 11 Takeoff 11 Option 1 11 Option 2 12 Flight Modes 12 Angle Mode 12 Exp curve function in Angle mode 12 Flight Control Sensitivity function 13 Cruise control function in angle mode 14 Sport Mode 14 RTL Mode 15 Manual Mode 16 Smart Mode 17 Drone Settings 18 Task Mode 20 CCC 20 Follow Me 21 Watch Me ...

Страница 3: ...Disclaimer 44 Collection and Processing of Data 45 Battery Warnings and Usage Guidelines 45 General Safety Precautions and Warnings 46 Camera Usage Warnings 47 FCC Statement 47 RF Exposure Warning 47 IC Radiation Exposure Statement for Canada 48 NCC Warning Statement 48 CE Warning Statement 48 EU Compliance Statement 48 ...

Страница 4: ...ze Propellers Excluded Propeller Size Propeller Pitch 9 8in 248mm 5 7in 145mm Max Ascent Speed Max Descent Speed Max Speed MaxTilt Angle Max Angular Speed Max Service Ceiling Above Sea Level Max FlightTime OperatingTemperature Range Satellite Positioning Systems Operating Environment Sensor Flight Speed Model APV System 70 55oz 2000g 21 9x19 1x12 0in 556x485x305mm 20 4in 520mm Six Rotors 8 9mph 4m...

Страница 5: ...Band VideoTransmission Distance Range Optimum Conditions LCD Screen Size Built in Battery Voltage Capacity Max Charge Current Product Name 3 Axis Gimbal Camera ION L1 PRO Model Dimensions Capacity LIPO 4S 15 2V 79 8Wh 20 5oz 580g SC4000 4H Approx 1 5h 2h Max Charging Current Max Discharging Rate 5A 50A Android 16 Up to 1 mile 1 6Km Optimum condition 5 8GHz WiFi FCC Compliance up to 1 2mile 2km CE ...

Страница 6: ... 30 48 50 60 120fps 1280x720 24 25 30 48 50 60 120fps 3 0 Photo Formats JPEG DNG JPEG DNG Video Formats MP4 Photography Modes Single Burst 3 5 7 Interval 2s 3s 5s 7s 10s 15s 20s 30s 60s AEB 0 3 0 7 Panorama Horizon Sphere Exposure Mode Auto Exposure Manual Exposure ISO Priority Shutter Priority 100 6400 4 1 8000s Auto Lock Daylight Cloudy Shade Incandescent Sunrise Custom 2000 12000K Spot Metering...

Страница 7: ...imbal Pan Control Knob 05 Throttle Altitude Control Mode 2 Elevator Pitch Control Mode 1 06 Rudder Yaw Control Mode 2 and Mode 1 07 LeftTrim UP Down EV value trim Left Right digital Zoom 08 Take Still Photo Button 09 Landing Gear Switch 10 Custom Setting Button 11 Obstacle Avoidance Switch 12 Flight Mode Selection Switch 13 Elevator Pitch Control Mode2 Throttle Altitude Control Mode 1 14 Aileron R...

Страница 8: ...storage function to either charge or discharge your battery to the safe storage percent age To purchase it please visit www yuneec com Installing the Battery Push the battery into the battery compartment until hearing a click Unfolding the Arms Once theTYPHOON H3 has been removed from the storage trans port case lock the arms in place Gently lift the arms until a click is heard To unlock the arms ...

Страница 9: ...ration STEP 1 Power on the ST16S Ground Station first and then the air craft and make sure they are connected correctly If they are not connected correctly the telemetry data will not display on the screen STEP 2 Tap the System icon on the top right corner on the ST16S and then enter the aircraft setting interface by tapping select the Compass Calibration Installing the Propellers Each arm of theT...

Страница 10: ...e aircraft in Angle Mode If the pilot takes off the aircraft in Smart Mode make sure to keep the air craft 32 8ft 10m away from the pilot NOTICE For the best performance the 5 8GHz patch antenna should be pointed to the aircraft Powering ON OFF NOTICE Please make sure all firmware is the latest version Firmware and the user manual may be downloaded from web site www yuneec com The quick start guid...

Страница 11: ... level ground STEP 3 Switch on the ST16S Ground Station Wait a few seconds for all systems to be boot up STEP 4 Tap the settings icon on the right top corner of the ST16S Select the icon and slid to the Drone selection STEP 5 Tap the refresh icon and then tap OK to unbind RC link Select the corresponding receiver listed in the column Wait until a tip pops up to indicate the binding is completed Bi...

Страница 12: ...middle position Exp curve function in Angle mode This function is used to adjust the Operational Curve of joystick function throttle aileron elevator and rudder in Angle flight mode so as to achieve the most user friendly airplane control feel 1 Click the settings button at the top right to find Flight Control Settings in the aircraft options and open this menu Option 2 Press the icon then slide t...

Страница 13: ...the curve reaches the desired shape and then release your hand to complete the setting 3 Click Reset in the upper right corner and click Yes in the pop up box to restore all three curves to the factory settings 4 After setting green will pop up on the screen indicating that the setting is successful and effective otherwise the setting will not take effect please reset Flight Control Sensitivity An...

Страница 14: ...ore sliding otherwise when sliding the slider to the left the angular velocity of aircraft spin will be decreased under the same rudder input compared with that before sliding 4 Click Reset in the upper right corner and click Yes in the pop up box to restore all three sliders to the factory settings 5 After setting green will pop up on the screen indicating that the setting is successful and effec...

Страница 15: ...o Land Mode In RTL Mode the GPS connectivity will fly backTYPHOON H3 in a straight line in the direction of the pilots current location and automatically land within 13 26ft 4 8m of the pilot It can be helpful for pilots that lose orientation during flight Simply activate RTL Mode untilTYPHOON H3 automatically moves toward the home position and once you ve confirmed orientation switch back to Angl...

Страница 16: ...d begins to descend it will turn its tail pointing to the pilot CAUTION You must be certain there is no obstacle in the RTL flight path otherwise TYPHOON H3 may come into contact with them and crash WARNING RTL Mode only works when TYPHOON H3 has a suitable GPS signal lock If TYPHOON H3 loses GPS signal lock it will switch to Angle Pilot Mode automatically 8m HOME HORIZONTAL DISTANCE FROM PILOT PI...

Страница 17: ...ill enabled in follow conditions 1 The drone fly in to the No fly zone the drone will switch to Angle mode automatically to prevent you fly the drone into the No fly zone 2 Low battery the drone will switch to Home mode or Auto Landing mode NOTICE The Typhoon H3 drifts away from the wind when the pilot is not steering Crashes are also excluded from the guarantee SMART MODE I Power on the controlle...

Страница 18: ...ngs button 3 Select the aircraft setting switch to enter the aircraft setting page 4 Page introduction Drone Settings I Return setting 1 Setting of return location 1 Dynamic Home after selecting the dynamic return point the aircraft will automatically return to the home point based on the position of the remote control when the return key is switched on 2 Home select home point to return the aircr...

Страница 19: ...LED light on the aircraft arm especially in the use scene of night shooting which can effectively avoid the influence of the LED light on the aerial photography effect The user can set the on off of the aircraft arm light by clicking the circle in front of the disable front light disable all lights and enable all lights IV Other settings 1 Aircraft GPS After sliding the GPS switch can be turned of...

Страница 20: ... Cable Cam function Choose Set waypoints Tap to create a new point recording the current flying position Tap to delete the last point created during the flight NEXT Tap the NEXT icon and Execute CCC inter face will be entered Save Tap Save and the current route will be saved The name of waypoints can be defined by the pilot Start Tap Start TYPHOON H3 will fly back to way point 1 automatically When...

Страница 21: ...e in the centre of the video or you can use the gimbal tilt slider and gimbal pan knob as a trim of your gimbal angle Follow Me The Follow Me function allows TYPHOON H3 to follow the pilot adjusting its location to the loca tion of the ST16S Ground Station This function is enabled when ST16S s GPS positioning has been acquired and TYPHOON H3 is using shared GPS signal with the ST16S Ground Station...

Страница 22: ...to enter the Orbit me function The center point will be the position where the ST16S is by default Set an ideal radius by controlling the joystick The height and radius data will be calculated automatically and indicated Press the Start icon and push the Aileron Roll control stick the aircraft will begin to execute POI The Start icon will become Pause icon The pilot can pause the the task by tappi...

Страница 23: ...tton you can exit team mode no matter on the Master remote or the Slave remote Landing There are three ways to land the aircraft 1 Position the TYPHOON H3 above the area where you would like to land Lower down the retract able landing gear and then slowly lower the left hand stick to below the center position TYPHOON H3 will descend slowly and land 2 Activate Home Mode and TYPHOON H3 will automati...

Страница 24: ...ome position except for low battery Remote Controller ST16S Charging Charge the ST16S battery by using supplied USB cable and inserting it into the Micro USB port on the charger It will take approximately five hours to charge a fully discharged battery WARNING Do not leave the battery in the charger after the battery is fully charged Flight Control The default flight control is known as Mode 2 The...

Страница 25: ... the settings button 3 Turn on the remote control setting switch to enter the remote control setting page I Mode switching The factory default joystick mode is mode 2 also this user manual is described in the mode 2 joystick mode The user can select the mode according to his own operation habits II Hardware monitor function Click the RC monitor key to open the remote control hardware monitor Under...

Страница 26: ...tart again from the single 3 Exposure mode click the circle in front of exposure mode and define the function key to the expo sure mode switching function After setting press the aux B2 key once and the camera s exposure mode will switch one exposure mode in the order of auto manual ISO priority and shutter priority until all exposure modes are switched and then start again automatically General s...

Страница 27: ...ally 2 Camera firmware version The Camera firmware version showed on the screen displays the Mega firmware update pack age which you downloaded and used for the OTA update The Mega firmware update package con tains all firmware needed for the done update pro cess Autopilot Gimbal and Camera From that we can know what the firmware you are using indeed for better customer service It also show the ca...

Страница 28: ...o before powering down TYPHOON H3 to avoid loss of video data NOTICE Only when in Velocity mode may the gimbal camera be tilted upwards 30 maximum Gimbal Camera Pan Control The gimbal pan mode switch on ST16S S2 enables the Follow Mode When the switch position is UP the gimbal camera is in Follow Mode The pan control of the gimbal camera is disabled when the switch position is UP The gimbal camera...

Страница 29: ... gimbal tilt velocity output it is The green curve is the current curve For example as the picture shown above the parameter is 0 88 from the curve we can know that in the period of a little difference input close to the origin the curve is flat and the gimbal tilt angular acceleration is very small This means in this period if you give more or less difference input the tilt velocity can only incr...

Страница 30: ...ling of the tilt control of the gimbal The bigger the ratio is the faster max tilt velocity it can achieve and vice versa Setup method According to the actual use needs slide the ratio slider left or right and click Save to save the set tings 1 The more the slider to the left the smaller the scale is the smaller the change range of the actual output velocity of the gimbal tilt control slider is an...

Страница 31: ...click camera icon in the recording mode to switch the recording mode to the shooting mode 3 3 Shutter video button Click to trigger camera shooting recording function 3 4 Camera settings menu Click to open the camera setting menu and set the camera parameters 3 5 Photo mode switch Click the switch button of photographing mode to select between single interval burst AEB and pan oramic II Camera set...

Страница 32: ...e of the camera is auto exposure so the switch on the right side of the shutter is auto mode by default In auto mode the shutter cannot be manually adjusted and the shut ter time can only be manually adjusted after the auto mode is closed After the automatic shutter is closed the left and right arrow signs appear in the shutter slider The user can drag the shutter slider to set the exposure time p...

Страница 33: ...Enter the photo parameter setting menu in photo mode 1 1 Photo resolution ION L1 PRO gimbal camera provides the following three different photo reso lutions for users to choose directly click the required resolution to select 1 2 Image quality users can choose among normal high definition and ultra high definition picture quality and directly click the required pic ture quality to choose 1 3 File ...

Страница 34: ...ed format NOTICE That in the process of one time setting the video resolution and frame rate must be set before the camera can record the user s setting of video reso lution otherwise because the parameters set are incomplete the camera will not record the setting of video format 2 1 Video format ION L1 PRO gimbal camera provides the following video formats for users to choose from H264 coded form...

Страница 35: ... metering and center metering After selecting the spot metering the user can select the metering area on the screen After click ing the area the spot metering icon will appear indicating that the camera is metering with the ex posure conditions of the area NOTICE the metering mode only affects the expo sure of the camera in the exposure mode of auto matic exposure or semi automatic exposure sen si...

Страница 36: ...e photographing model this menu in the video recording mode has a 10 bit log option After this option is selected the camera will record the original video data no longer pro cess the sampling data and the picture will also show a gray color to save the most and the most original picture details The users is required to process the video data captured by themselves 8 Sharpness ION L1 PRO gimbal ca...

Страница 37: ...l appear on the screen 10 Histogram Turn on the histogram switch and the expo sure histogram will appear on the screen to assist the user to judge the exposure 11 Center point Turn on the center point switch the cross line appears in the center of the screen to assist the user in composition ...

Страница 38: ...The user can choose according to the actual needs to achieve the best picture effect 38 13 Format SD card Click Format SD card to pop up the following confir mation pop up box click YES camera to format SD card 14 Reset camera settings After clicking reset the camera settings the following confirmation pop up box will pop up Click YES to restore the camera to the factory settings ...

Страница 39: ...der this function you can preview the photos or videos taken before Click the Edit button in the upper left corner The original Edit button will become the Cancel button A circle will appear in the lower right corner of the picture or video in the preview menu Click the picture you want to select to select A icon will appear in the lower right corner after the picture is selected to indicate that ...

Страница 40: ...he information icon in the upper right corner to display the information time and resolution of the screenshot Click Delete to delete the currently browsing photo NOTICE the Delete button in the gallery will only delete the screenshot recording file stored in the remote control and will not delete the file stored in the SD card 3 Photo Preview Click the photo to be enlarged and previewed in non ed...

Страница 41: ...e upper right corner to display the screen recording information time and resolution click the play button in the center of the screen to play the preview video click the Delete button to delete the cur rently playing video NOTICE the Delete button in the gallery will only delete the screenshot recording files stored in the remote control and will not delete the files stored in the SD card Appendi...

Страница 42: ...s that the updating process is completed and successful 42 STEP 1 Tap the system settings icon on the right top of the screen and then select the icon Scroll down and tap Check for updates STEP 2 Choose an available WiFi input the pass word and tap OK STEP 3 When Available Updates displayed on the screen tap the Download icon Wait for a few min utes till a 100 completed circle is displayed which m...

Страница 43: ... During Initialization The Aircraft is in Binding Mode Binding Failed Calibration Failed STATUS Initiate Compass Calibration The Aircraft is in Sport Mode The Aircraft is in Angle Mode without GPS lock The Aircraft is in Angle Mode with GPS lock The Aircraft is in RTL Mode The Aircraft is inTask Mode First Second Level Low Voltage Battery Warning Compass Alarming The Aircraft is in No Fly Zone OBS...

Страница 44: ...ion of legal regulations caused by use of the product in a no fly zone e g next to an airfield above a motorway or a natural conservation area Damage and or injury as well as violation of legal regulations caused by operating the model in a magnetic field e g high voltage lines electricity transformer stations radio towers mobile phone masts etc a strong wireless signal environment no fly zones po...

Страница 45: ...tern for certain functionalities services content etc Battery Warnings and Usage Guidelines WARNING Lithium Polymer LiPo batteries are significantly more volatile than alkaline NiCd or NiMH batteries All instructions and warnings must be followed exactly to prevent property damage and or serious injury as the mishandling of LiPo batteries can result in fire By handling charging or using the includ...

Страница 46: ...bstructions that do not offer a clear view of the sky and can restrict GPS reception Do not attempt to operate your aircraft in areas with potential magnetic and or radio interference including areas nearby broadcast towers power transmission stations high voltage power lines etc Always keep a safe distance in all directions around your aircraft to avoid collisions and or injury This aircraft is c...

Страница 47: ... in a residen tial installation This equipment generates uses and can radiate radio frequency energy and if not installed and used in accordance with the instructions may cause harmful interference to radio com munications However there is no guarantee that interference will not occur in a particular installa tion If this equipment does cause harmful interference to radio or television reception w...

Страница 48: ... un envi ronnement non contrôlé NCC Warning Statement 本產品符合低功率電波輻射性電機管理辦法 第十二條 第十四條等條文規定 經型式認證合格之低功率射頻電機 非經許可 公司 商號或使用者均不得擅自變更頻率 加大功率或變更 原設計之特性及功能 低功率射頻電機之使用不得影響飛航安全及干擾合法通信 經發現有干擾現象時 應立即停用 並改善至無 干擾時方得繼續使用 前項合法通信 指依電信法規定作業之無線電通信 低功率射頻電機須忍受合法通信或工業 科學及醫療用電 波輻射性電機設備之干擾 CE Warning Statement This device meets the EU requirements on the limitation of the general public to electromagnetic fields by way of...

Страница 49: ......

Отзывы: