Yujin Robot iCLEBO O5 Скачать руководство пользователя страница 25

25

6. Care and Maintenance

6-3. Items to Check Before Reporting a Problem

The table below describes the most common "malfunctions" during use.

If you cannot resolve the problem using the information described below,  please feel 

free to contact our Customer Support.
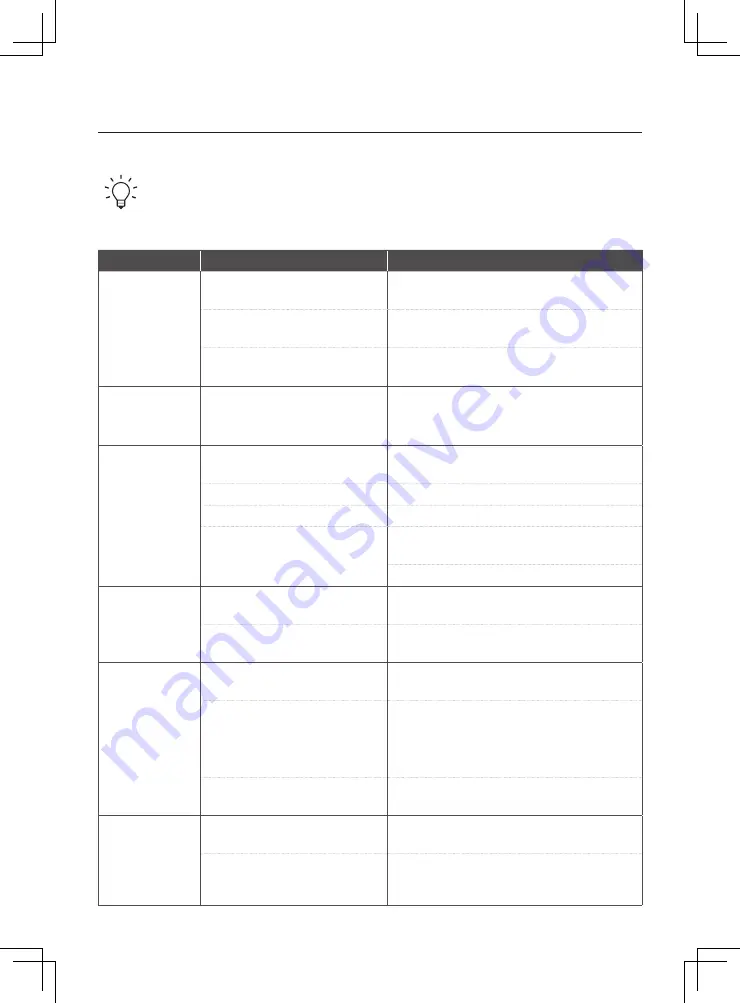
Symptom

Cause

Solution

The robot does not 

clean well.

▶ 

The dust bin is already full.

▶ 

Empty the dustbin after consulting the 

      “Care and Maintenance” section. 

▶ 

There is dust trapped between the

     filters and the air cannot be released.

▶ 

Clean the filter after consulting the 

      “Care and Maintenance” section.

▶ 

Hair is tangled in the main blade 

     and is preventing operation.

▶ 

Clean the main blade after consulting the  

      “Care and Maintenance” section. 

Robot does not 

turn on even when 

the power switch is 

on.

▶ 

The battery is low.

▶ 

Charge the robot for at least 2 hours.

The robot does not 

react or only works

in one place

▶ 

The power switch is in the OFF (O)  

state.

▶ 

Check the power switch on the side of the main unit.

▶ 

The battery is low.

▶ 

Recharge the robot.

▶ 

The remote control is not working.

▶ 

Check the remote control battery and retry.

▶ 

The robot's bumper is pressed in.

▶ 

Use a soft cloth to wipe the beam receiver or  the 

infrared sensor on the remote. 

▶ 

Press the bumper part several times.

The robot does not 

charge.


▶ 

The charging station or robot is not 

     connected to the plug correctly.

▶ 

Make sure the robot is connected to an appropriate 

charging station of proper wattage. 

▶ 

There is a foreign substance on the 

charging terminal preventing contact.

▶ 

Clean the charging terminals of the robot and  the 

charging station with a soft cloth.

The robot does 

not return to the 

charging station 

after cleaning. 

▶ 

The power of the charging station is

      not connected correctly.

▶ 

Connect the power of the charging station properly.

▶ 

The charging station is not properly

      installed.

▶ 

Move the charging station. Make sure there is 

nothing within 0.5m to the left and right of the 

charging station, and 1.5m to the front. This is 

so that the robot can automatically return to the 

charging station after cleaning.

▶ 

The robot started at a different point  

other than the charging station.

▶ 

To return to the charging station after cleaning, it 

must start cleaning from the charging station.

The robot’s noise is 

gradually 

increasing. 

▶ 

The dustbin is full or the filter is dirty 

and air cannot escape

▶ 

Empty the dustbin or clean the filter by reviewing the

      “Care and Maintenance” section. 

▶ 

A foreign substance is stuck to 

the main brush and the friction is 

generating noise.

▶ 

Clean the main brush by reviewing the

      “Care and Maintenance” section.

Содержание iCLEBO O5

Страница 1: ...ad Precautions for Safety carefully before use for correct operations The user manual includes the product warranty Product appearance and specifications are subject to change for product improvement...

Страница 2: ......

Страница 3: ...Mode 12 4 3 Cleaning Option 13 4 4 Suction Power Settings and Smart Turbo 13 4 5 Moving Manual Cleaning 14 4 6 Automatic Charging 15 4 7 Mop Cleaning 16 4 8 Boundary Strip Installation Sold Separately...

Страница 4: ...tion Before Use Readcarefullyforthesafeandcorrectusageoftheproduct Removefragileandsmallobjectsinadvance Ifthereisanywater oil oranimalwasteonthefloor cleanitbeforeusingtheproduct Donotplacetheproduct...

Страница 5: ...eswherethereisariskofitfalling Donotletchildrenplaywiththerobot Ifleftunusedforlongperiods pleasechargetherobotfor2hoursbeforeusingit Donotdisturbtherobotwhileitisinoperation Ifdamageoccursonmaterials...

Страница 6: ...parately ChargingStation QuickGuide MopPad 2 RemoteControl IncludesBatteries CleaningBrush SideBrush L R User Ma nual iCLEBO O5 en yujinrob ot com Adapter Thereisariskoffireiftheadapterplugisnotfullya...

Страница 7: ...isplay Window Camera Side Brush Wheel Front Sensor Unit Handle Manual Charging Port Power Switch Inductive Charging Sensor Anti slip Pad Adapter Jack Charging Jack Charging Terminal Front EPA filter M...

Страница 8: ...Remote Control Batteries Please assemble and use the two AAA batteries included with the remote control at the time of purchase 1 Slide the cover on the back of the remote control downward to open it...

Страница 9: ...ve with the same marking R under the robot Then push the fixing pins in firmly to secure the side brush Side Brush Fixing Pin Side Brush Groove Connecttheadapterjacktothe chargingstation Connectthepow...

Страница 10: ...tomofthemainunitwiththeterminalofthechargingstation 3 Checkthechargingstatus Whencharging thelampblinksinthe displaywindow Whenchargingiscompleted thebatterystatuslights upgreen Connecttheadapterjacko...

Страница 11: ...11 4 Using Robot 4 1 To Start Stop Cleaning Pressthecorrespondingbuttonontherobotortheremotecontroltostartcleaning Pleasedothesametostopcleaning OR Robot Remote Control...

Страница 12: ...on Navi Mode Default Setting This is a zigzag cleaning method through camera navigation mapping The display window shows the time of cleaning Max Mode After the navi mode cleaning is finished the clea...

Страница 13: ...rs This may damage the carpet or cause additional problems Mop Mount the mop plate at the bottom of the robot It is possible to mop and vacuum at the same time by attaching the mop plate Refer to P15...

Страница 14: ...cleaning youcanperformmanualcleaning Whenthecontrolbuttonispressedinthestandbymode thecleaningrobot simplymoves Youcanusethecontrolbuttonsontheremotecontroltomovetherobottoadesiredlocation 1 3 2 4 1 4...

Страница 15: ...urnstothechargingstationandchargesitself Aftercharging therobotreturnstotheremainingcleaningareato resumecleaning Ifthebatteryisdischargedandthe LO messageappears transfertherobottothechargingstationt...

Страница 16: ...terturningtherobotover pushthemop plateinthedirectionofthearrowandattachit Ifthemopplateisnotattachedcorrectly itmay detach floor Side Pleaseinstalltheboundarystriparoundrailings toilets andstaircasee...

Страница 17: ...the mainunitoftherobot 2 Removethefilterasisshownin thepictureandcleantheinside properly However ifthefilteriscleaned withwater makesureitis completelydrybeforeassembly 3 Whenreplacingthefilter replac...

Страница 18: ...ush Care 1 Placetherobot sothebottomsideisfacingup 2 Holdthesidebrushwithbothhandsandpull upwardtodisassemble Whencleaningwithwater waituntilthesidebrushiscompletelydrybeforeuse 3 Usethecleaningbrusht...

Страница 19: ...herobotsothatthebottomside isfacingupandtakeoutthesidebrush 2 Unlockthefixingclipofthemainbrush coverandtakeoutthecover 3 Takeoutthemainbrushandremove foreignmaterials 4 Aftercleaningthemain blade ide...

Страница 20: ...20 5 Care and Maintenance 5 4 Sensor Care Useacottonswaborasoftclothtowipethefrontandbottomsensorareasoftherobot 1 2...

Страница 21: ...are 1 Fliptherobotovertoshowthebottomsidefacingupward 2 Pressthetabsonthefrontwheelcovertoremove 3 Removethefrontwheelandusethecleaningbrushtoclean dustandforeignmaterials 4 Reattachthefrontwheelandre...

Страница 22: ...water once a month Mop Pad 3 Months Please replace it if it becomes severely damaged or dirty Main Brush When necessary Please exchange it if the main and side brushes are worn out Side Brush Battery...

Страница 23: ...ode buttonontherobot displaywindowforabout5to6seconds 2 When rSt appearsinthedisplaywindow press andholdtheplaybuttonontheremotecontrol 3 Ftr appearsinthedisplaywindowandthereset begins 4 When End app...

Страница 24: ...st Bin Be sure to reinsert dustbin correctly Wheel Motor Overload Remove debris and foreign objects from around the wheel Main Brush and Side Brush Overload Remove main and side brush to check for hai...

Страница 25: ...mote Press the bumper part several times The robot does not charge The charging station or robot is not connected to the plug correctly Make sure the robot is connected to an appropriate charging stat...

Страница 26: ...urchased Techsupportmayrandomlyaskforsalesreceiptorother proofofpurchasetodeterminewarrantycoverage B WarrantyLimitation Exclusion ExclusiveRemedies ThisLimitedWarrantydoesnotextendtoanyproductthathas...

Страница 27: ...ujinRobotInc ServiceCenterthathasbeen scratchedordamagedduringtransport includingbutnotlimitedto theproduct anditsaccessories Products shippedtotheYujinRobotInc ServiceCenterwithmissing partswillberet...

Страница 28: ...are Apartofthisproduct ssoftwarecomponentincludesopensourcecode YujinRobotCo Ltdprovidesacompletecopyofthecorrespondingopen sourcecode Visitwww iclebo comtoobtainthesourcecode MenuCustomerService Sele...

Страница 29: ...29...

Страница 30: ...30...

Страница 31: ...31...

Страница 32: ...ion 13 9 x 13 6 x 3 4 in Weight 7 1 lbs Charging Time 240 min Usage Time Based on Hardwood Floor Power Level 1 120 min Power Level 2 90 min Power Level 3 70 min Operation hours Contact Information Mon...

Отзывы: