


●After each training:
Wipe the console and other surfaces with a clean soft and damp cloth to remove
sweat residues.
Caution:
Do not use any abrasives or solvents. To avoid damage to the computer, keep any liquids
away. Do not expose the computer to direct sunlight.
●Weekly:
To make the cleaning easier it is recommended to use a mat for the treadmill. Shoes can
leave dirt on the striding belt that can fall beneath the treadmill. Clean the mat under the treadmill once a
week.
STORAGE:
Store you treadmill in a clean and dry environment. Ensure the master power switch is off and is un-
plugged from the electrical wall outlet.
Running belt elastic adjustment
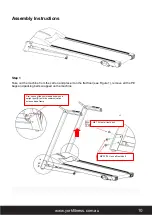
All the running belts need to be adjusted before sending out from the factory and after the installation,
but after a period of time, it may get loose. For example, the user pauses or slips while running. When
this situation occurs, adjust the bolts of running belt from two sides with a quarter turn clockwise. If the
running belt is too loose, step on the running belt, the running belt and the roller will be slipped. But if the
running belt it too tight, the motor, running belt and roller might be damaged.
All running belts should be adjusted before and after installation. However, after a period of use, they
may run off-track. The reasons are as follows:
The treadmill is not placed on a flat ground;
(2) When users exercise, they are not running in the center of the running belt
(3) Uneven strength from user's feet
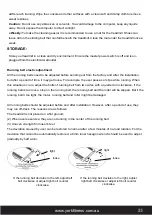
The deviation caused by user can be restored to normal after a few minutes of no-load rotation. For the
deviation that cannot be automatically restored, a 6mm inner hexagon wrench should be used to adjust
gradually by half a turn.
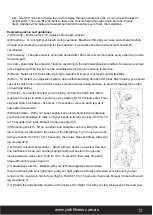
loose
tight
tight
loose
If the running belt deviates to the left, adjust left
bolt clockwise or adjust right bolt counter
clockwise.
If the running belt deviates to the right, adjust
right bolt clockwise or adjust left bolt counter
clockwise.
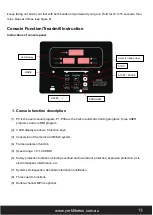
Содержание T600
Страница 1: ...Owner s Manual T600 Treadmill Item 51156 www yorkfitness com au...
Страница 5: ...www yorkfitness com au Exploding drawing...
Страница 28: ...www yorkfitness com au...


