
• Preview a clip
• Click the play button on the cascade image
• Click the (x) or the video to close the player
Settings
Show how Settings work
Click on settings button
Discuss each of the settings
General Settings
Speaker volume – Controls audio output levels
Mic Level – Controls audio input levels
Subtitles - Turns teleprompter on or off
Mirror Camera – sets camera to work as a mirror
image instead of normal visual
Cascade Movies – Turns on / off the mini movies on
the cascade
Cascade Sound – Turns on / off the mini movie
sounds on the cascade
User Accounts
Add user accounts
Each user account must be validated with an account at Yoostar.
com
Parental Controls
A pin number must be set the first time the Parental Controls are
used
Parental Controls determine what level of content is visible in the
Cascade
Setting Movie Ratings to “G” will only show G rated movies in
the Cascade
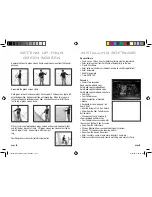
Record
From the Your Clips Cascade
Select a clip to perform
Double click on an image – or -
Click on the details button – or –
Use the remote to navigate to a clip and press the select button
Show and describe “pick a role” screen
Description of the clip
Preview of the clip
Roles available from this clip
Print Script
Show camera setup
Select a role to play
Double click on a role image
Highlight a role image and click record
Step in process
Ensure the camera is completely showing the greenscreen
Nothing should be showing in the image but the greenscreen
Adjust the camera or greenscreen if necessary
Position yourself in the chalk outline on the screen
Press the record button
Using your Remote, press the REC button
Using your Mouse, click the REC button
Using your keyboard press the Space Bar
Step completely out of the scene
Make sure that the greenscreen is the only thing showing in the camera
frame
Press the Record Button
Using your Remote, press the REC button
Using your Mouse, click the REC button
Using your keyboard press the Space Bar
Position yourself back into the scene and within the Chalk Outline
Press the Record Button
Using your Remote, press the REC button
Using your Mouse, click the REC button
Using your keyboard press the Space Bar
After the countdown ends the scene begins
Following the teleprompter, record your scene
page
10
page
11
text iS jUSt dropped in for now
not formated yet
Yoostar Owners Manual booklet.indd 12-13
4/16/09 9:22:24 AM


