2-2
IM 703753-01E
2.2
Connecting the Interface Connector
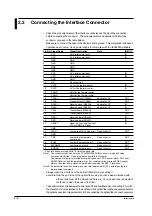
• Check the pin assignments of the interface connector and the input line connection,
before connecting the connector. The pin assignments and details of the interface
connector are given in the table below.
Make sure to connect the case to the device’s frame ground. This will prevent erroneous
operation due to noise. Use a power supply that complies with the IEC60950 standard.
Pin No. Signal Name
Signal Description
Note
IN/OUT
1
VCC
5-V digital power input
IN
2
VCC
5-V digital power input
IN
3
GND
GND
4
GND
GND
5
GND
GND
6
GND
GND
7
VCC
5-V digital power input
IN
8
VCC
5-V digital power input
IN
9
GND
GND
10
NC
No connection
11
PVCC
5 V for the thermal cooler
IN
12
PVCC
5 V for the thermal cooler
IN
13
PGND
GND for the thermal cooler
14
PGND
GND for the thermal cooler
15
TCLK+
Transmit clock (RS422)+
baud rate
×
16*
OUT
16
TCLK-
Transmit clock (RS422)-
baud rate
×
16*
OUT
17
RCLK+
Receive clock (RS422)+
baud rate
×
16*
IN
18
RCLK-
Receive clock (RS422)-
baud rate
×
16*
IN
19
TXD+
Transmit data (RS422)+
OUT
20
TXD-
Transmit data (RS422)-
OUT
21
RXD+
Received data (RS422)+
IN
22
RXD-
Received data (RS422)-
IN
23
RESET
Reset pin Low input for reset
IN
TTL or CMOS 5 V input
24
GND
25
WDG
Low during Watch Dog error Open collector
OUT
26
GND
27
TMP
Low during temperature
Open collector
OUT
control error
28
BUSY
Low during measurement
Open collector
OUT
29
WARMUP
Low during warm-up
Open collector
OUT
30
ERROR
Low during other errors
Open collector
OUT
*: The clock frequency is equal to 16 times the baud rate.
Note 1: The connector that is used is the FCN-705Q030-AU/M connector made by Fujitsu
Components Limited. Use a plug that supports this connector.
The causes of other errors include communication error, PDA sensor alarm, DSP error,
ROM/RAM error, and temperature alarm. For communication errors and RDA sensor
alarms, the other errors signal is cleared after receiving the REA_7 response.
Note 2: If a hardware reset is executed, you must wait approximately 18 s before issuing the
measurement command.
• Always clean the end face of the optical fiber before connecting it.
Example: Rub the end face of the optical fiber using a cotton swab moistened with
ethanol and blow off the ethanol with dry air. You can use other equivalent
methods to clean the ends of the fiber.
• Take special care not to damage the end face of the optical fiber when connecting it. As with
the presence of dust, scratches on the end face of the optical fiber will have adverse effects on
the optical power level measurements. When connecting the optical fiber, connect it securely.


