background image

Yoggie Management Console 

Advanced Security Settings 


60

  | Gatekeeper Pico 


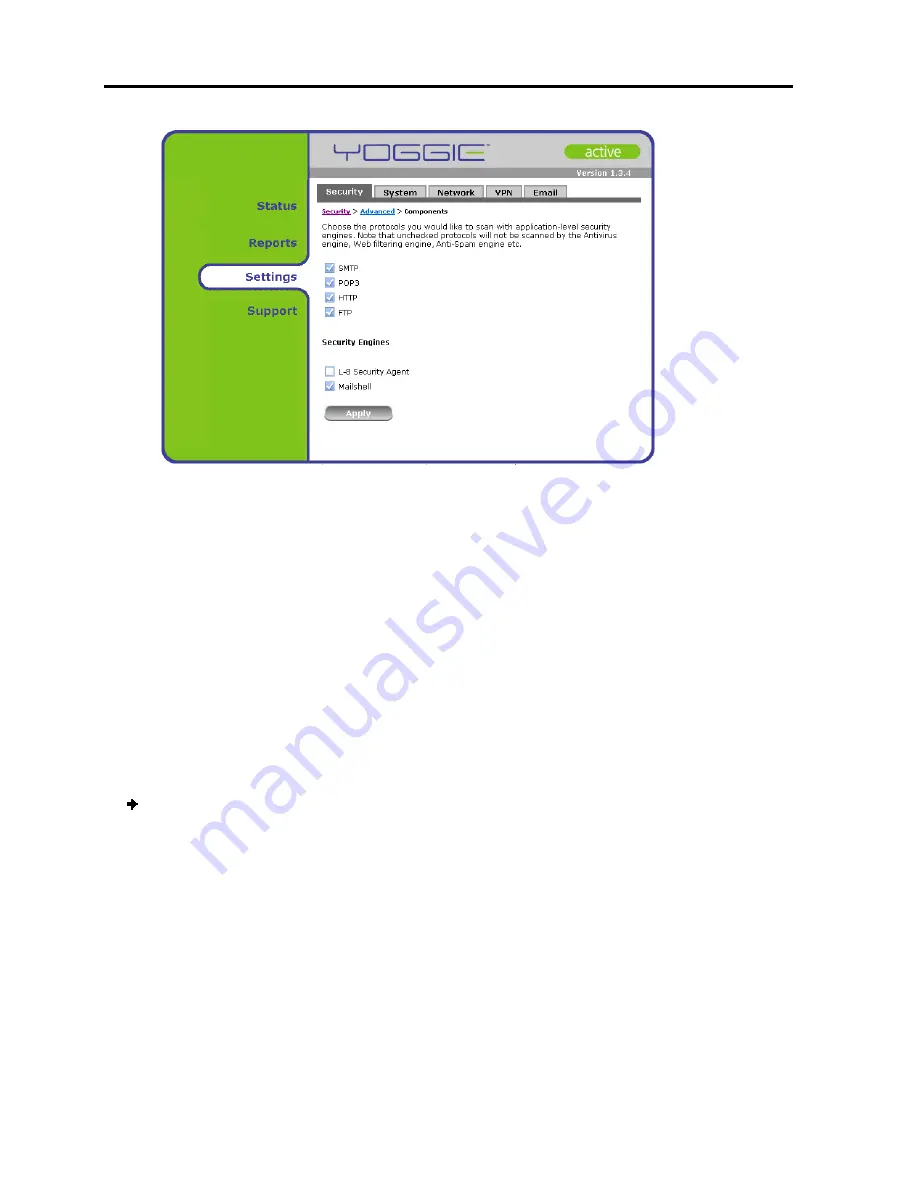
4.  Select the checkboxes of the protocols you want Gatekeeper Pico to scan. 
5.  Select the checkbox of the Security Engine you want Gatekeeper Pico to use: 


Select Mailshell if you want to activate spam mail checks.  


Select Yoggie`s patent-pending L-8 Security Agent if you wish to activate 

Layer-8 protection.  

6. Click 

Apply

.  

Gatekeeper Pico scans the protocols according to the specified settings. 

Configuring IDS/IPS 

Gatekeeper Pico features IDS/IPS protection. In this advanced configuration option 
you can specify the security policies for each activity. 

  To configure IDS/IPS protection: 

1. Click 

Settings

 in the 

Navigation

 pane of the Management Console. 

The 

Security

 tab appears in the 

Display

 pane. 

2. Click 

Advanced

.  

3. Click 

IDS/IPS

The 

IDS/IPS Policy

 screen appears. 

Содержание GATEKEEPER PICO

Страница 1: ...www yoggie com...

Страница 2: ...plicitly permitted by Yoggie Security Systems Ltd in the Terms of Use Agreement The technology and products described in this material are protected by registered and or pending patents of Yoggie Secu...

Страница 3: ...DRIVER INSTALLATION AND REGISTRATION 12 YOGGIE MANAGEMENT CONSOLE 17 ACCESSING THE MANAGEMENT CONSOLE VIA THE GATEKEEPER PICO ICON 17 MANUALLY ACCESSING THE MANAGEMENT CONSOLE 19 CHANGING THE INTERFAC...

Страница 4: ...41 Configuring Spam Protection Settings 43 Creating Custom E mail Rules 43 Changing the Order in which E mail Rules are Applied 45 Modifying Activating Deactivating and Deleting E mail Rules 45 ADVANC...

Страница 5: ...er Guide Gatekeeper Pico Features User Guide 5 About this User Guide The following User Guide provides installation and usage instructions for the following Gatekeeper versions Gatekeeper Pico Gatekee...

Страница 6: ...y solution for known and unknown threats These solutions include Adaptive Security Policy Multi Layer Security Agent Layer 8 Security Engine URL Categorization and Filtering Anti Spam Anti Phishing An...

Страница 7: ...In this mode which is only available in Gatekeeper Pico Pro the Gatekeeper unit is connected to a Yoggie Management Server The Yoggie Management Server extends the IT manager s ability to manage and...

Страница 8: ...to the laptop If the Gatekeeper is physically disconnected from the laptop during use all network connections are automatically and immediately terminated Gatekeeper Pico icon located in the Windows...

Страница 9: ...Introduction Package Contents User Guide 9 Package Contents Gatekeeper Pico or Gatekeeper Pico Pro Gatekeeper Pico CD Quick Start Guide...

Страница 10: ...Introduction System Requirements 10 Gatekeeper Pico System Requirements USB Port and PC Running Windows XP or Vista 32 bit...

Страница 11: ...Power lights when Gatekeeper Pico is powered up Security Events blinks when a security event occurs Update blinks when updates are being downloaded Do not remove Gatekeeper Pico during updates Whenev...

Страница 12: ...Gatekeeper unit as a new hardware device and ask to install a driver Click Cancel to exit the driver installation wizard Driver Installation and Registration It is recommended to disable any software...

Страница 13: ...User Guide 13 The Interface Language screen appears 4 Select your preferred language from the drop down list and click Next The End User License Agreement EULA screen appears 5 Read the EULA and click...

Страница 14: ...f the following If your laptop will be connected to the Yoggie Management Server YMS select the Corporate Mode setup option If your laptop will not be working with the Yoggie Management Server select...

Страница 15: ...ated on the CD sticker Standalone Mode only Settings for your corporate Yoggie Management Server IP address and password Corporate Mode only 9 Click Next The Privacy screen appears 10 Set your desired...

Страница 16: ...dows notification area and Gatekeeper Pico is now protecting your laptop Take Gatekeeper Pico for a test drive Download EICAR s virus demo file from http www eicar org anti_virus_test_file htm Gatekee...

Страница 17: ...f the Gatekeeper Pico driver software is installed see Getting Started Web browser if for some reason the Gatekeeper Pico icon is not available you can manually access the Management Console through a...

Страница 18: ...ccessing the Management Console via the Gatekeeper Pico Icon Password enter your Gatekeeper Pico password the default password is yoggie 4 Click OK The Management Console opens 18 Gatekeeper Pico Navi...

Страница 19: ...manually accessed by entering the Gatekeeper Pico Management Console URL into the address field of your Web To manually access the Management Console 1 Open a Web browser and enter the following Gatek...

Страница 20: ...elect the language you wish to use from the list 5 Click Apply The selected interface language will be used and the main Yoggie Details page appears Changing Your Password You can change your Gatekeep...

Страница 21: ...dress field as required 6 Click Apply Your user details are changed and the Yoggie Details page appears Changing Modes Gatekeeper Pico can be used as a standalone Pico standalone mode or as part of a...

Страница 22: ...l with Yoggie 5 Select your privacy setting from the drop down list You may choose one of the following options Share security logs with Yoggie share all the security events collected by the Gatekeepe...

Страница 23: ...vity You can view the following Current security status Security activity charts including 3D charts Security and system logs You can also view and print security activity reports Viewing Security Sta...

Страница 24: ...ttacks that took place over the last 15 minutes IDS IPS Events displays the number of attempted security breaches detected and defeated by the Intrusion Detection System Intrusion Protection System ID...

Страница 25: ...and drag it to change its orientation You can also navigate through the charts view them in 2D replay animations and print them To view reports 1 Click Reports in the Navigation pane of the Management...

Страница 26: ...spyware active content and other similar execution attempts Spam displays the e mail spam distribution score the number of e mail messages that are likely to be spam 2 In the Charts tab click a chart...

Страница 27: ...Management Console The main chart page of the Charts tab appears in the Display pane 2 Click the Security Log tab The security log is displayed as shown below 3 To display the details of an event clic...

Страница 28: ...nagement Console Monitoring Security Activity 6 Navigate to the location where the compressed security log file will be saved on your PC and click Save The log file is saved to your computer 28 Gateke...

Страница 29: ...security system events To view the system log 1 Click Reports in the Navigation pane of the Management Console The main chart page of the Charts tab appears in the Display pane 2 Click the System Log...

Страница 30: ...displays VPN related events To view the VPN log 1 Click Reports in the Navigation pane of the Management Console The main chart page of the Charts tab appears in the Display pane 2 Click the VPN Log t...

Страница 31: ...ded policy It provides the recommended level of security while maintaining functionality Low Policy least secure policy This policy provides minimal security while providing maximum functionality To s...

Страница 32: ...through a Proxy Server this server must be defined in the Yoggie Management Console Configuring Internal Network Settings You can change your internal network settings as needed To configure Internal...

Страница 33: ...eld enter the new device subnet mask 6 Click Apply Configuring Proxy Settings If you connect to the Internet using a proxy server you must configure basic settings To configure Proxy Settings 1 Click...

Страница 34: ...roxy Settings page appears 4 Select Manual proxy configuration 5 In the HTTP Proxy field enter the web address of the proxy server 6 In the Port field enter the port number on which the proxy server i...

Страница 35: ...ss than the standard MTU which is 1500 Gatekeeper Pico must be configured to the same MTU as Windows Web Filtering RPC Mode Some firewalls restrict access to UDP port 9020 which is used by Gatekeeper...

Страница 36: ...ico 3 Click Advanced The Additional Settings page appears 4 To change the MTU check the Custom MTU checkbox and enter the new MTU default is 1500 bytes Start at 1400 MTU and then try lower numbers if...

Страница 37: ...N tab 3 Do one of the following To disable the VPN connection select VPN Connection Disabled To enable the VPN connection click VPN Connection Enabled A confirmation message is displayed 4 Click OK Th...

Страница 38: ...screen appears 3 In the VPN Type drop down list select one of the following VPN Types NetASQ Juniper Zywall P1 IPCop Generic 4 In the Connection Type field select one of the following connection type...

Страница 39: ...lect Certificate and click Browse to select and upload the certificate file 13 The default VPN settings use the DES algorithm for encryption and SHA1 message digest for authentication However you can...

Страница 40: ...network subnet mask 7 In the User Name and User Password fields enter your VPN user name and password 8 In the Certificate field click the Browse button to select and upload the certificate file 9 Cli...

Страница 41: ...o work properly in Port Address Translation PAT environments 9 Click Apply Spam E mail Protection Settings Spam is unsolicited e mail often of a commercial nature sent indiscriminately to multiple mai...

Страница 42: ...header files which can be found in the message source and include the following information X Yoggie SpamLevel Indicates Spam Probably Spam Phishing or empty if not spam X Yoggie SpamScore the exact...

Страница 43: ...ppears in the Display pane 2 Click the Email tab The Email Settings screen appears 3 If you want Gatekeeper Pico to tag subject lines of suspicious spam e mails select the Tag Subject lines of suspici...

Страница 44: ...orm if the condition is met Allow Does nothing to the e mail generally used to create exceptions to other rules Tag with Tags the message with the text you enter in the text box 5 Click OK The rule is...

Страница 45: ...te them when they are no longer needed You can also temporarily deactivate a rule To modify a Custom E mail Rule 1 Double click the rule you want to modify The Custom Web Rules dialog box appears 2 Ed...

Страница 46: ...us button The rule is deleted from the rule list 3 Click Apply The deletion is saved Deleting a rule removes it from the rule list but the deletion is saved only when you click Apply Therefore if you...

Страница 47: ...are Anti spam anti phishing web filtering etc on different incoming communication protocols This advanced configuration option enables you to enable or disable application level scanning of certain pr...

Страница 48: ...heckbox to enable web filtering 5 Select the checkbox of the categories you wish to filter To select all categories click Block All To clear all categories click Allow All 6 Click Apply To add a Custo...

Страница 49: ...wing action section select whether to allow or block the site rop down list 6 7 Click Apply to save your settings Click OK The rule is added to the rule list Defining a rule adds it to the rule list b...

Страница 50: ...ct the rule you want to delete 2 Click the min The rule is deleted from he deletion is saved Deleting a rule removes it from the rule list but the deletion is saved only when you click Apply Therefore...

Страница 51: ...e ports to be used The following precedence convention is applied When there are two or more rules a rule positioned higher in the list takes precedence over lower ones Rules override i e take precede...

Страница 52: ...rts checked in the Whitelist except as specified in the Rules in the bottom portion of the screen The Whitelist overrides the Blacklist thus when the Whitelist is checked it does not matter whether th...

Страница 53: ...Yoggie Management Console Advanced Security Settings User Guide 53 The firewall screen appears 4 Click the blacklist link The Blacklist screen opens...

Страница 54: ...set Blacklist settings are ignored if a Whitelist is used See the procedure above to enable disable Blacklist based blocking To modify the Whitelist 1 Click Settings in the Navigation pane of the Man...

Страница 55: ...blocked 6 Click Apply The security policy is set See the procedure above to enable disable Whitelist based blocking To create and sequence Firewall Rules 1 Click Settings in the Navigation pane of the...

Страница 56: ...ialog appears 5 Specify the following Rule components Direction Inbound or outbound traffic Remote IP address For Inbound traffic select Any or select the option below Any and enter the IP address of...

Страница 57: ...ded to the list 7 Repeat the above steps for all Rules you wish to define For example you can create several blocking Rules and then add one at the end that blocks all other traffic 8 To re sequence t...

Страница 58: ...when you click Apply Therefore if you attempt to move to another screen in the Gatekeeper Pico Management Console before clicking Apply you will receive a warning that you must first save your work Si...

Страница 59: ...rom the web according to the specified settings Configuring Protocol Scanning Gatekeeper Pico uses application layer scanners and engines Anti virus Anti spyware Anti spam Anti phishing Web Filtering...

Страница 60: ...8 Security Agent if you wish to activate Layer 8 protection 6 Click Apply Gatekeeper Pico scans the protocols according to the specified settings Configuring IDS IPS Gatekeeper Pico features IDS IPS p...

Страница 61: ...hreat select one of the following settings from the drop down list Allow Gatekeeper Pico allows this activity and does not log it Log Gatekeeper Pico allows this activity and logs it Block Gatekeeper...

Страница 62: ...save a support file that contains all Gatekeeper Pico logs configuration data and other relevant information This file can then be sent to a Gatekeeper Pico support expert for analysis To generate a s...

Страница 63: ...ch you want to save the support file and click Save Reset Options You may need to reset logs and counters for troubleshooting To reset device counters 1 Click Support in the Navigation pane of the Man...

Страница 64: ...iagnostic test during a support session General Diagnostics runs diagnostic tests on Gatekeeper Pico s security applications Network Diagnostics runs a ping and a trace test Virus Test As part of this...

Страница 65: ...iagnostics User Guide 65 3 In the General Diagnostics section click the Run button The general diagnostics dialog opens with results of the various tests 4 After reviewing the results of the tests cli...

Страница 66: ...Support in the Navigation pane of the Management Console The main Support page appears 2 Click the Diagnostics tab 3 In the Network Diagnostics section enter the IP Address or computer name in the fi...

Страница 67: ...Support Diagnostics User Guide 67 5 To perform a trace enter the IP Address or computer name in the field next to the Trace button 6 Click Trace A window opens and the trace is performed...

Страница 68: ...s test file 1 Click Support in the Navigation pane of the Management Console The main Support page appears 2 Click the Diagnostics tab 3 In the Virus Test section click the Virus Test button The file...

Страница 69: ...tection is disabled Disabling Gatekeeper Pico Enforcement To disable Gatekeeper Pico protection 1 Right click the Gatekeeper Pico icon in the notification area 2 Select Disable Protection from the dis...

Страница 70: ...The Change Password dialog box opens 3 Enter the current disable password in the Current Password field 4 Enter the new disable password in the New Password field 5 Enter the new disable password onc...

Страница 71: ...d at any time To uninstall Gatekeeper Pico 1 From the Start menu select Programs Yoggie Uninstall Yoggie The Uninstall wizard opens 2 Enter the uninstall password in the Password field The default uni...

Отзывы: