


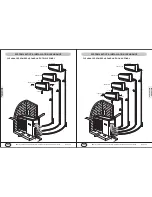

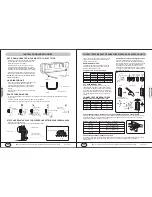


BRIEF UNIT INFO
P11 OF 46
YMGI, Engineered Comfort Products for A Sustainable and Efficient Green World !
H
W
D
3.75"
7.85"
7.85"
Mark for right outlet pipe hole
Mark for left outlet pipe hole
Refrigerant pipe
Condensate drain hose
Model
09K
12K
W
H
D
30.3
9.8
7.5
32.7
11.2
7.9
18K
40.2
12.2
9.0
UNIT DIMENSIONS, MOUNTING BRACKET CLEARENCE
24K
39.7
12.4
8.6
UNIT DIMENSIONS
MOUNTING BRACKET CLEARENCE
Left wall
Right wall
Ceiling
Note: Actual unit/part may appear differently from what are illustrated above.
BRIEF UNIT INFO
P12 OF 46
YMGI, Engineered Comfort Products for A Sustainable and Efficient Green World !
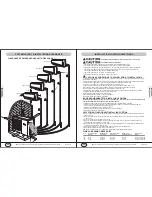
WIRING DIAGRAMS
These circuit diagrams are subject to change without notice, please refer to the one supplied with the unit.
PIPE-IN
TEM.SENSOR
PIPE-MID
TEM.SENSOR
PIPE-OUT
TEM.SENSOR
ROOM
TEM.SENSOR
FAN
MOTOR
M1
~
RT4
RT3
RT2
RT1
4
3
2
TUBE-1
TUBE
TUBE-0
ROOM
PG
PGF
CAP
JUMP
AP2
DISP1
DISP2
SWING-UD
TR-OUT1
TR-IN
M2
~
N1
COMU
AC-L
BU
BK
BN
XT
N(1)
2
3
YEGN
E
INDOOR UNIT
OUTDOOR UNIT
PTC
TC
TRANSFORMER
SWING
MOTOR2
AP1
DISPLAY
PIPE-IN
TEM.SENSOR
PIPE-MID
TEM.SENSOR
PIPE-OUT
TEM.SENSOR
ROOM
TEM.SENSOR
FAN
MOTOR
M1
~
RT4
RT3
RT2
RT1
4
3
2
TUBE-1
TUBE
TUBE-0
ROOM
PG
PGF
CAP
JUMP
AP2
DISP1
DISP2
SWING-UD
TR-OUT1
TR-IN
M2
~
N1
COMU
AC-L
1BU
2BK
3BN
XT
N(1)
2
3
4YEGN
E
INDOOR UNIT
OUTDOOR UNIT
PTC
TC
TRANSFORMER
SWING
MOTOR2
AP1
DISPLAY
KEY
MICRO SWITCH
X303
E
GROUNDING PANEL
EVAPORATOR
WMMS-09EW-V2B(59)(2) and WMMS-12EW-V2B(59)(2)
WMMS-18EW-V2B(59)(2) and WMMS-24EW-V2B(59)(2)
Connect Terminals N(1) and 3 to
Get 208-230/1/60 for Condensate
Pump (Field Installation)-Per
Pump Installation Instructions
Fuse on PCB
Fuse on PCB
Connect Terminals N(1) and 3 to
Get 208-230/1/60 for Condensate
Pump (Field Installation)-Per
Pump Installation Instructions


