


MUST READ-1
P3 OF 46
YMGI, Engineered Comfort Products for A Sustainable and Efficient Green World !
1. Be sure to hire only one certified, licensed HVAC Company to complete 100% of the installation so that all
details of the installation are clear, complete and well taken care of.
2. Be sure to have ONLY the licensed HVAC professional perform all parts of the installation. Factory Warranty
will be lost if any portion of the installation is not performed by licensed HVAC contractor. DIY or partial DIY will
void ALL factory warranties. One example of partial DIY would be calling the HVAC technician to release
refrigerant or the sort while other installation has or is to be conducted by non-HVAC technician.
3. With hiring a technician that is offering their services as a "side job" and not through their licensed HVAC
company may pose a possible risk of an incomplete or unsatisfactory installation of no guaranteed
workmanship and lack of further service, if needed.
4. Have the installing technician read in full the installation manual of the product model you have. Some details
may vary and some may be the key to determine the success and quality of the installation. Experience with
certain manufacturer may not be applied fully to another manufacturer. For example, wiring, refrigerant
adjustment and trial testing procedures may differ from manufacturer to manufacturer and model to model.
Any ignoring or negligence may cause unit failure or damage which could be irrevocable and permanent.
5. All of YMGI's products are fully tested and have passed rigorous safety and performance standards and others
related to the industry, before being packed and shipped. YMGI only uses famous brands as suppliers for their
parts that are also known for their high quality and performance. The quality of the installation plays a key role
as much as up to 90% importance in your unit's overall performance and lifetime. A poor installation can result
in unit failure and inefficiency either immediately or over a period of time.
6. Some licensed contractor/technician may make a mistake some time. YMGI doesn't supervise nor is able to
control their installation.
It is key that the installer take each variable into account during the initial
installation in order to ensure a complete and professional installation and properly working units.
ATTENTIONS
The following will cause damage to the unit and key components
factory
warranty:
and the loss of your unit's
1. Any foreign substances introduced into the system as a result of failure of not sealing the ends of the
refrigeration piping before pulling through structures at time of installation.
2. Not installing an oil P-trap in the suction copper line where indoor unit is located 18' or more below outdoor unit.
3. Cross piping and/or cross wiring on any units including more than one single zone or a multi zone system.
4. Not conducting a positive leak check by charging the system with dry-nitrogen and soap bubble testing.
5. Not conducting a negative leak check by evacuating the copper lines for 30 minutes. Vacuum must be held at
500 micron or better for at least 5 minutes, starting from 5 minutes after the vacuum pump is shut off.
6. Not conducting a positive leak check prior to the negative leak check.
7. Not selecting the correct size of wire or circuit breaker.
8. Not answering ALL questions in the technician's checklist inside the warranty registration form.
1. Any kinks or improper bending of the copper piping.
2. Any improper flaring or not centering of the flare with the nut, or not tightening any connection.
3. Not trial testing each indoor unit individually.
4. Not reading technical data (temp/time/pressure/current) after the system is stabilized (normally compressor
needs to work at least 10 minutes). Data read too early may lead to inaccurate or false judgment or even a
false sense of security.
In an effort to protect our customers from any possible faulty installation which can lead to premature unit failure,
we like to provide the above information to you in addition to the technician. You can judge yourself and
observe while your system is being installed, though your observation may not be treated as any guarantee
whether your system would be installed properly and professionally. If at any time you feel there may be an
installation issue, please have your technician contact YMGI at (866)833-3138 x 703 to clear your questions.
The following may be overlooked, ignored, or treated as not a problem during your installer's installation,
but actually will cause your unit to underperform or even cause unit failure.
WELCOME AND PLEASE READ THROUGH MANUALS
MUST READ-1
P4 OF 46
YMGI, Engineered Comfort Products for A Sustainable and Efficient Green World !
1) Check with the customers to find out detailed information of structure to be conditioned, local weather (typical design and
extreme temperature/humidity conditions, cooling and heating hours), previous and existing HVAC equipment, usage and
dependence on the new HVAC equipment or the YMGI products.
2) Performing a cooling/heating load calculation by using commercially available professional programs/methods such as
Right-J (Manual J) for residential HVAC applications/jobs and Right-CommLoad (ASHRAE RTS/CLTD) for light commercial
and commercial HVAC applications/jobs.
3) Check with YMGI distributor/sales or contact manufacturer directly to obtain information to fully understand YMGI products,
including but not limited to product features, cooling/heating performance-at standard ratings/conditions and extreme
conditions, allowed indoor and outdoor temperature/humidity ranges, installation, operation, maintenance, service,
warranty, parts and so on.
4) Properly select correct (most suitable) YMGI product models (of units and accessories) for your HVAC applications/jobs
and list them in your proposal/quote, in writing, on your company's quote form or letter head, basing upon the information
you get from 1), 2) and 3) above.
5) List your currently valid HVAC license # and EPA # in your proposal/quote.
6) Make sure you are the only party to perform the whole installation job and you will not sub-contract any part of the
installation to any non-licensed parties/persons. You will be solely responsibile for the full installation that you have been
contracted for.
7) Check to make sure you have all the materials you need to properly and correctly finish the installation. The YMGI units
and accessories may be just a portion of what you need. YMGI employees and YMGI distributors/sales, dealers and agents
are not installers and may only be able to provide suggestions to you, but you are the only sole decision maker to
determine what other materials you must need and/or the customer may want to fulfill the installation job.
8) Check against both NEC and your local codes to make sure all the installation of YMGI units and accessories meet these
requirements.
9) Connect the unit to correct electrical power source. In the area where lightning or storm incurs frequently, a proper type/
size of power surge protector needs to be installed between the outdoor unit and power source.
10) Select proper types and sizes of HVAC circuit breakers, disconnect switch boxes, wires and conduits from circuit breaker
to disconnect box and then from disconnect box to outdoor unit.
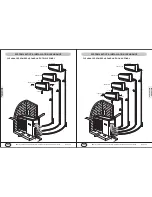
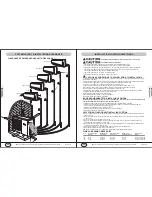
11) Select proper location to mount indoor units and outdoor units with all factory requirements being followed (cooling/
heating/air is not blocked or restricted, mounting structure is secure, aesthetical looking, installation convenience is
considered, maintenance/service clearance is ensured and all applicable codes are met and etc.).
12) Cap/tape the two ends of every copper line before running them through structures to keep from any foreign substances
entering into pipe and causing contamination. Label them A-A, B-B, C-C, D-D, or other marks on each pair of copper
line/wiring cable set to keep from any possible cross-piping or cross-wiring in multiple zone installations or where pipes for
different single zone systems are close to one another.
13) Secure the wiring cables that connect between indoor unit and outdoor unit, following applicable NEC and local codes for
your particular installation. If there is no special NEC or local code to govern how these wires are to be installed, you can
tape/cable tie them along with insulated copper line.
14) Tighten all pipe and wire connections to keep from any possible leakage or false connection.
15) Conduct positive pressure leakage checking of inter-connecting copper lines between each indoor unit and outdoor unit by
charging dry-nitrogen at outdoor unit service port (note: don't back-seat stopping valve, at this time). Liquid soap solution
shall be applied at all pipe connections to check for leakage. A1/4-5/16" hose/valve adaptor may be needed if you have
traditional manifold of 1/4" connection hose.
16) If there is no positive leaking, then conduct negative pressure leakage checking of inter-connecting copper lines between
each indoor unit and outdoor unit by pulling vacuum at outdoor unit service port (note: don't back-seat stopping valve, at
this time) and checking if the vacuum level 500 Micron can be held for at least 20 minutes.
17) If there is no leakage found at refrigeration pipe connections, flip up the indoor unit face panel and remove filter, carefully
pour some clear water onto the up-right aluminum coil surface to test if the water can drain out of each indoor unit freely
without any leakage being found.
18) If there is water leakage found, locate the source of the leak and correct. Only after everything is clear engage the correct
electrical power to the system.
19) Then back-seat stopping valves of outdoor unit to release refrigerant from outdoor unit into inter-connecting pipes and
indoor unit.
20) Check to make sure both indoor unit and outdoor unit are powered on correctly before controlling the indoor unit to
operate in fan mode first. Then move on to test cooling, dehumidifying/drying, heating and other modes.
21) Read refrigerant pressures and pipe/valve temperatures only until the system is stabilized (normally 10 minutes after
cooling/heating mode is started successfully). Put this data into the technician checklist in the lower half section of the
Limited Product Warranty Registration Card/Form.
22) Adjust refrigerant charging level (remove refrigerant if pipe is shorter/temperature is colder; add refrigerant if pipe is
longer/temperature is warmer), following manufacturer's instructions, if average pipe length is shorter or longer than 25'
and pressure/temperature readings at outdoor unit service valves are not falling into normal ranges.
23) Explain to the user/owner(s) about proper unit operation and maintenance and leave your contact information for them to
reach you easily.
24) If the customer finds the unit doesn't work properly and cannot resolve the issue themselves, check the customer's
units/parts/accessories and correct the problem if there is any. Communicate with YMGI-technical support line (866)833-
3138 x 703, if needing help.
Following these requirements will aid in ensuring the units to be installed to the general HVAC practicing standards and
necessary factory requirements, finding any possible problems early, preventing any further damage to the unit and helping
ensure a properly working unit over its lifetime.
INSTALLING TECHNICIAN/CONTRACTOR'S JOBS AND RESPONSIBILITIES


