


INST
ALLER'S
INSTRUCTION
P23 OF 46
YMGI, Engineered Comfort Products for A Sustainable and Efficient Green World !
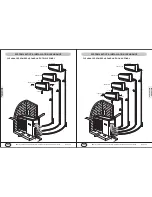
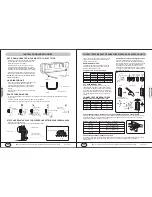
Pipe insulation
Interconnection cable
Sealing tape
Cable tie
Sealing tape
Interconnection cable
Drain hose
Pipe
Refrigerant pipe
Hanger or
Clamp
Pipe
Interconnection cable
Cable tie
Wall
Outside
Pipe/wire wall
sleeve/ring
Putty (stuffing gaps)
Overlap wrapping
tape..
Pipe of indoor unit
Connecting pipe
Seal Copper Line Set/Wire Cable/Drain Hose Line Combination
* Run cables along with the refrigerating copper line sets and secure them with tapes at 6 feet apart.
* Wrap tape closely (cover a third of the width of the wrapping tape applied early) to ensure good sealing.
* Tape and seal the end of wrapping tape.
* Shape the pipe combination gently, without causing kinking, sharp bending, or other damage to it.
* Fix the pipe combination securely on the external wall with proper clamps, at 6 feet apart.
* Fill the gap between the wall hole and wall sleeve with putty to keep from rain or dust entering inside.
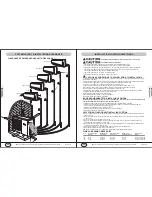
CONNECT REFRIGERANT PIPES BETWEEN INDOOR AND OUTDOOR UNITS
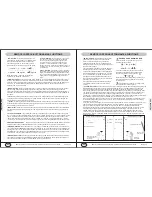
PIPING GUIDE
Set the packed pipes
vertically and then unwinding
slowly.
Don't unwind only one end
of the coiled pipes.
Use pulley to keep the safe
bending radius..
May also use rolling wheel to
reduce internal pipe tension
and avoid possible
deformation.
Use elbow tool to keep
bending radius.
Keep minimum bending
radius..
Don't make sharp or small
radius bending.
Don't bend too long pipe
without tools.
Don't make less than 90
degree bend.
Don't bend shot pipes.
Inside
Unit front panel
UNIT OPERA
TION
P24 OF 46
YMGI, Engineered Comfort Products for A Sustainable and Efficient Green World !
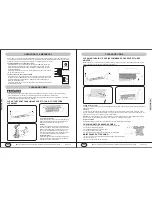
REMOTE CONTROL-BUTTON NAME & FUNCTIONS
LCD
Display
ON/OFF
FAN
CLOCK
BLOW
TURBO
MODE
INCREASE
(Temp.,Time)
TIMER ON
TIMER OFF
LIGHT
SLEEP
TEMP
U-TOUCH
NOT USED
NOTE2:
Be sure there are no obstructions between the indoor unit and the remote control. Do not drop or allow
any liquids near the remote. Do not place the remote in direct sunlight or any place that can become very hot.
"ON/OFF" BUTTON:
Press this button to turn the
unit on. Press once more to turn the unit off. When
turning the unit ON/OFF, the TIMER, and SLEEP
functions will be canceled. The preset time will remain.
"MODE" BUTTON:
By pressing this button you can
choose what mode you would like the unit to run in.
When the remote is first turned on the mode
displayed will be the AUTO mode. The temperature
cannot be adjusted in this mode and will not display
on the indoor unit. This is a factory preset
O
temperature of 78 F. While the unit is in AUTO mode
if the room temperature drops below the factory set
O
temp of 78 F then the unit will run in HEAT mode until
that temperature is satisfied. If the room temperature
O
rises above the set temp of 78 F then the unit will run
in COOL mode until the room temperature is satisfied.
The unit itself will determine what mode to run in order
O
to maintain the temperature of 78 F.Under HEAT
O
mode the initial set temp will be 82 F (28OC). Under
O
other mode the initial set temp will be 77 F.
"SLEEP" BUTTON:
This function will increase or
decrease the set temp depending on what mode the
unit is running in. When SLEEP mode is turned on in
cooling mode the temp will automatically increase
0.5 to 1.0 degree once every half to one hour for
several times over a period of 2 hours and remain at
that temperature until SLEEP mode is turned off.
When SLEEP mode is turned on in heating mode the
set temp will automatically decrease 0.5 to 1.0
degree once every half to one hour for several times
over a period of 2 hours and remain at that
temperature until SLEEP mode is turned off. This way
when the unit is SLEEP mode during cooling the fan
will blow at a lower speed to accommodate for the
decreased cooling load due to less activity and a
lower outdoor temp. The same principle of savings is
applied to heat mode.
To activate the sleep mode press the SLEEP button
once. You will see a picture of a moon and stars in
the lower left hand corner. To turn off the SLEEP
mode simply press the button once more and the
moon and stars will disappear from the remote screen.
SWING
DECREASE
(Temp.,Time)
IR Control Signal Transmitting
NOTE1:
This is a general use remote control. That can be used for numerous air conditioning model numbers.
There may be some buttons on the remote that are not for use with the unit purchased. When these buttons are
pressed you may hear a beep sound emitted from the remote. This will not affect the unit status.
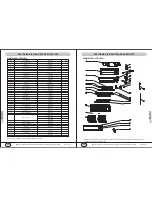
The COOL mode SLEEP profile is as follows:
Temp.
Ts+2
Ts+1
Ts+1/2
Ts
0
1/2
1
2
Hours since sleep set
1(hr)
SLEEP set off
SLEEP set on
The HEAT mode SLEEP profile is as follows:
Temp.
Ts-3
Ts-2
Ts-1
Ts
0
1/2
1
2
Hours since sleep set
1(hr)
SLEEP set off
SLEEP set on
1/2
1
2


