


TROUBLESHOOTING
MIG
WELDING
ISSUES
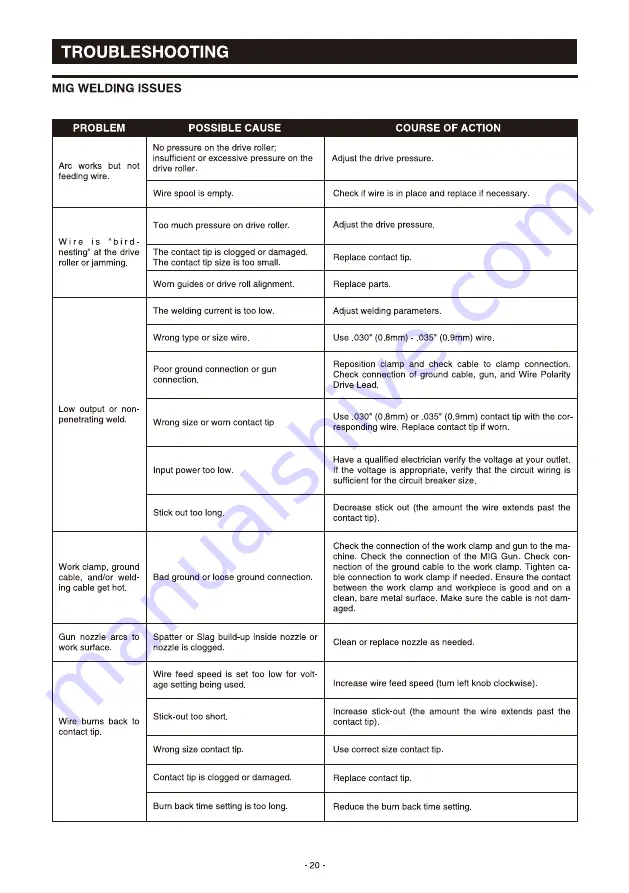
PROBLEM
Arc
works
but
not
feeding wire
Wire
is
"bird
nesting" at the drive
roller or jamming
Low Output or non
penetrating weld.
Work clamp, ground
cable,
and/or weld-
ing cable get hot.
Gun
nozzle
arcs
to
work
surface
Wire
burns
back
to
contact tip.
POSSIBLE
CAUSE
No pressure on the drive roller;
insufficient or excessive pressure on the
drive
roller.
Wire spool is empty
Too much pressure on drive roller.
The contact tip is clogged or damaged
The contact tip size is too small.
Worn guides or drive roll alignment.
The welding current is too low.
Wrong type or size wire
Poor ground connection or gun
connection.
Wrong size or worn contact tip
Input power too low.
Stick out too long
Bad ground or loose ground connection.
Spatter or Slag build-up inside nozzle or
nozzle is clogged
Wire feed speed is set too low for volt-
age setting being used
Stick-out
too
short
Wrong size contact tip
Contact tip is clogged or damaged
Burn back time setting is too long
• 20
COURSE
OF
ACTION
Adjust the drive pressure.
Check if wire is in place and replace if necessary
Adjust the drive pressure
Replace contact tip
Replace parts
Adjust welding parameters
Use 030" (0 8mm) - 035" (0 9mm) wire
Reposition
clamp and check cable to clamp
connection
Check connection
of ground cable, gun, and Wire Polarity
Drive
Lead
Use .030" (0.8mm) or .035" (0.9mm) contact tip with the cor-
responding wire
Replace contact tip if worn.
Have a qualified electrician verify the voltage at your outlet
If the voltage is appropriate, verify that the circuit wiring is
sufficient
for the circuit
breaker
size
Decrease stick Out (the amount the wire extends past the
contact tip)
Check the connection of the work clamp and gun to the ma
chine.
Check
the connection
Of the
MIG
Gun.
Check
con
nection of the ground cable to the work clamp. Tighten ca
ble connection to work clamp if needed. Ensure the contact
between the work clamp and workpiece
is good and on a
clean,
bare metal
surface.
Make
sure the cable
is not dam
aged
Clean or replace nozzle as needed.
Increase wire feed speed (turn left knob clockwise)
Increase stick-out
(the amount the wire extends
past the
contact tip)
Use correct size contact tip
Replace contact tip
Reduce the burn back time setting.