YASKAWA JVOP-KPLCB04AxB, Руководство по установке
Установочный мануал для продукта YASKAWA JVOP-KPLCB04AxB доступен для бесплатного скачивания на manualshive.com. Этот мануал содержит важные инструкции по установке и настройке продукта, обеспечивая безопасное и эффективное его использование. Скачайте его сейчас, чтобы быть уверенными в правильной эксплуатации устройства.
Поделиться
Скачать


Отзывы:
Нет отзывов
Похожие инструкции для JVOP-KPLCB04AxB
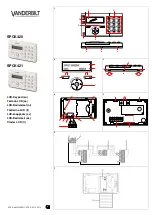
SPCK420
Бренд: Vanderbilt Страницы: 11

CMD1W
Бренд: Xantech Страницы: 5

Ranger 9060E LCD
Бренд: CADDX Страницы: 9

AU02100
Бренд: Bandini Industrie Страницы: 40

WKP-3250
Бренд: Ortek Страницы: 6

NS-PNK8A01
Бренд: Insignia Страницы: 2

LA GARD 5715
Бренд: Kaba Страницы: 2

T3 Prox
Бренд: Alarm Lock Страницы: 1

ccGen2 KP-1
Бренд: URC Страницы: 19

Magnum Alert
Бренд: NAPCO Страницы: 16

INET-CBDEX-E
Бренд: Crestron Страницы: 2

MG32LRF
Бренд: Magellan Страницы: 2

4-Line
Бренд: JVA Страницы: 2

TechTerm TT1R2
Бренд: Two Technologies Страницы: 50

Vantage RK12E-A Series
Бренд: LEGRAND Страницы: 4

RC-206
Бренд: Kramer Страницы: 4

ImproX KHR XKR-901-1-0-GB-01
Бренд: impro Страницы: 16

ELT-KLED
Бренд: Elite Suite Страницы: 32


